Content
Content
Instructions
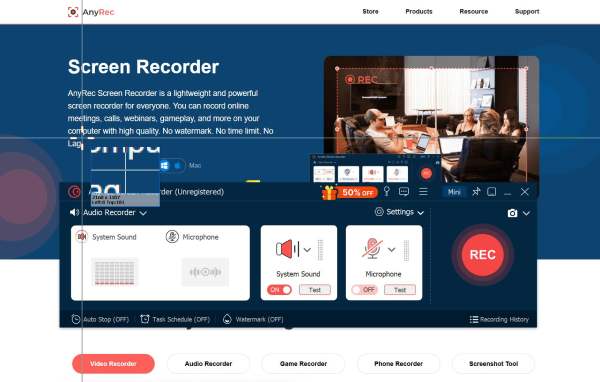
AnyRec Screen Recorder is an easy-to-use and powerful screen recorder for Windows. It provides 7 different recording modes for different scenarios, including Video Recorder, Audio Recorder, Game Recorder, Window Recorder, Webcam Recorder, Phone Recorder, and Last Recorder. In this way, you can capture all onscreen activities, videos, audio files, webcam footage, coming calls, and snapshots. There are also many output parameters and editing tools for you to get the best recordings.
Register
AnyRec Screen Recorder offers a free trial version with limited features, such as 3 minutes recording length, no video clipping, and no microphone enhancement. Just click the Menu button and click the Register button.
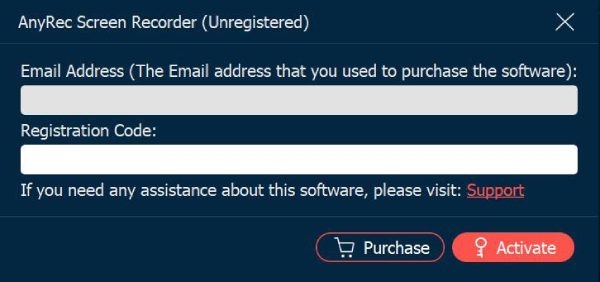
Now, you can enter the necessary information to get the registration tool.
Email Address: Input the Email you used to purchase the software.
Register Code: Check the registration code from the order confirmation letter.
Update
If there is any glitch for AnyRec Screen Recorder, you can always get free updates to fix bugs and improve the product functions. Here are 2 frequently used methods you should know.
Method 1: Update Manually
Click the Menu button with three lines and click the Check Update button. It will detect the current version and search for new updates automatically. If there’s an update, you can download and install it immediately.

Method 2: Update Automatically
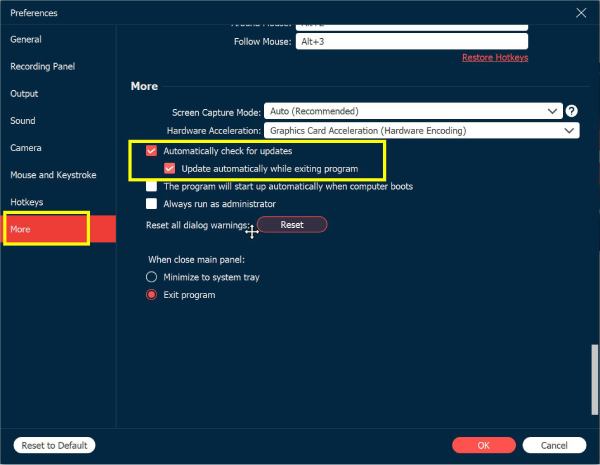
Click the Preferences button from the Menu drop-down list. Under the More tab, you can tick the Automatically check for updates checkbox. In this way, you can receive the automatic update notification if there is an update. You can also choose to download it when exiting the tool.
Preferences
When you need to capture onscreen activities with different output, best quality, etc., you can choose the different options from the Preference left sidebar to tweak the desired settings according to your need.
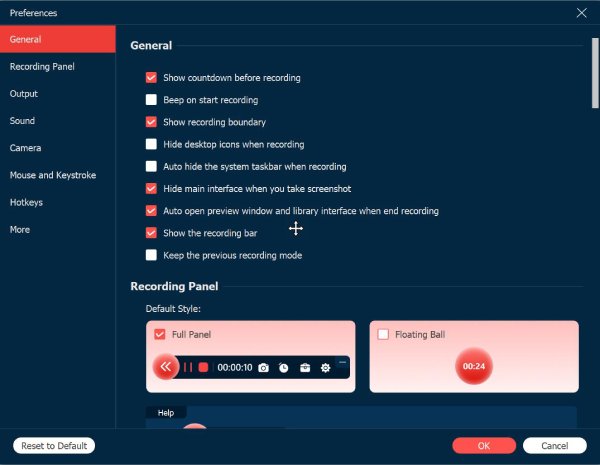
General
In the General option, you can adjust many settings to get a better recording experience. You can choose to show countdown before recording, beep on start recording, show recording boundary, hide float bar when recording, hide desktop icon when recording, auto-hide desktop icons when recording, etc.
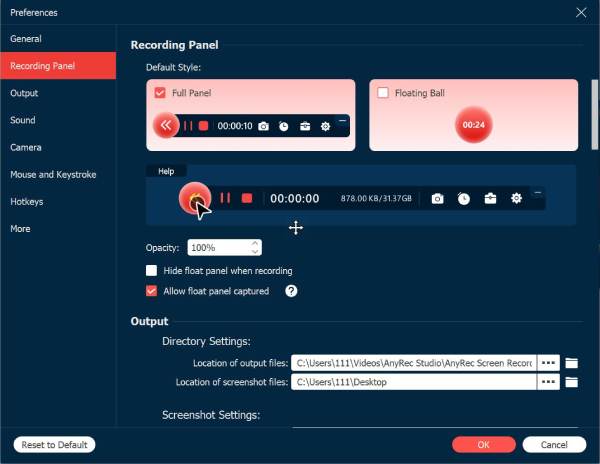
Recording Panel
During the recording, there will be a floating recording panel for you to get more functions, like adding annotation, setting time, etc. You can choose to set the full panel or only the floating time ball as default. You can also adjust the opacity as you like via the Recording Panel setting.
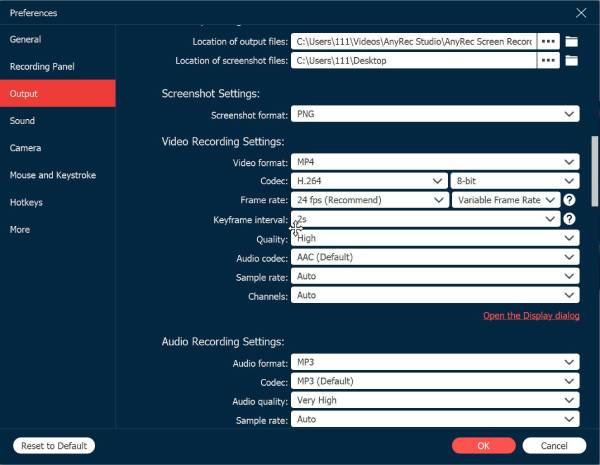
Output
Click the Output tab, you can customize the storage path and output format for videos, audio files, and snapshots. Moreover, you can change the output quality to export the best recordings. In this way, you can easily share or upload the recordings without format issues.
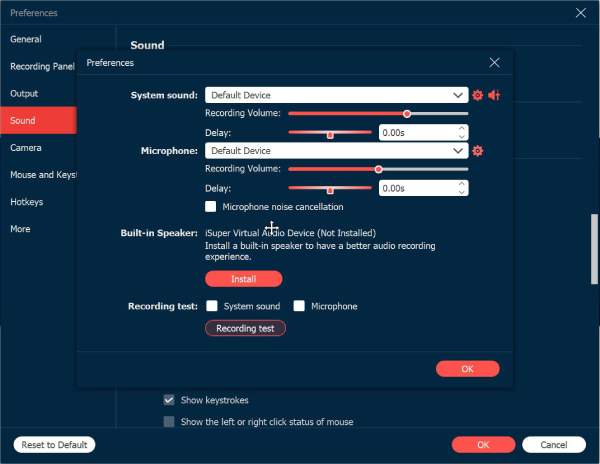
Sound
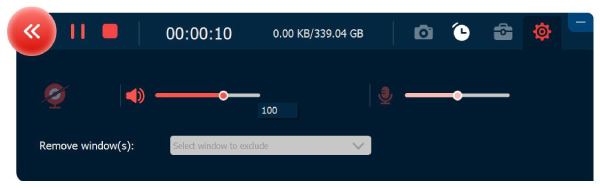
Click the Sound button to adjust the volume and delay for both system sound and microphone separately. You can enhance the audio quality by ticking the Microphone noise cancellation checkbox. There is also a recommended built-in speaker for you to get better audio recording. Now, you can test the sound firs before recording.
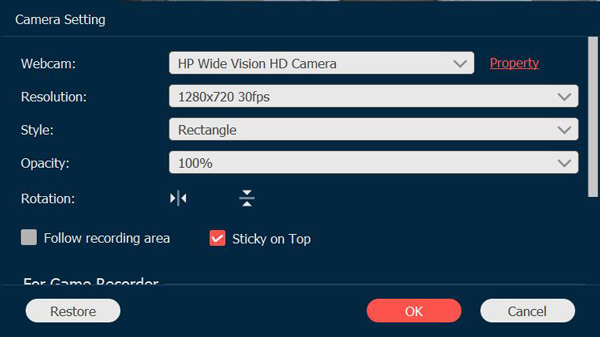
Camera
After clicking the Camera tab, AnyRec Screen Recorder will detect your camera first. Then, you can choose the resolution, style, opacity, and rotation. You can even set the camera screen to stick on top or follow the recording area.
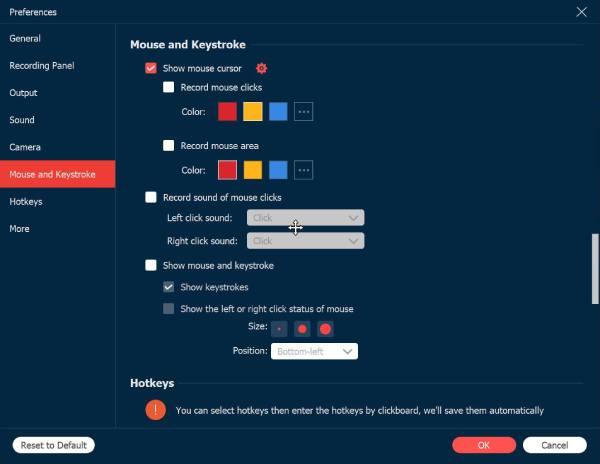
Mouse and Keystroke
Click the Mouse button, you can show the mouse cursor, and change the color or mouse clicks and area flexibly. Moreover, you can personalize keystrokes with different size, which is better for recording tutorials.
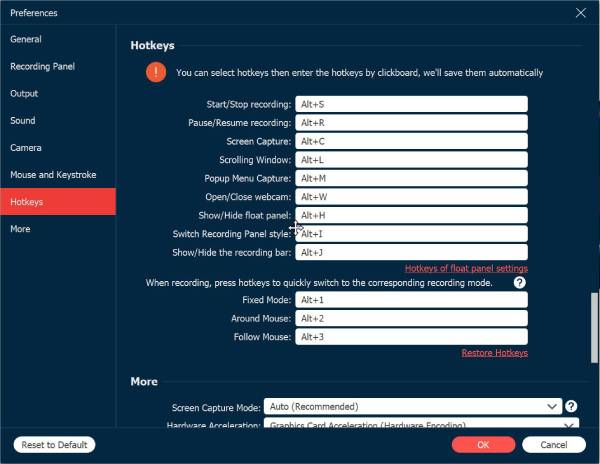
Hotkeys
Go to the Hotkeys option, where you can change the hotkeys to start/stop/pause/resume record, screen capture, show/hide float panel, scrolling window, change recording mode, etc. You can also change the hotkeys freely by entering the new hotkeys via keyboard. After that, the program will save them automatically. Well, you can set custom hotkeys instead of the Print Screen key to get better experience.
More
Finally, there are more settings for you to change the capture mode, enable the hardware acceleration, automatic updates, startup automatically when the computer boots, minimize the system tray, exit the program, etc.

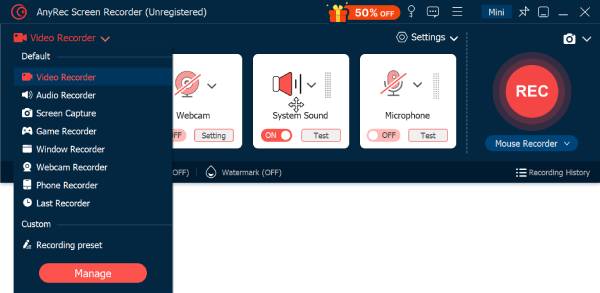
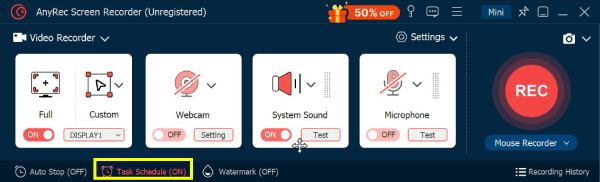
Main Features
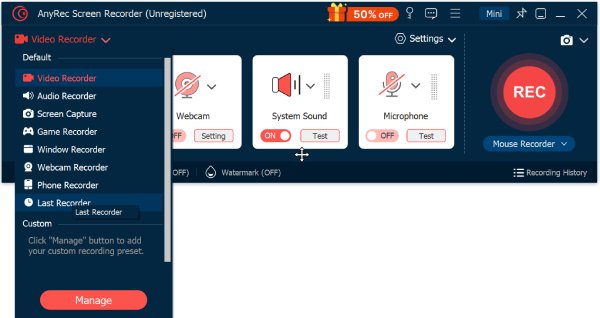
The recording mode is set to be video recorder as default. Thus, you can click the Video Recorder button at the top-left corner to select the desired function to record video, audio, game, webcam, phone, specific window, or take screenshots.
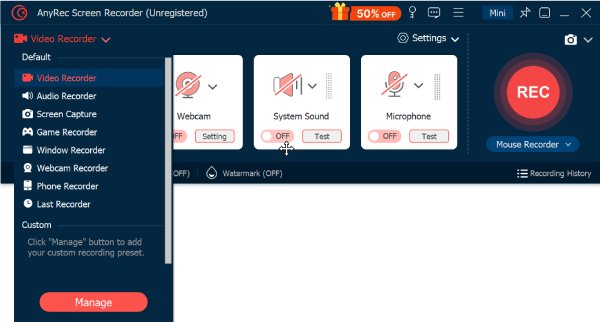
Video Recorder
Video Recorder enables you to record all on-screen activities. Just learn more details about how to record screen videos with optional audio and webcam.
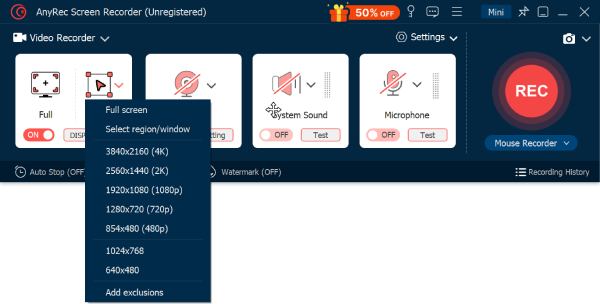
Step 1: As the default recorder, you can directly choose the Full screen or customize the area from 480P to 4K. You can also record video with audio and webcam.
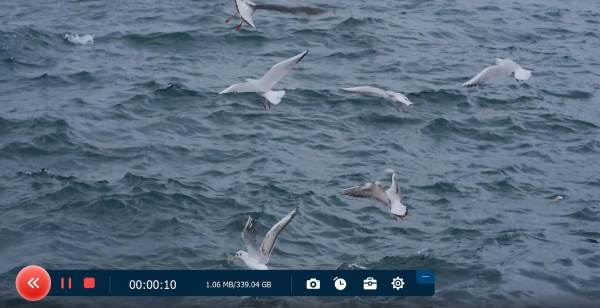
Step 2: After selecting the desired area, you can click the REC button to start capturing. During the recording process, you can take snapshots, set record length, edit the recording, or adjust the audio volume.
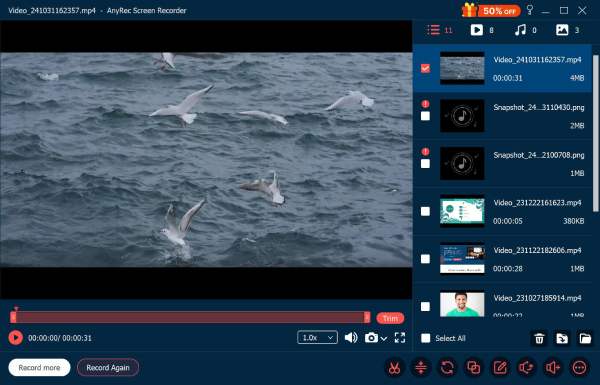
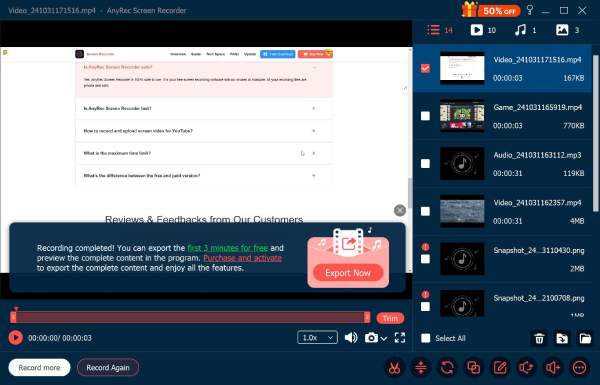
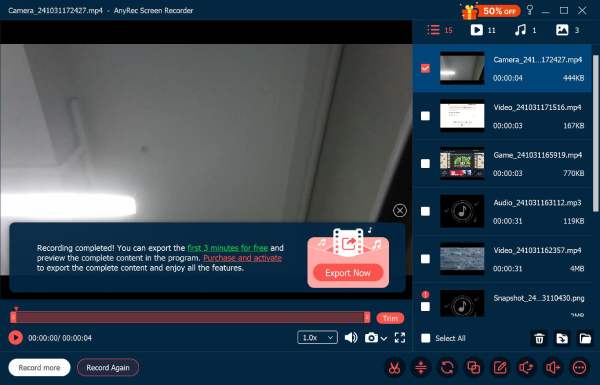
Step 3: Click the Stop button to finish the process and go to the preview window. Here, you can also edit the video by trimming, speeding up, rotating, compressing, and more.
Audio Recorder
If you need to record audio files, such as Zoom meetings, narrations, Skype calls, conversations, and more, the audio recorder is a great option to capture the audio files from different channels.
Step 1: In the Audio Recorder function, you can toggle on the System Sound and Microphone option separately. You can also select the desired input device and volume as you like.
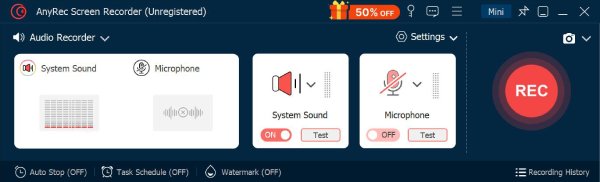
Step 2: After all the settings, click the REC button to capture your microphone and system sound. You can even adjust the volume during recording. Finally, click the Stop button and save it.
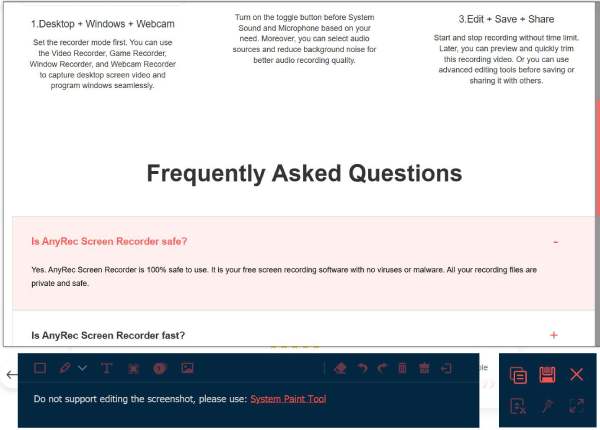
Screen Capture
Whether you need to take snapshots on your computer directly, or capture screens from a video, you can use the screen capture function. There are more editing features to polish the photos.
Step 1: Once you click the Screen Capture button, you can use your mouse to drag and choose a desired area. It will automatically detect some special window when moving.
Step 2: When you release the mouse, you can add annotations, callouts, and more marks on the screenshots. Then, click the Save button to choose the desired path.
Step 3: To capture the entire page, you can further click the Scrolling Window button at the right bar. Follow the guide to scroll down your mouse and complete the long screenshots at any time. But there’s no editing tools for you.
Game Recorder
It is also a light-weighted gameplay recorder, which captures the gameplay videos from online sites (Steam, Minecraft, CSGO, Dota 2, etc.), as well as game consoles (Play Station 3, Play Station 4, Play Station 5, Xbox, Switch, Wii, and more) within clicks.
Step 1: Click the Game Recorder button and permit your administrator to run the software. Then, click the Select the game button and choose the desired gameplay from the list.
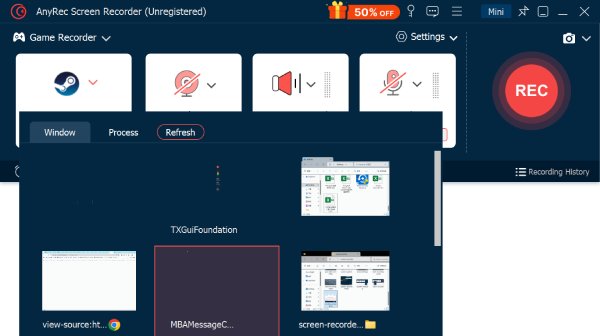
Step 2: It’s recommended to turn on the webcam, microphone, and system sound recording to make a good game live.
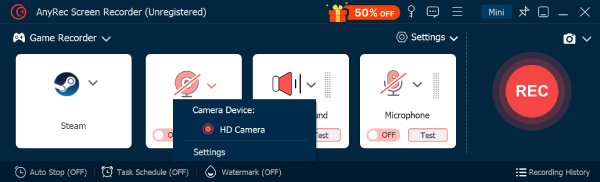
Step 3: Just like recording videos, you can click the REC and then the Stop button to capture gameplay. At last, edit the recorded game videos and save them in local folder.
Window Recorder
With this window recorder, you don’t need to worry about the popping up of other windows. Once you choose the desired window, the capture area is fixed without any interference. It’s really helpful for recording online classes or meetings.
Step 1: In the Window Recorder tool, click the Select the window button to choose the desired website or software from the list of all the launched programs.
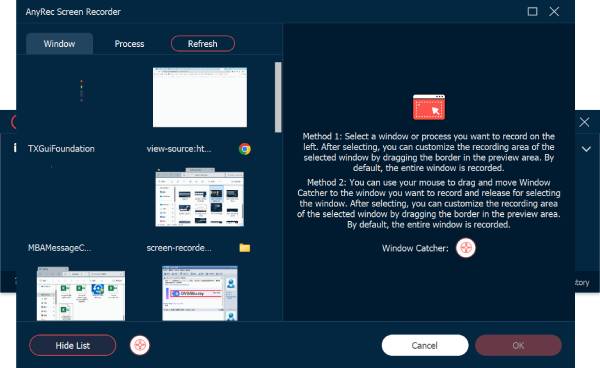
Step 2: Click the OK button to decide the window. Then, click the REC button to start and Stop button to finish the recording. You can get more editing functions now.
Webcam Recorder
As for recording business meetings (Zoom, Google Meet, GoToMeeting, Lync, Microsoft Teams, etc.), Skype calls, and gameplay narration, you should also include the webcam footage. If the built-in camera is not available, you can insert an external webcam into your computer.
Step 1: Click the Webcam button from the Video Recorder. The system will ask for the permission of the built-in camera. As for the external camera, you can select the desired one from the dropdown list.
Step 2: You can also change the resolution, volume of system sound and microphone, etc. Rotating the webcam is also supported once your webcam is not set in right position. Then, click the Record button.
Step 3: Click the Stop button to save and edit the recording. Here, you can trim, crop, rotate, and compress the recordings as you like.
Phone Recorder
Some phone streamers need to record their phone when they play the game, or someone needs to record the phone to make video tuition or make a video presentation, they all can use this function to achieve their goal with simple clicks.
Step 1: Click the Phone Recorder button from the list, and then choose Android or iOS recorder according to your need. 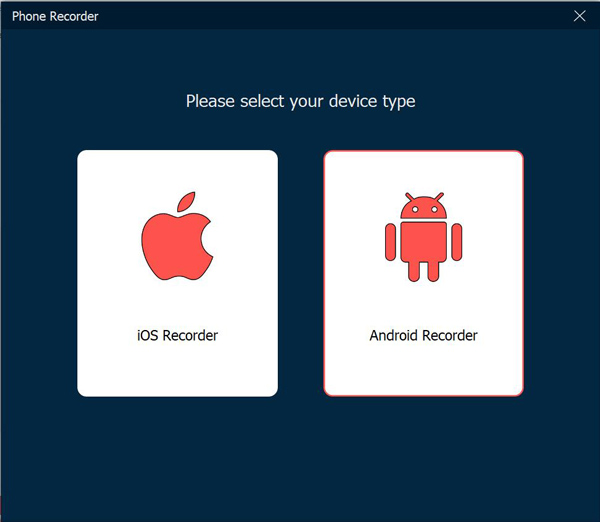
Step 2: For Android users, you can connect the device to computer via Wi-Fi or USB connection, while iOS user can only use the same Wi-Fi to connect. Just follow the detailed guide. 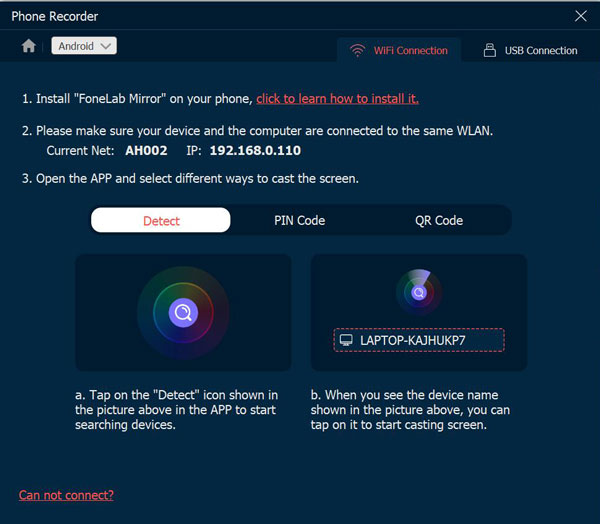
Step 3: Once connected, you should permit the screen mirror on your phone. You can set the resolution and recording content first. Then, click the Record or Snapshot button to start capturing. 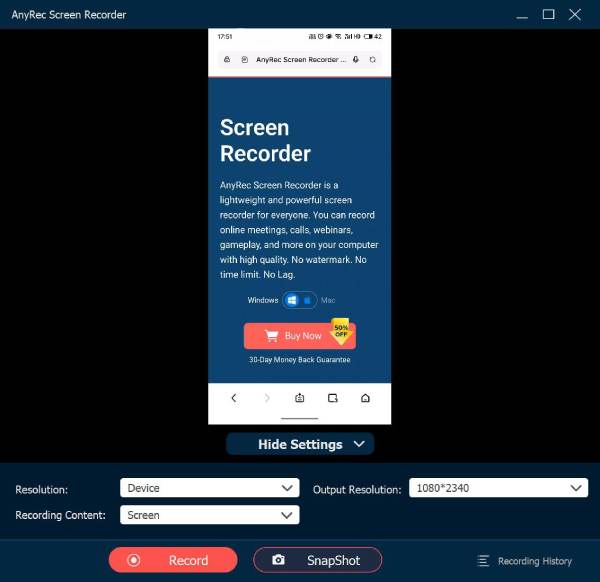
Last Recorder
If you want to continue with the previous task, you only need to click the Last Recorder button to restore the settings. After that, you can simply tweak the settings as the other recording modes.
Advanced Editing
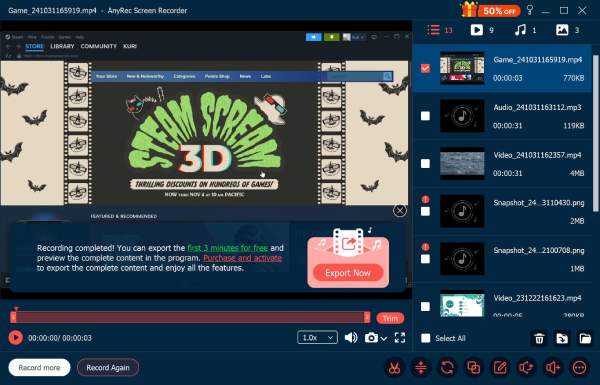
If you have upgraded to AnyRec Screen Recorder full version, you can unlock more video and audio editing tools. These tools are available since the version 1.0.30. So, make sure you have updated the program to the latest version. Just go to the Record History button to access all editing tools.

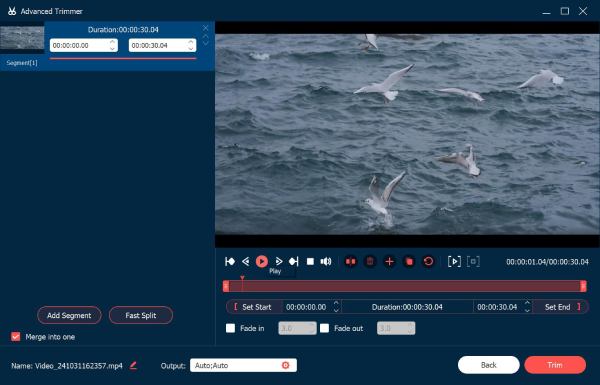
Advanced Trimmer
With the advanced trimmer tool, you can easily cut the unwanted parts. Just click the Set Start and Set End buttons to set custom video length, or you can trim videos by dragging the points. Tick the box before Fade in and Fade out to add more video effects. Moreover, you can add more video segments and merge those video files into a new one within Advanced Trimmer. Click the Trim button to save changes.
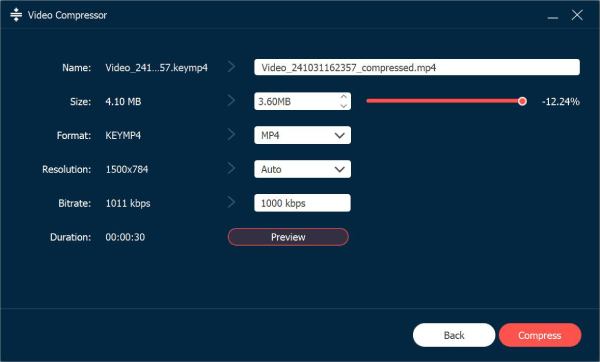
Video Compressor
After clicking the Video Compressor button, you can make video size smaller than before by percentage or certain file size. It’s also okay to change video format, resolution, and bitrate to reduce the GB, MB, or KB size of any video or audio file. Click the Preview button to have a check, and then click the Compress button to confirm.
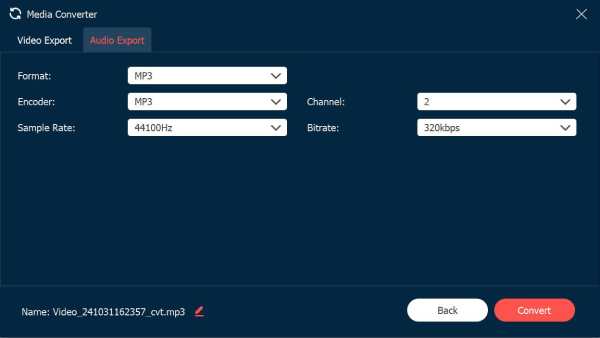
Media Converter
In the Media Converter editing tool, you can adjust video settings with multiple options, including format, resolution, frame rate, quality, encoder, and zoom mode. What’s more, you can adjust the encoder, sample rate, and channel of audio.
Video Format: Convert recordings to MP4, MOV, WMV, AVI, MKV, and GIF.
Resolution: Adjust video resolution to 3840×2160, 2560×1440, 1920×1080, 1280×720, 640×360, 1;1, 9:16, 4:3, 21:9, 5:4, 16;10, 3;2, 2;1, or custom.
Frame Rate: Set video frame rate to 60fps, 59.94fps, 30fps, 29.97fps, 25fps, 24fps, 23.97fps, 20fps, 15fps, 12fps.
Quality: Save the recording video to high quality, standard, or custom.
Video Encoder: Adjust video encoder to H.264, HEVC, or MPEG-4.
Zoom Mode: Set the video zoom mode as letter box, pan & scan, and full.
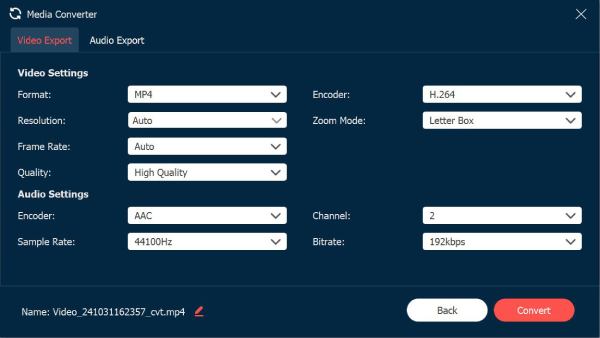
Audio Format: Save and convert audio to MP3, AAC, AC3, WMA, WAV, AIFF, FLAC, MKA, OGG, AU, M4A, M4B, M4R, DTS, APE, AMR, MP2, ALAC.
Audio Encoder: Set the audio encoder as AAC or AC3. (Check AAC vs. AC3)
Sample Rate: Adjust the audio sample rate as 22050Hz, 32000Hz, 44100Hz, and 48000Hz.
Channel: Adjust the audio channel as 1 or 2.
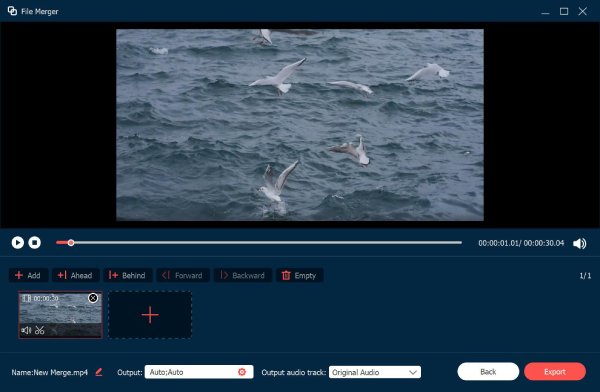
File Merger
Click the Add button to add more video clips. You can click the Behind or Forward button to combine video clips in the right order. The preview window can show all changes immediately. What’s more, you can adjust settings of output video and audio tracks with the bottom options. At last, click Export to combine videos into one successfully.
Media Metadata Editor
Here you can change file name, title, artist, album, composer, genre, year, and comments of any video/audio recording file. Moreover, you can click the Add button with plus icon to add a cover. Tick the box before Always display when saving based on your need. At last, click Complete to finish metadata editing.

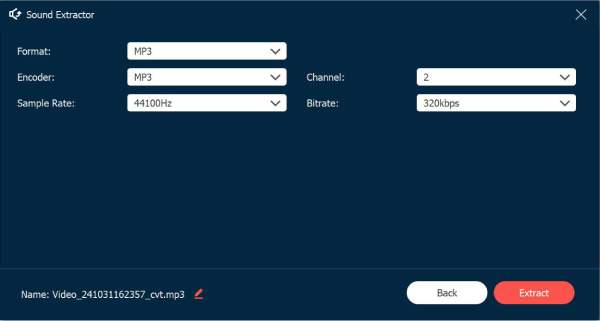
Sound Extractor
If you only want to save the audio file from the video recordings, you can click the Sound Extractor button. Here, you can set the audio format in MP3, WAV, FLAC, OGG, M4A, change the encoder, sample rate, bitrate, and channel. Then, click the Extract button to save the audio track only.
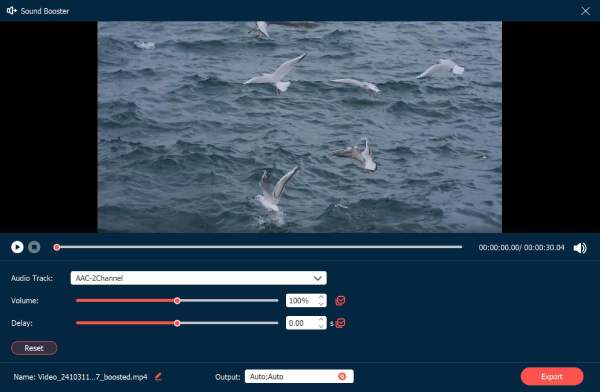
Sound Booster
Maybe you forget to test the volume first and get a recording with a low or high volume. Don’t worry, you can use the sound booster to adjust the volume and even the delay of audio tracks. If you are satisfied with the effects after previewing, click the Export button to save.
Recording Controls
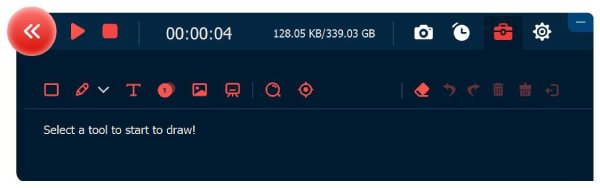
Edit During Recording
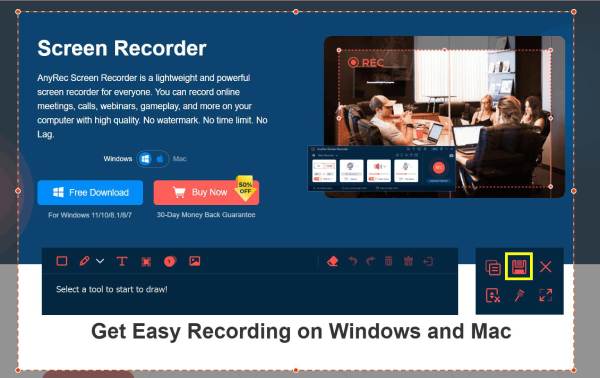
For editing recordings, you can simply click the Edit button during the recording process. It has different options to add a rectangle, ellipse, arrow, line, etc. into the recording. You can also adjust the size and color of these options according to your requirement. Moreover, you can set the recording length or take screenshots during recording.
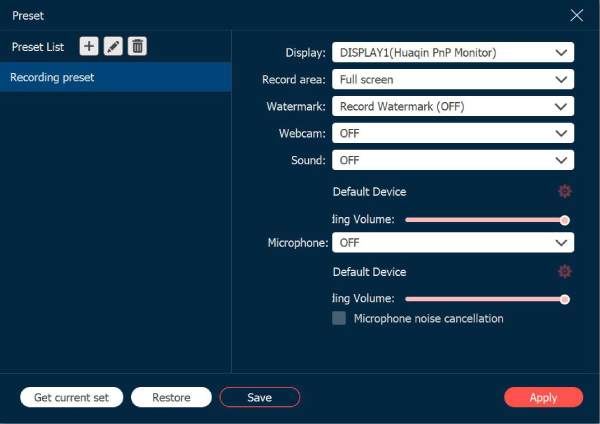
Preset Recording
When you have to record some video tutorials frequently, you can customize a preset recording from the More menu. You can create a preset recording and apply it to all the recording tasks.
Step 1: Click the Video Converter button and click the Manage button at the bottom to add a new customized recording preset.
Step 2: In the pop-up window, click the Add button to create a new one. You can tweak and adjust the different parameters, including the display, record area, webcam, etc. After that, you can click the Save button and click the Apply button to apply the settings.
Advanced Mouse Recorder
Under the REC button, there is a special mouse recorder, which provides more controls to the mouse movement during the recording. With this tool, you can easily capture special tutorials. There are 2 modes for you to choose – Around mouse and Follow the mouse.
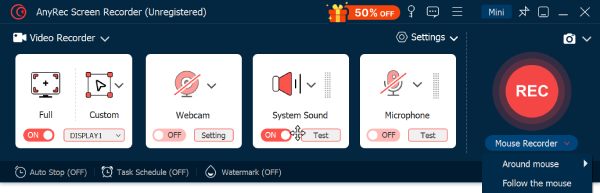
Around mouse: It is a recording mode that the recording area that will change as you move your mouse, and the area always centers on the mouse. When you move your mouse to the border of your screen display, then the area beyond your screen display will be shown on a black screen.
Follow the mouse: Just as around mouse mode, it will change the recording area as you move the mouse. But different from the previous mode, the recording area will be changed when the mouse is out of the original recording area.

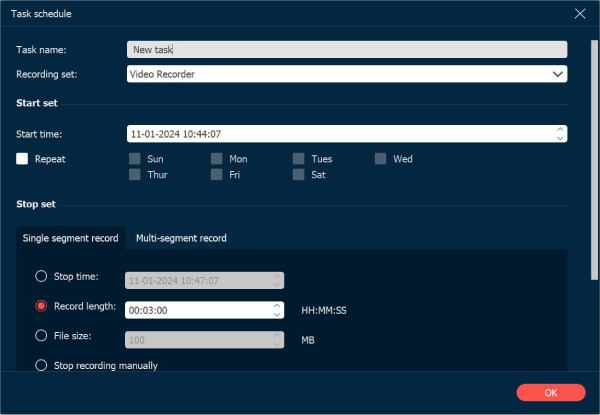
Task Schedule
When you need to record some broadcasting programs automatically, the Task Schedule feature is an option to record videos without extra clicks.
Step 1: Click the Task Schedule button at the bottom, and then click the Add button to create a new task.
Step 2: In the pop-up window, you should fill the task name, set the starting time, recording length, and recording set from the presets. After that, you can click the OK button to confirm.
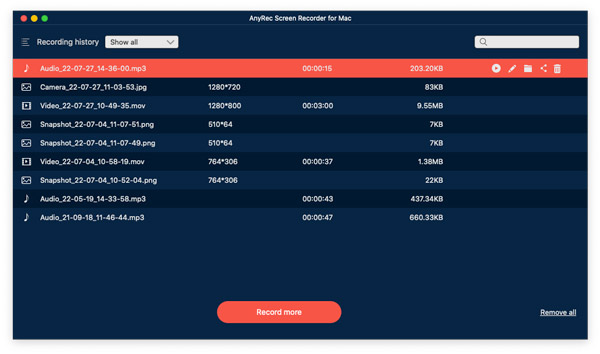
Manage Recording History
Once you have captured the desired videos, audio files, or taken snapshots, you can find the recording files available in the recording history. Right-click the mouse to rename the recording files, playback the videos directly, or even share them on YouTube, Facebook, and more.

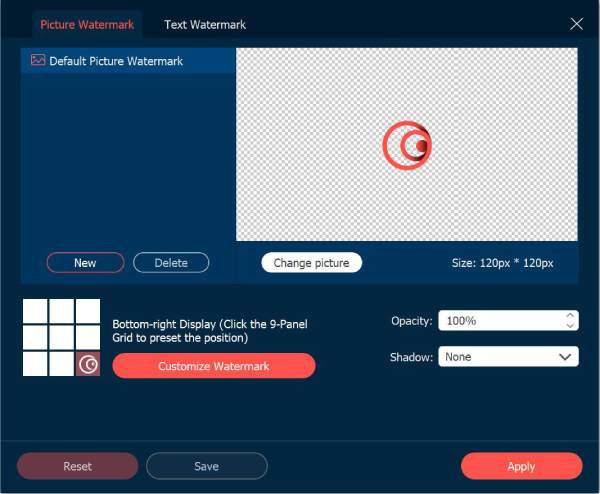
Add Watermark
You can click the Record Watermark button to make your recording video attached with a watermark, which will save you time to edit the watermark after recording. And you can choose the default text or picture watermark.
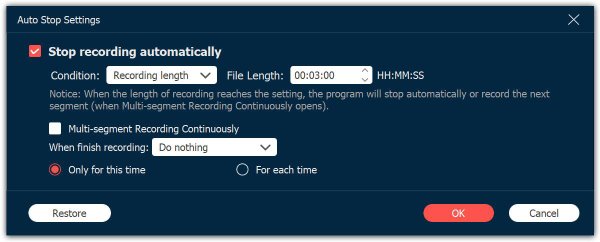
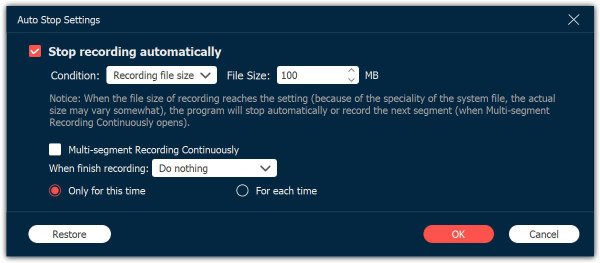
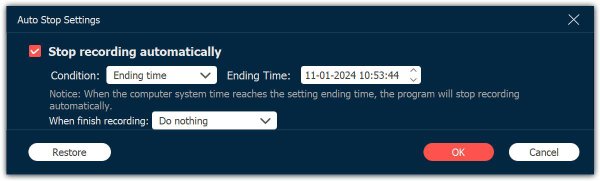
Auto Stop
If you want to auto stop recording screen, you can click the Auto Stop button at the bottom of main screen. And you can choose three kind ways to stop recording.
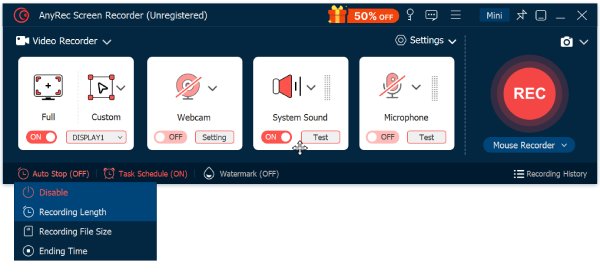
Recording Length: You can set the file length of your video. When your video gets that length, it will stop recording.
Recording File Size: You can set a limitation of the recording file size. When the file gets that point, it will stop recording.
Ending Time: You can set a timer. When your computer gets that time, it will stop recording. You can also choose to shut down your computer after stop recording.
Instruction
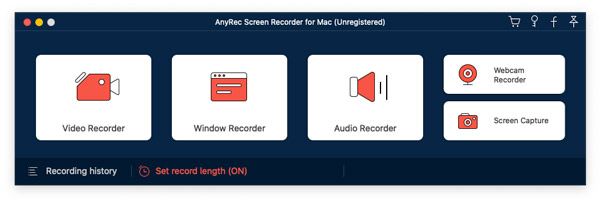
AnyRec Screen Recorder for Mac is a beginner-friendly Mac screen recorder. You can record Mac screen video, audio, and webcam simultaneously or separately based on your need. There is no steep learning curve. You can quickly find all options from the built-in Video Recorder, Window Recorder, Audio Recorder, Webcam Recorder, and Screen Capture. Now, let’s see what you can do with AnyRec Screen Recorder for Mac.

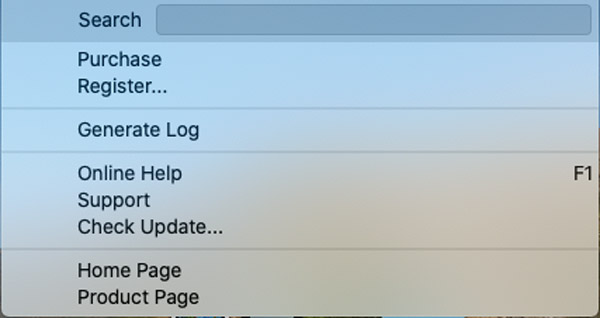
Register
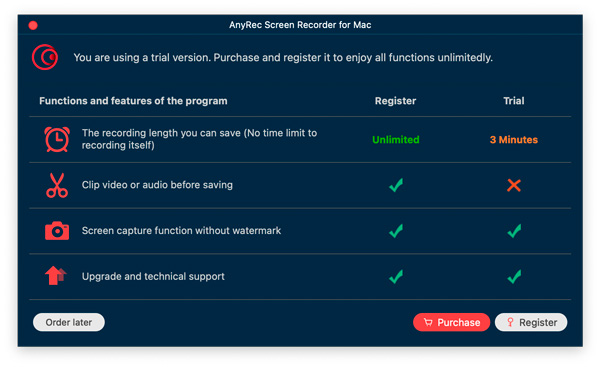
After installing the package, you will see a popup. You can click Purchase or Register to sign up for a user account to unlock all features. Or you can click Order later to start a free trial to have a try first. As you can see, the main difference between the registered and the free trial version is the maximum recording length. Moreover, the video or audio trimmer is not available until you register an account.
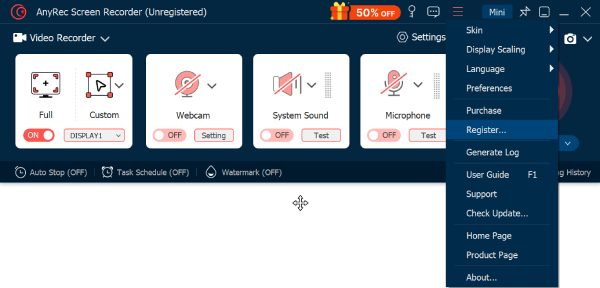
It’s okay if you want to register AnyRec Screen Recorder for Mac after the free trial. You can click Purchase or Register from the top Help drop-down list.
If you click Purchase: In the popping-up buying screen, purchase a 1-month or lifetime license for your Mac screen recorder. Follow the on-screen instruction to complete the process. Or you can click the Shopping Cart icon on the top right corner of the program.
Update
AnyRec Screen Recorder for Mac provides 2 different ways to update the program.
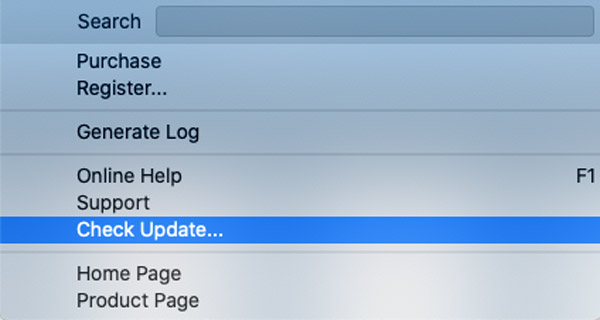
Method 1: Update Manually
From the top Help dropdown list, you can click Check Update.
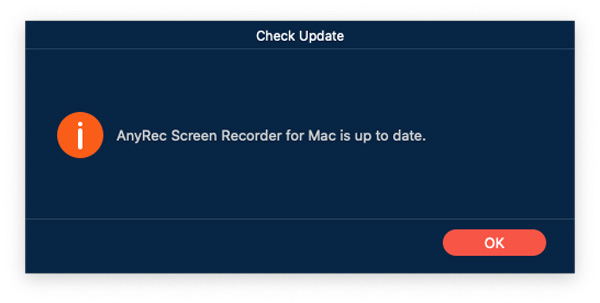
AnyRec Screen Recorder for Mac will check all available updates immediately. If you have upgraded to the latest version, it will notify you that AnyRec Screen Recorder for Mac is updated to date. Click OK to close the window.
Method 2: Update Automatically
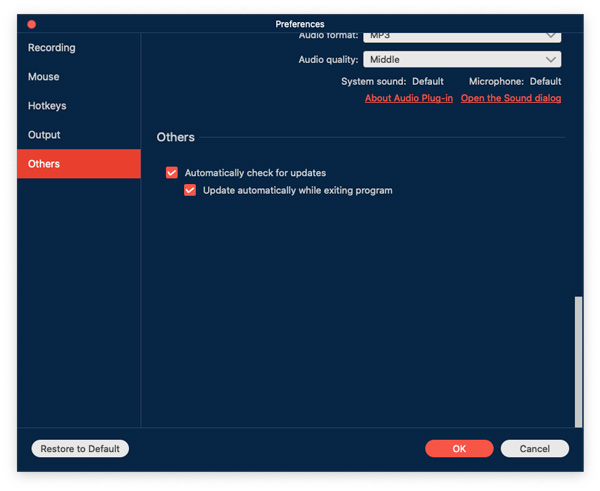
If you want to keep the program to the latest version all the time, you can enable its auto-update function. Choose Preferences from the top AnyRec Screen Recorder for Mac drop-down list.

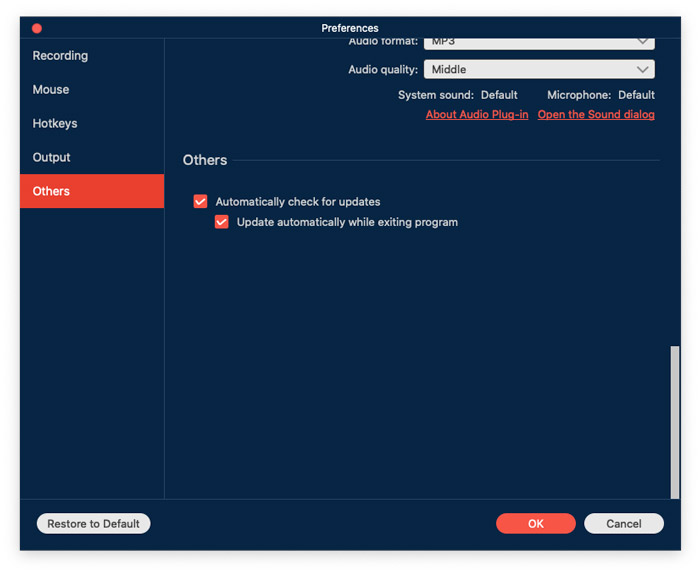
Click Others in the Preferences left panel. Make sure the Automatically check for updates option and the Update automatically while exiting program option are enabled. Later, click OK to save the changes.
Set Accessibility Access
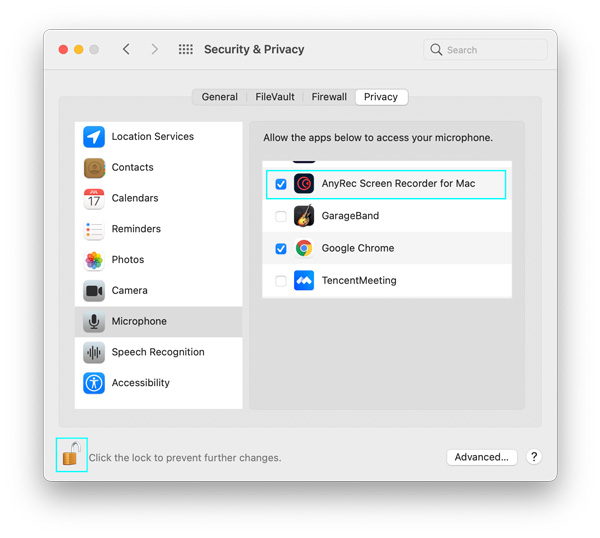
The first time you run AnyRec Screen Recorder for Mac, you will be prompted with the Accessibility Access (Events) notification. Click Open System Preferences.
You will be in Accessibility by default. Click the Lock button on the bottom right corner next to Click the lock to make changes. Enable the checkmark before AnyRec Screen Recorder for Mac. Later, click the bottom Lock icon next to Click the lock to prevent further changes
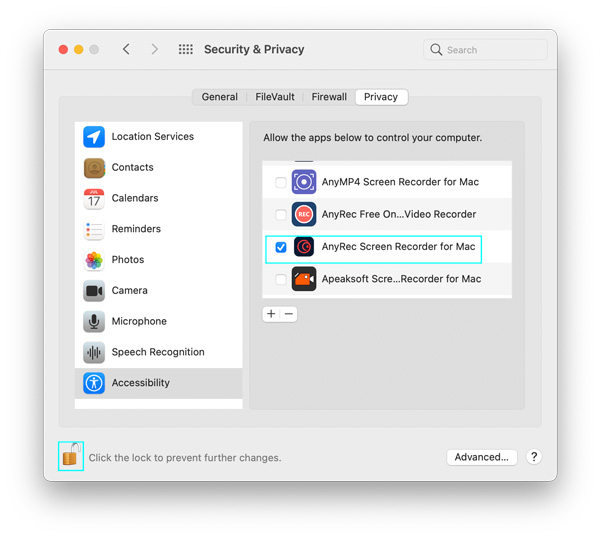
Close the Security & Privacy window. Now you can record with AnyRec Screen Recorder for Mac.
Preferences
Before starting video and audio recording, you can customize recording settings within the Preferences window. You can unfold the AnyRec Screen Recorder for Mac list and then select Preferences on the top. Or you can go to the specific recorder, and then click the Settings button with the Gear icon to navigate to Preferences as well.
Recording
In the default Recording menu, you can enable or disable many options before recording, including Show countdown for recording, Beep on start recording, Show recording boundary, Hide float bar while recording, Allow to move the recording region while recording, Hide Dock while recording, Auto open preview window when ending recording, Exclude float bar when recording. Click OK to save changes.

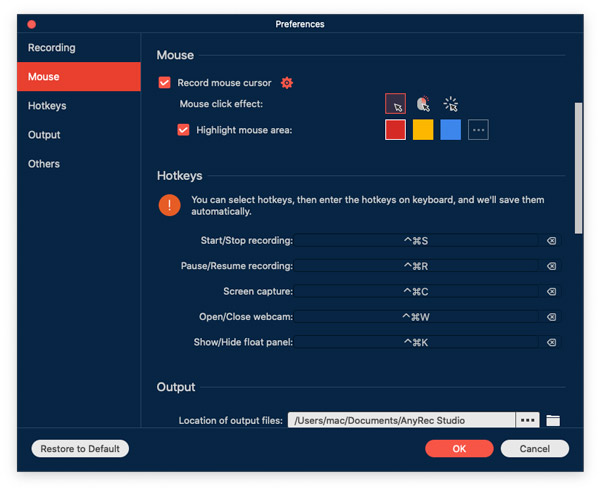
Mouse
Go to the Mouse menu. Here you can manage the checkmarks before Show mouse cursor and Highlight mouse area. It also provides 3 different mouse click effects. Moreover, you can also set a custom color for the highlight mouse area. To save your changes, click OK on the lower right corner.
Hotkeys
Here you can check the default hotkeys for screen recording and capturing. Or you can change and type new hotkeys before Start/Stop recording, Pause/Resume recording, Screen capture, Open/Close webcam, and Show/Hide float panel. The program will save it immediately. Later, you can record video/audio and take screenshots on Mac via hotkeys.
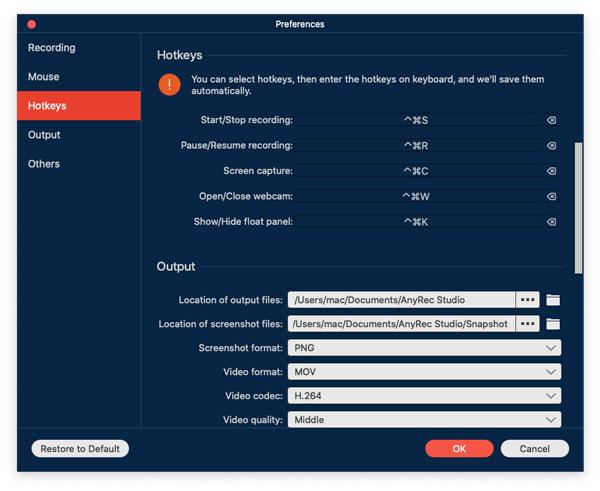
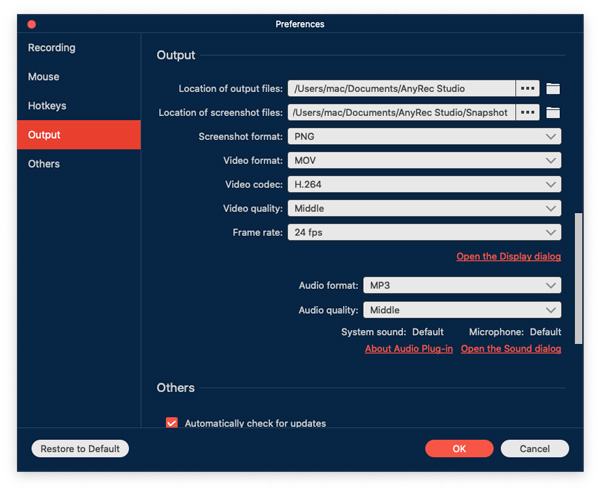
Output
You can set the output path of your recorded files and captured snapshots in Output. Moreover, you can change output settings within those options.
Screenshot format: PNG, JPG/JPEG, BMP, GIF, TIFF
Video format: MOV, MP4, M4V, Gif
Video codec: H.264, HEVC, Apple ProRes 422, Apple ProRes 4444
Video quality: Lowest, Low, Middle, High, Highest, Lossless
Frame rate: 20 fps, 24 fps, 25fps, 30 fps, 60 fps
Audio format: MP3, M4A, WMA, CAF, FLAC, OGG, OPUS
Audio quality: Lowest, Low, Middle, High, Highest, Lossless
Others
Apart from screen recording settings, you can select Automatically check for updates. Thus, your Mac screen recorder software can keep up to date all the time.
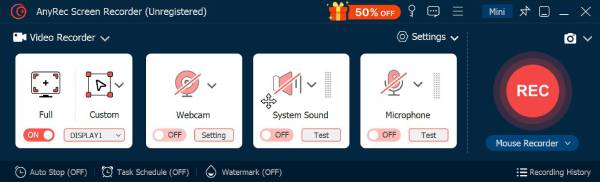
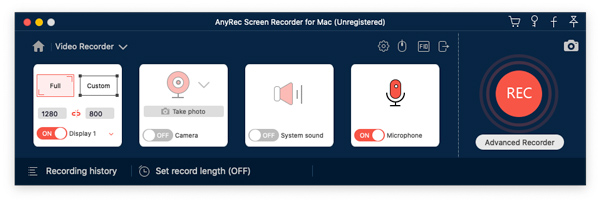
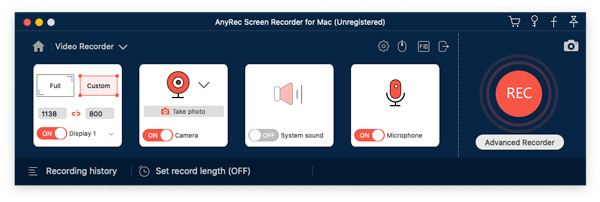
Video Recorder
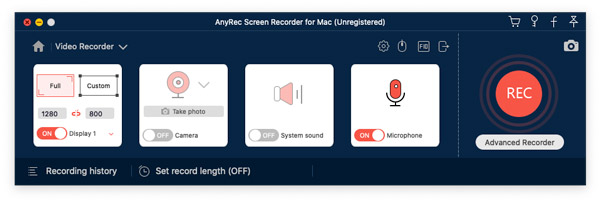
You can record desktop activities, screen videos, online meetings, and many other videos in MP4 and other formats. Just click Video Recorder on the main interface.

Step 1: Set screen capture area
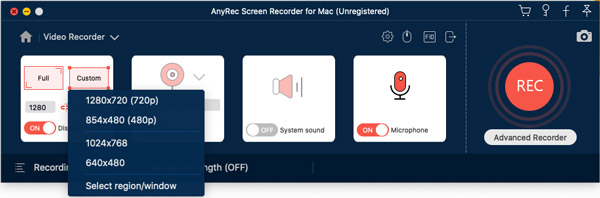
Enable the Display 1 option. Choose between Full and Custom. You can record a full-screen video on Mac with Full.
Or you can unfold the Custom list. You can select 1920×1080, 1280×720, 854×480, 1024×768, 640×480, and Select region/window. Here you can drag with the left-click mouse to select a certain window or custom rectangular area.
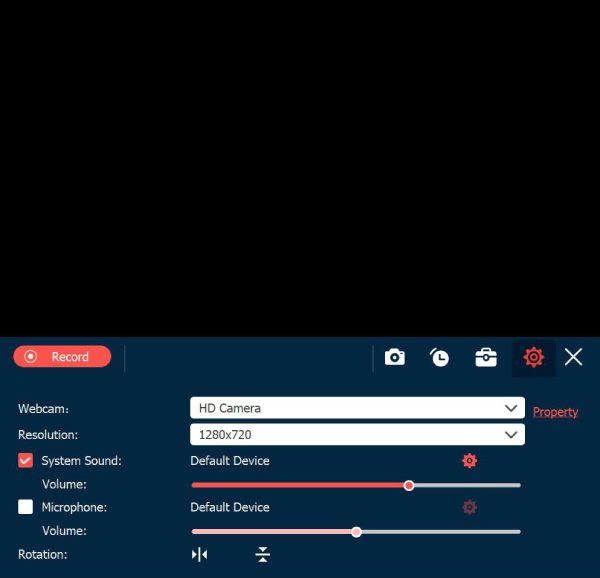
Step 2: Enable/disable webcam recording (optional)
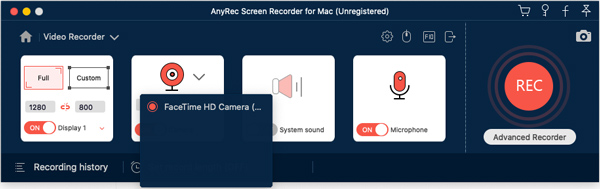
If you want to record yourself and computer screen simultaneously, you can turn on Camera. Use your left-click mouse to adjust webcam screen size and position.
The default Mac camera is the Facetime HD Camera. If you want to record a screen with an external webcam, you can choose your connected external camera from its drop-down list.
Step 3: Record screen with audio (optional)
Turn on System Sound to record Mac screen with system audio.
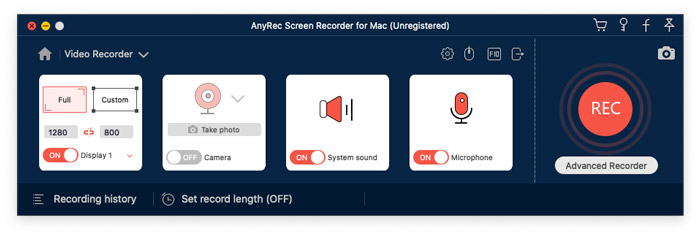
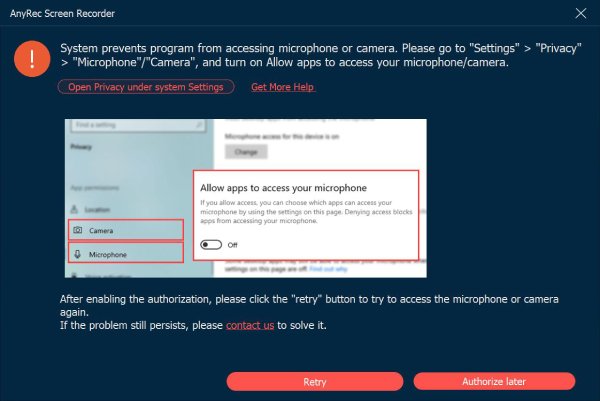
If you want to screen capture with your voice, you can turn on Microphone as well. Before recording sound on Mac, you need to enable microphone permission first.
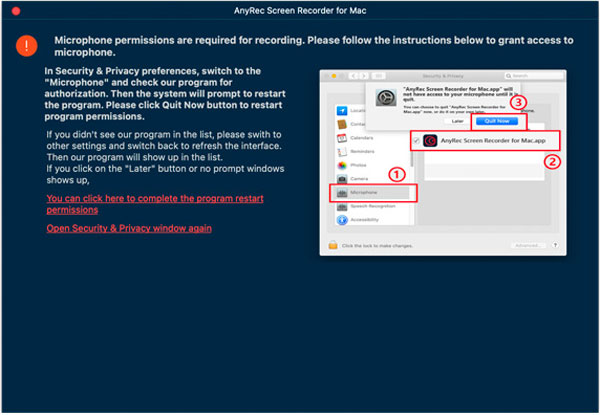
In the popping-up Security & Privacy window, Find and click the lock icon on the bottom left corner. Then enter the computer password to unlock it.
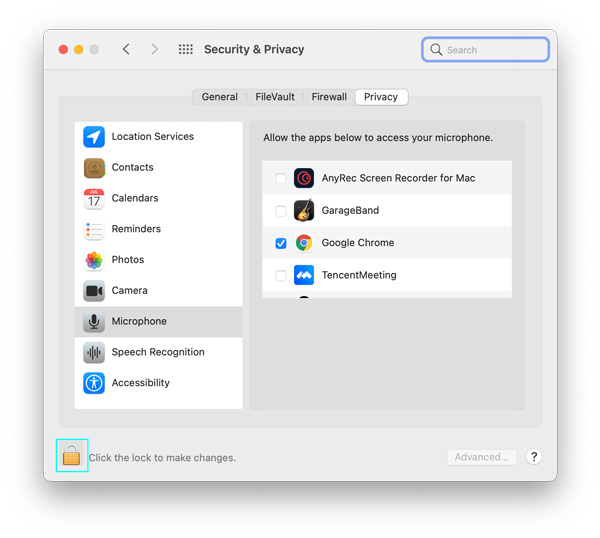
Click the checkbox next to AnyRec Screen Recorder for Mac. In the new popup, click Quit & Reopen to confirm. By the way, make sure the Lock button is closed.
Step 4: Start recording
Click REC to start recording screen video with audio on Mac.

After a 3-second countdown, AnyRec Screen Recorder for Mac will record the selected screen automatically. You can pause, resume, and stop recording on Mac based on your need.
Click the Edit button to access all on-screen drawing tools. You can add rectangle, ellipse, line, arrow, color paints, text, step tools, etc. Moreover, select the specific size and color. You can erase, redo, undo, trash, and exit the current drawing tool freely.

If you want to take a screenshot, you can click the Camera button. AnyRec Screen Recorder for Mac will take a full-screen snapshot immediately. You can find the captured picture in Recording History. In the further updates, AnyRec will bring the Mac scrolling screenshot feature as well.
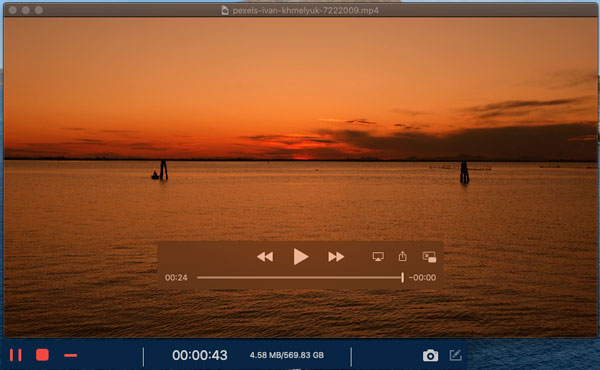
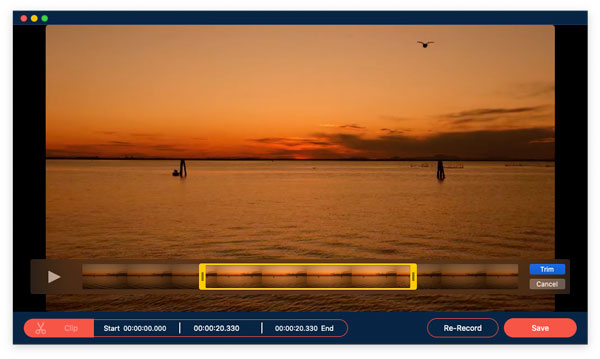
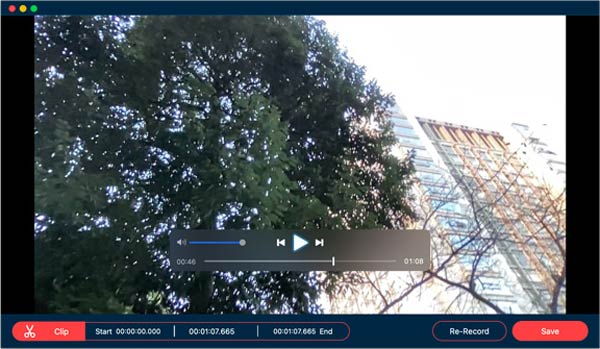
Step 5: Trim video recording
Click Stop to end up screen recording. In the Preview window, you can check the recording file. If you want to delete unwanted video clips, you can click Clip on the bottom right corner.
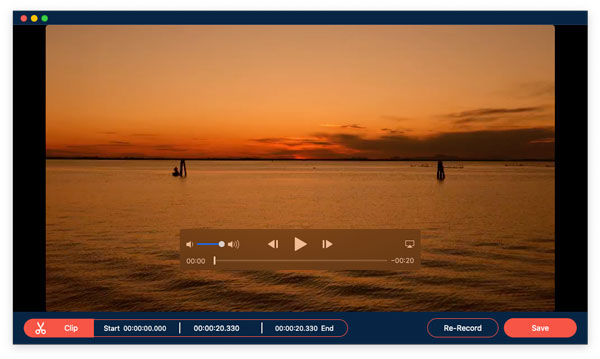
Set the start and end time on the bottom video clipper. Or you can drag with the left-click mouse to trim a recording video. Click Trim to confirm and save changes.
Step 6: Save recording
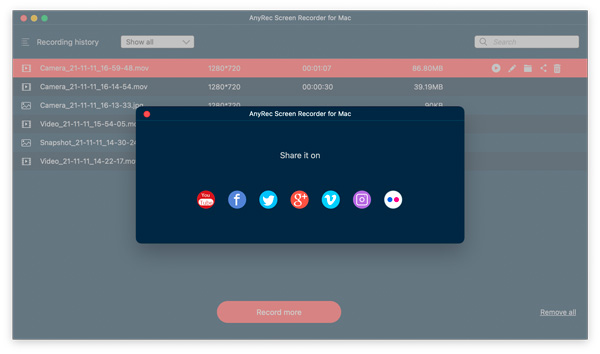
After that, click Save to download your Mac recording video. You can get all recording files in Recording history. Here you can play, rename, open a folder, share, and delete it.
Window Recorder
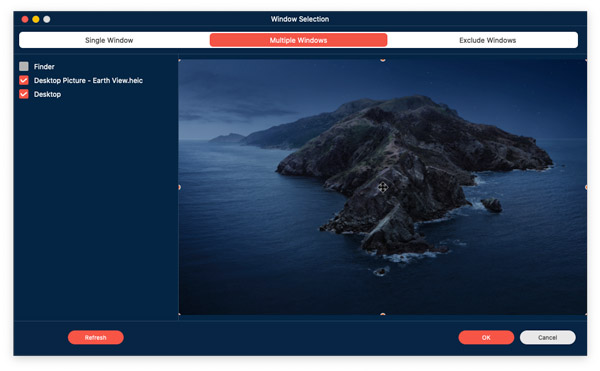
To capture a gameplay video or Skype video chat with multiple partners, you can click Window Recorder to get the desired video. It provides Single Window, Multiple Windows, and Exclude Windows to record desired windows accordingly.
Step 1: Select the window to record
Click Window Recorder to direct to Window Selection. It will show you all the running apps on your Mac. You can use it as your game recorder and more.
For example, if you need to record a gameplay video, you can select Single Window. To add commentary with a webcam, you can choose Multiple Windows or Exclude Windows to get the desired windows you want to record. After that, you can click OK to continue.
Step 2: Set up recording parameters
It also enables you to custom the recording area, enable the webcam recording, and tweak the system sound/microphone recording.
Step 3: Start the window recording
When you get everything ready, you can click the REC button to start recording the chosen windows on your Mac.
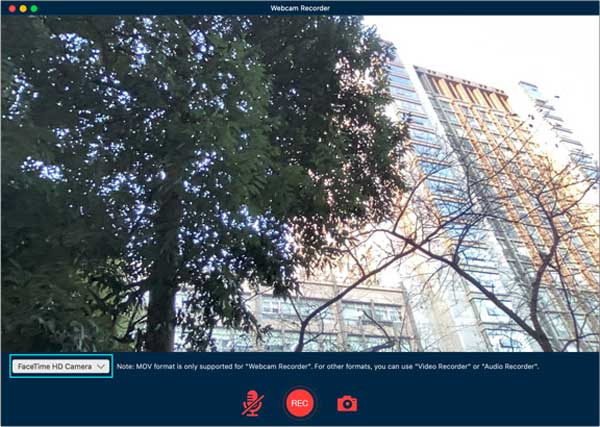
Webcam Recorder
Step 1: Choose webcam recorder
To record your face only, you can select Webcam Recorder on the main interface.

Step 2: Set input camera
The Mac webcam recorder pops up and enables FaceTime HD Camera as the default camera. If you plug an external camera into your Mac computer, you can change it from the bottom list.
Step 3: Turn on microphone
To record yourself with voice, you need to turn on Microphone at the bottom.
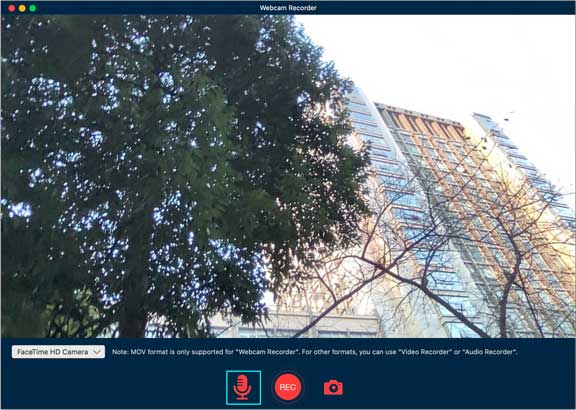
Step 4: Record webcam video
Click REC to record a webcam video on Mac. After webcam recording, you will be in the Preview window. Preview and trim your recording file.
Step 5: Share your webcam video
Go to Recording history to find your recording video in MOV format. Moreover, you can click Share to share the recording video to YouTube, Facebook, Twitter, etc.
Audio Recorder
Step 1: Choose audio recorder
To record audio on Mac, select Audio Recorder on the main interface.

Step 2: Set input audio source
Turn on System Sound to record Mac computer audio only. Of course, you can turn on Microphone to get access to the Mac voice recorder as well.
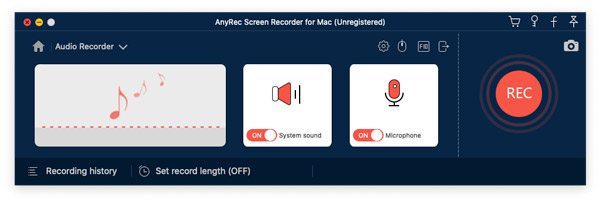
The first time you record voice on Mac, you need to set the microphone recording permission on Mac manually. Follow the on-screen instruction to complete the process.
Step 3: Record Mac audio
Click REC to record audio on Mac. To get better audio quality, you can speak close to the microphone. AnyRec Screen Recorder for Mac allows users to pause, resume, and stop recording audio on Mac without a time limit.

Step 4: Stop recording audio on Mac
Click Stop to finish Mac audio recording. In the Preview window, you can click Play to pre-listen your recording audio file.
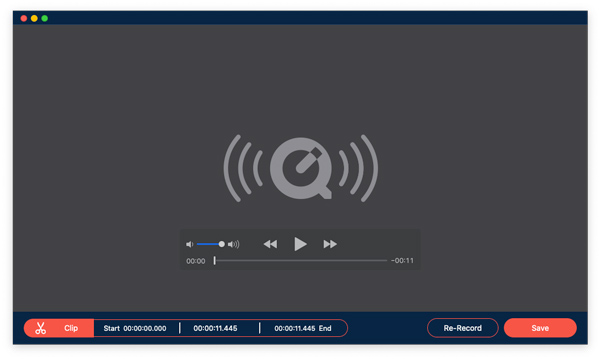
Moreover, you can use the audio clipper to extract certain audio clips. Click Clip on the bottom left corner. Move the dragger to set the start and end times. Click Trim to confirm.

Step 5: Save Mac audio recording
After that, click Save to export your Mac audio recording to MP3 format. You can manage it in Recording history if necessary.
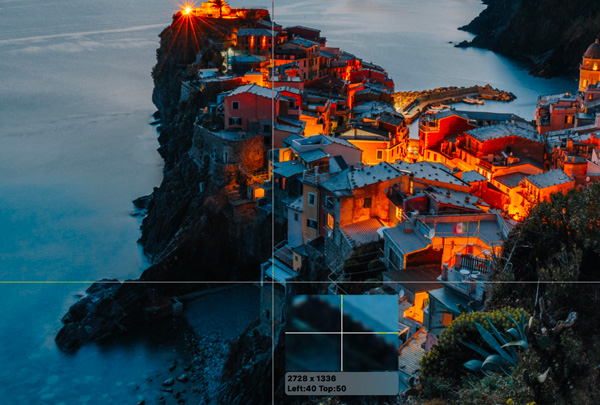
Screen Capture
Step 1: Choose Screen Capture
You can access Screen Capture to take a screenshot on Mac directly.

Step 2: Take a screenshot on Mac
AnyRec Screen Recorder for Mac detects all windows smartly. You can screenshot a program on Mac with one click. Or you can drag with the cursor move to capture a rectangular screenshot. Once you release the left-click mouse, you can get a captured image immediately.
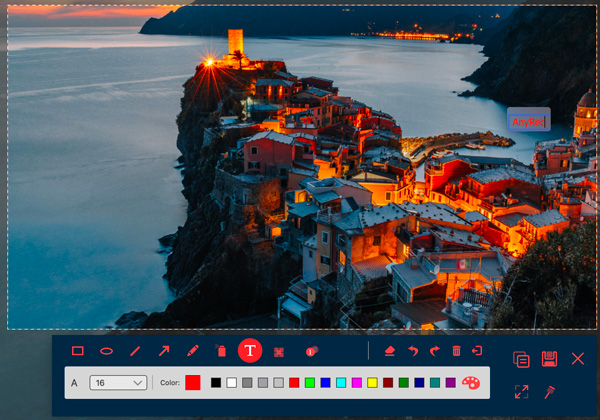
Step 3: Edit a screenshot
You can add annotations to the snapshot in custom color and size, including text, shapes, blur, step tools, etc. Furthermore, you can pin, copy, save, and delete the current Mac screenshot.
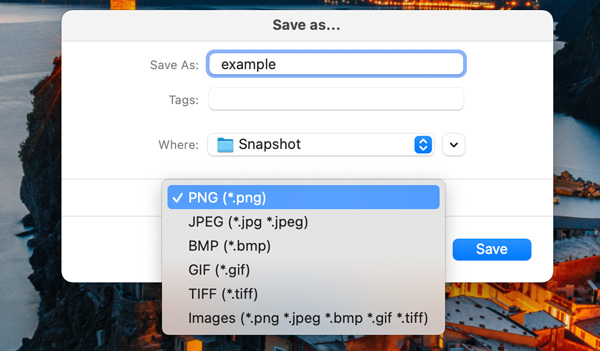
Step 4: Save your screenshot
Click Save to get the Mac snapshot. In the Save as window, set the file name and output folder. The default output screenshot format is PNG. You can unfold the list to save the Mac screenshot to JPEG, BMP, GIF, TIFF, or Images.
Set Record Length
Step 1: Choose record length
Click Set record length (OFF) on the bottom of the interface.

Step 2: Specify details
Tick the checkbox next to Record Length. Then you can set the custom record length here. If you want to auto record and save the screen, you can tick the checkbox before Shut down when end recording. Moreover, switch between Only for this time and For each time based on your need.
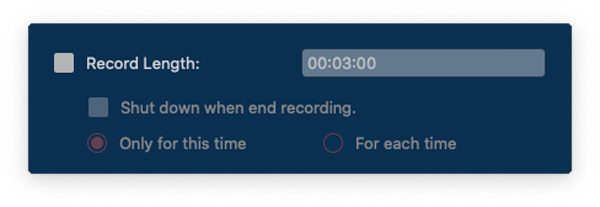
Step 3: Turn on record length
Click any blank space to exit the window. You can see the Set record length (ON) option turns red. Next time AnyRec Screen Recorder for Mac can stop recording automatically. (Remember to disable Record Length if you want to record screen video without a time limit.)