How to Screenshot on Surface Pro X/8/7 with/without Keyboard
When using the powerful Surface Pro, whether you need to save necessary chat logs or share exciting gameplay moments, taking a screenshot on the Surface Pro is a useful skill. However, the Surface Pro features a detachable keyboard, which can be confusing for many users when taking screenshots. Don't worry! This guide will thoroughly explain multiple methods for capturing screenshots on your Surface Pro-from the simplest keyboard shortcuts to powerful professional software.
Guide List
Use a Powerful Screen Recorder to Screenshot on Surface Pro Classic Side Buttons for Taking Screenshots on Surface Pro Windows Built-in Tools for Screenshots on Surface Pro Using the Surface Pen to Screenshot on the Surface Pro Screenshot on the Surface Pro with KeyboardUse a Powerful Screen Recorder to Screenshot on Surface Pro
For users requiring more advanced features such as scheduled screenshots, long-scroll captures, or direct annotation editing, professional screen recording software delivers the best results in one go. Take AnyRec Screen Recorder, for example. It comes with built-in editing capabilities and allows you to take notes or doodle anytime. The built-in Snapshot tool enables users to take a screenshot of a Microsoft Surface Pro with any screen size.

Screenshot desktop, browser, program, and custom region on a Surface Pro.
Set a time delay to take screenshots of fleeting interface elements like dropdown menus perfectly.
Add lines, text, arrows, and other drawing tools in any color and size.
Save the Surface Pro screenshot to JPG, PNG, BMP, TIFF, or GIF format.
Secure Download
Secure Download
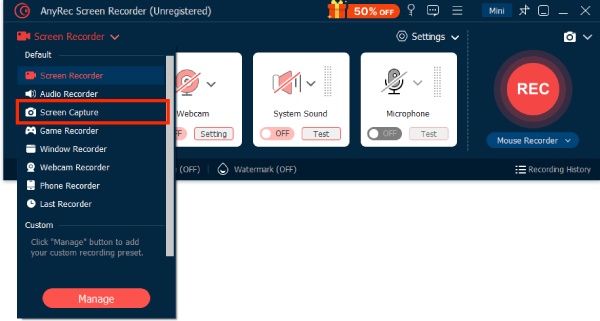
Step 1.Install AnyRec Screen Recorder on your Surface Pro, then launch the program and open the target page.
Step 2.On the main interface, select the "Screenshot" feature and use hotkeys or your mouse to select the desired screenshot area.
Note: The default output screenshot format is JPG. You can click "Output Settings" to change to PNG or other formats.
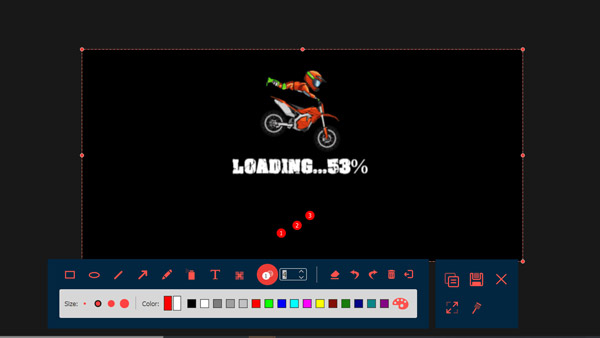
Step 3.After capturing the screenshot, use the built-in toolbar for quick editing, then click "Save" to complete.
Classic Side Buttons for Taking Screenshots on Surface Pro
One of the simplest methods to take a screenshot on a Surface Pro is by using the built-in buttons. Depending on the model, the method for taking screenshots on the Surface Pro may vary.
Surface Pro 4 / Pro 5 / Pro 6
Steps: Press and hold the Power button + Volume Down button to take a screenshot.
The screen will briefly dim, and the screenshot will automatically save to the "Pictures" and "Screenshots" folder.
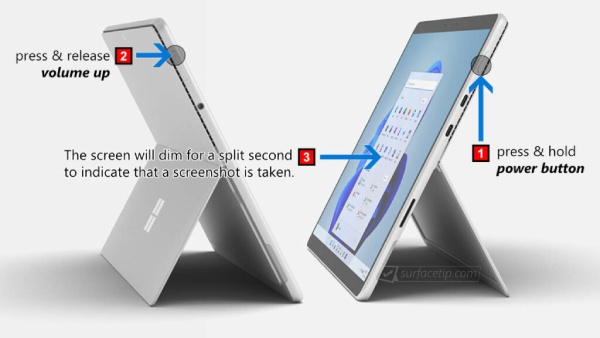
Surface Pro 7 / Pro 8 / Pro 9
Steps: Press and hold the Power + Volume Down button.
Avoid pressing the Volume Up button simultaneously during the long press, as this may trigger other functions, such as volume adjustment. Screenshots are automatically saved to "Pictures > Screenshots".
Surface Pro X
Steps: Power button + Volume Down button.
Due to its ARM architecture, the screenshot process mirrors Windows devices, though files may default to "OneDrive", "Pictures", and "Screenshots". This can be adjusted in Settings.
Windows Built-in Tools for Screenshots on Surface Pro
The Surface Pro is a laptop/tablet running the Windows operating system. As such, it comes pre-installed with the official snipping tool on Windows. This is a native screenshot program for Windows, and using the screenshot tool allows you to take screenshots of either the entire screen or any selected area on the Surface Pro device.
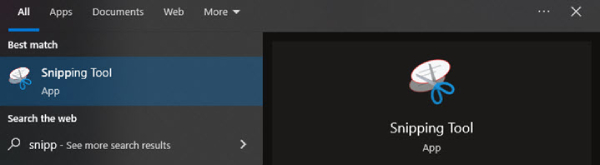
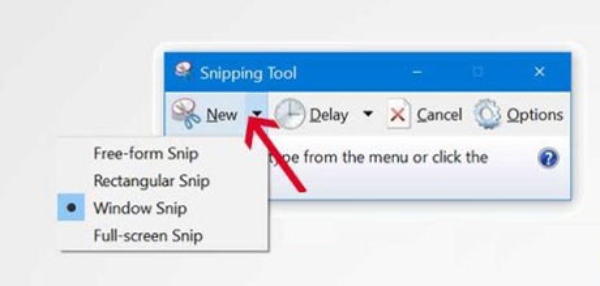
Step 1.Open the Start menu and search for "Snipping Tool". Double-click the "Snipping Tool" application to open it.
Step 2.Click the "New" button to start a new screenshot. You will have four options: Free-form, Rectangular, Window, or Full-screen Snip.
Step 3.The screenshot will automatically be saved to the clipboard, and you can paste it into any application that supports images.
Using the Surface Pen to Screenshot on the Surface Pro
The Surface Pen makes taking screenshots on the Surface Pro incredibly convenient. Simply double-click the pen tip button to capture a screenshot instantly, automatically launching the interface to edit screenshots. It supports full-screen, rectangular, or freehand drawing area captures, and you can use the pen tip to select the portion you want to capture precisely. It also allows you to annotate, crop, or share directly on the screenshot.
Step 1.Go to "Settings", find "Bluetooth & devices", tap "Pen", and check if the shortcut is set to "Open Screenshot & Sketch".
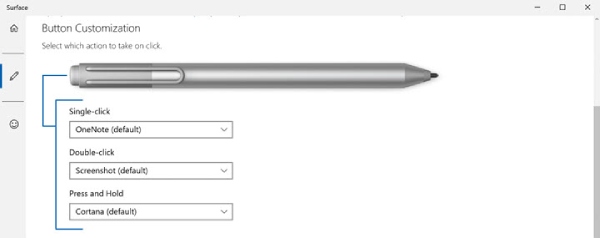
Step 2.On any screen, press the button on the top of the Surface Pen for about 1 second, then release it. The screen will turn gray and launch "Sketch & Capture."

Step 3.Use your pen or finger to select the area you want to capture, then edit it or save it directly.
Screenshot on the Surface Pro with Keyboard
The keyboard cover offers a physical shortcut key to take a screenshot on the Surface Pro, identical to traditional laptops. Its core features are efficiency, directness, and intuitive operation. Through different key combinations, it flexibly meets two primary needs: "immediate editing" and "quick archiving."
Step 1.Locate the "PrtScn" key in the upper-right function area of the keyboard. Then it will save the screenshot to the clipboard. You can paste it directly into apps.
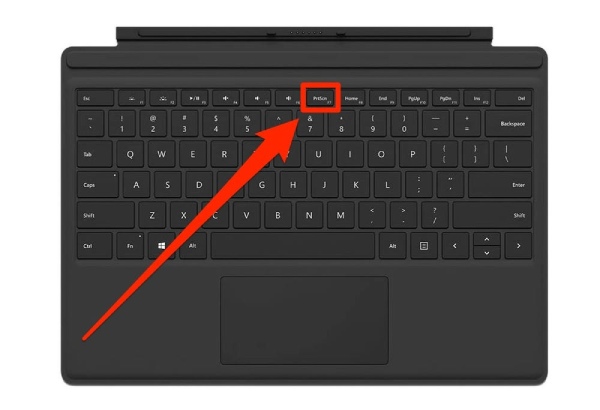
Step 2.Press the Win + PrtScn. The screen will briefly dim, and the screenshot will be automatically saved to the "Screenshots" folder.
Conclusion
When connecting a keyboard to your Surface Pro, shortcut keys in both modes allow you to capture the desired screen. In tablet mode, the top button on the Surface Pen serves as a quick screenshot shortcut. However, if you require high-definition screenshot quality and professional editing features, consider trying AnyRec Screen Recorder. It not only integrates all the above screenshot modes but also offers powerful functions like scrolling long screenshots and a built-in editor.
Secure Download
Secure Download


