Hot
AnyRec Screen Recorder
Capture every moment. Record like a pro.
Secure Download
No Blurry Maps: Take Google Maps Screenshot on All Platforms
Traveling is easier with Google Maps, but you may want to save the location or share it for offline reference, in case the signal is bad. In these situations, taking Google Maps screenshots helps. While there's a method for every device, not always provide the solution you need. So, this guide here explores five ways to snip and screenshot Google Maps across desktop, browser, and mobile platforms. By the end, you can ensure you never lose your way again, even if it is offline.
Guide List
The Best Method to Capture Google Maps Screenshots without Notification Screenshot Google Maps with Windows Hotkeys Get Google Maps Screenshots with Browser Print Function How to Capture Google Maps Screenshots on Mac Default Methods for Google Maps Screenshots [iPhone/Android]The Best Method to Capture Google Maps Screenshots without Notification
While there are built-in OS shortcuts, and no doubt it is convenient, they sometimes trigger system notifications or thumbnails that interrupt your Google Maps screenshots. For high-quality map images, AnyRec Screen Recorder shines as the premier solution. This lightweight yet powerful tool can handle everything, from simple Google Maps screenshots to complex recordings with no lag. It lets you define custom regions and quickly annotate them with arrows before saving. Regardless of your hardware, the tool ensures a consistent screenshot interface on both Windows and Mac. By using it for screenshotting, you can ensure your map image remains clean and high-quality.

Capture any part of the Google Maps screen in just a click with no notifications.
Save maps in multiple formats like JPG, PNG, BMP, etc., to match requirements.
Grab long lists of locations or routes with its scrolling window capture.
Grab long lists of locations or routes with its scrolling window capture.
Secure Download
Secure Download
Step 1.Start AnyRec Screen Recorder on your desktop computer. First, open the desired location on Google Maps, then from the software interface, click the "Snapshot" button to activate the screenshot.
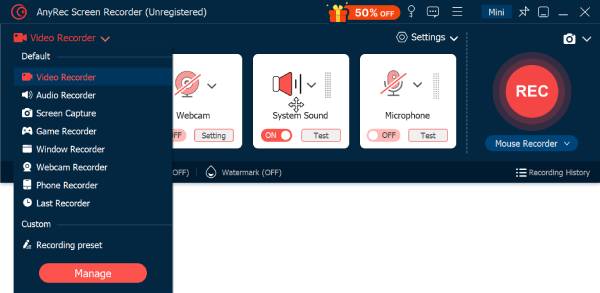
Step 2.Click and drag the mouse over the specific region to select the map area, or click the Google Maps window. After that, the screenshot gets done quickly.

Step 3.After everything, you can add annotations or any edits in the preview window. Then, click the "Save" button, select a file path to store your Google Maps screenshot.

Secure Download
Secure Download
Screenshot Google Maps with Windows Hotkeys
Taking a screenshot of Google Maps, especially those clear images, is necessary for trips, sharing locations, and saving routes for offline use. While the platform does not include a default button for saving an image, your Windows system has keyboard shortcuts to get the job done. With Windows hotkeys, you can capture specific regions without navigating through complex menus.
See the breakdown of steps to take Google Maps screenshots in Windows:
Step 1.Go to the specific area on Google Maps you want to capture and save. Make sure all labels are visible.
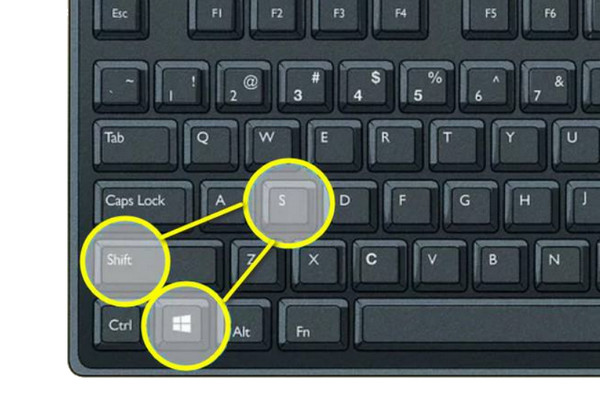
Step 2.Press the "Windows + Shift + S" keys to open the Snipping Tool overlay on your screen. There, pick the "Rectangular Snip" icon, then click and drag your mouse over the map area.
Step 3.Release the mouse button, and the image will be saved to your clipboard. From the notification on the right side, click on it to edit or save the file. Or "Paste" it directly into a chat.
Get Google Maps Screenshots with Browser Print Function
Beyond using standard screenshot tools to take a Google Maps screenshot, you can also take advantage of the browser's printing engine to create an image. This way of screenshotting is useful as it creates a clean layout that removes all tabs and search bars. By printing to a PDF, you can easily convert the map image into a high-resolution document that maintains scale and detail.
Here are the steps to get Google Maps screenshots with the browser Print function:
Step 1.Launch Google Maps in your browser. Navigate to the location you want to save, and then press the "Ctrl + P " keys to access the print settings dialogue box.
Step 2.Switch the "Destination" dropdown menu to "Save as PDF". Then, adjust the layout settings to "Landscape" if you wish to capture a large city or wide highway map.
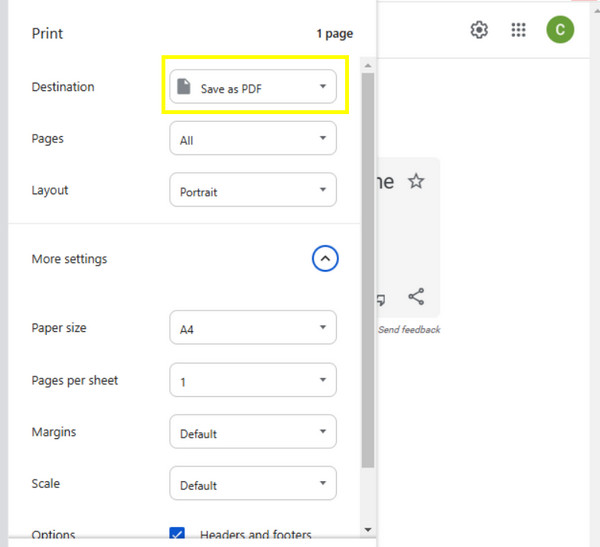
Step 3.Following that, click the "Save" button, and if you need a JPG or PNG format image, you can use a PDF-to-Image converter.
How to Capture Google Maps Screenshots on Mac
In addition to browser-based methods, you can screenshot on Google Maps on Mac using its default capture tool. Mac users can pick between capturing the entire desktop, an active window, or a defined portion of the map. All these captures are high-resolution, ensuring even that small street names and icons remain readable after saving. This Mac solution makes an ideal choice for users who need to add quick directions or arrows before sharing it.
Dive into the steps below to see how to capture Google Maps screenshots on Mac:
Step 1.Run the Google Maps app on Mac, and navigate to the location or saved route, then zoom in.
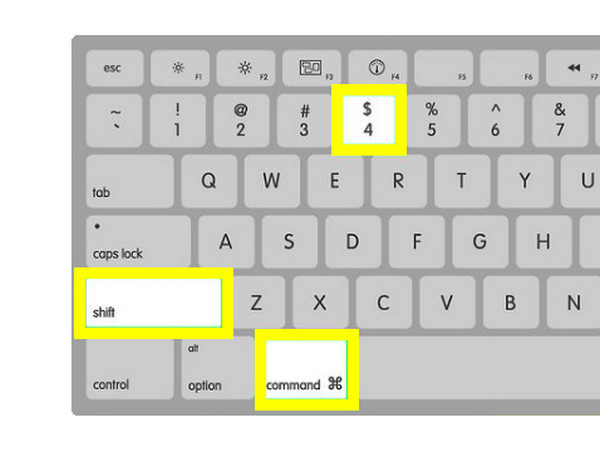
Step 2.On your keyboard, simply press the "Command + Shift + 4" keys, and your cursor will turn into a crosshair. Drag it across the area, then release to capture.
Step 3.Find the Google Maps screenshot automatically on your Desktop or by clicking the thumbnail to edit directly.
Default Methods for Google Maps Screenshots [iPhone/Android]
Finally, capturing Google Maps screenshot images on mobile devices is a necessity for travelers who may lose data connectivity. Luckily, both iPhone and Android devices use physical button combinations to snap a photo of whatever is on the screen. Once the map image is captured, it is quickly saved in your library for offline references anytime.
Your simple roadmap for iPhone and Android Google Maps screenshots is written below:
How to Take Google Maps Screenshots on iPhone
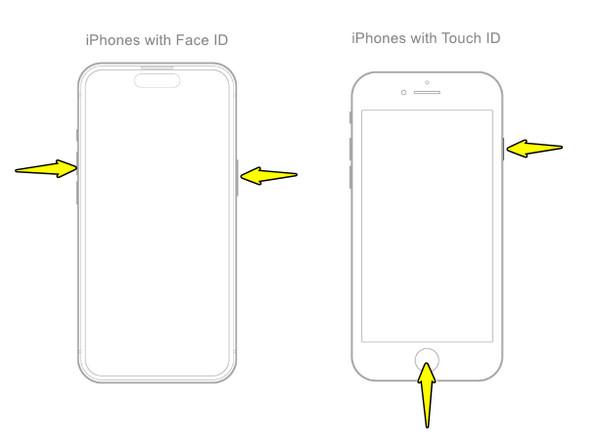
To make sure the steps are as clear as possible for iPhone users like you, it is helpful if you look at the specific buttons for each model. By following a certain sequence for your particular iPhone model, you can quickly capture a screenshot from Google Maps on iPhone for offline navigation.
Step 1.Open the Google Maps app and navigate to the specific area or directions you want to save.
Step 2.For iPhones with Face ID, press the "Power + Volume Up" buttons. Or, for iPhones with Touch ID, press the "Power + Home" buttons at once.
Step 3.Tap the thumbnail that shows up in the lower-left corner if you want to crop the map image. Or, go to the "Photos" app to access the captured iPhone screenshot.
How to Take Google Maps Screenshots on Android
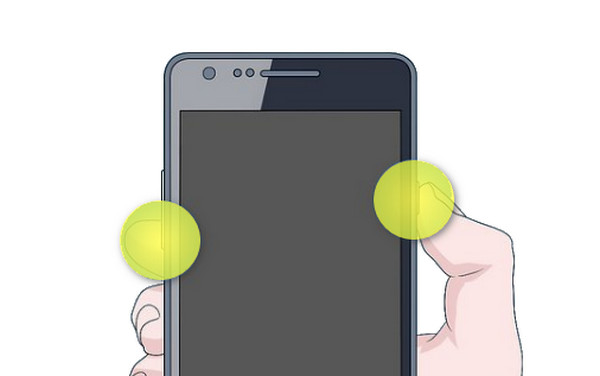
Next for Google's mobile platform, the steps for taking Google Maps Android screenshots remain largely standardized across several models, like Samsung. Most modern Android phones have physical shortcuts that make it easy for you to capture all necessary locations.
Step 1.Center the map on the certain area you wish to save. Then, press and hold the "Power" and "Volume Down" buttons at the same time.
Step 2.Once the screen flashes or a toolbar appears, the capture is successful. Swipe down from the top to see the notification to share the map quickly.
Step 3.Open your "Gallery" to view your saved map image.
Conclusion
Once you have mastered the various ways to take Google Maps screenshots, your location is always just a click away, regardless of your internet connection. From the quick hotkeys to the browser print function, each way here can help you in your specific purpose of capturing locations. Still looking for a more polished result without annoying notifications on your way? Use AnyRec Screen Recorder! Capture a high-resolution Google Maps screenshot here while enjoying its editing features, perfect for keeping your maps organized and your upcoming projects on track.
Secure Download
Secure Download
Related Article
About Our Author


