Hot
AnyRec Screen Recorder
Capture every moment. Record like a pro.
Secure Download
Where Do Screenshots Go on Windows 11/10/8/7: Complete Guide
Different screenshot tools have different location to save them on Windows, and here are 3 normal locations:
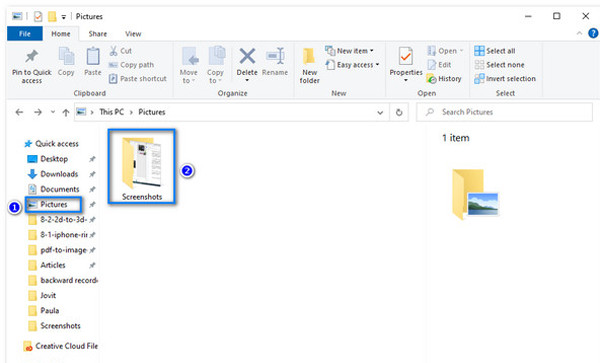
- 1. PrtSn+Win: Go to "This PC" > "Pictures" > "Screenshots".
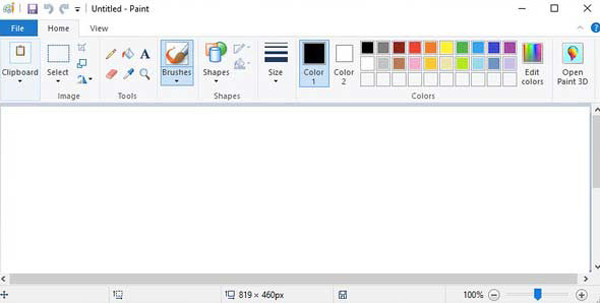
- 2. PrtSn: The screenshots will be saved in the clipboard, and you can copy them in "Paint" or other tools.
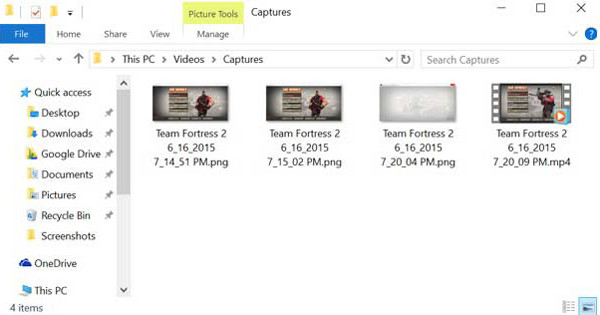
- 3. Game Bar: Find the screenshots in "This PC" > "Videos" > "Captures".
Secure Download
Secure Download
Where do screenshots go on Windows 11/10/8/7? Using the built-in tools to take screenshots has been a big help to keep track of your activities to share them with friends or help you take notes. It is very simple, and the screenshots will be saved automatically. But where to find the screenshots on your Windows? This article will provide a full guide to the location of screenshots on Windows. Moreover, you can learn how to change the location as you like.
Guide List
Where Do Windows Screenshots Go on Windows 11/10/8/7 How to Find and Change the Location of Windows Screenshots Best Alternative to Take Windows Screenshots and Manage Files FAQs about the Location of Windows ScreenshotsWhere Do Windows Screenshots Go on Windows 11/10/8/7
Normally, there are three ways to take screenshots on Windows, and the locations of Windows screenshots are different. So for that, read the following methods to take screenshots and find out where do screenshots go on Windows 11/10/8/7.
1. The Default Folder - Screenshots
Usually, when you press the "PrtScn" and "Windows" keys simultaneously, all your screenshots would be saved by default in the "Screenshots" folder. To find the folder, you can open the "C Drive Users folder". Click your username and then find the "Pictures" folder. Then open the "Screenshots" folder. This is where all your screenshots go and are stored.
You can also find the screenshots save on your Windows in the "Photos" app just by opening the "Album" app to easily access the them.
2. Clipboard to Save Screenshots in any locations
Pressing the "PrtSc" button on the keyboard is the default way to take screenshots on Windows 10/8/7. And the screenshot will go to the clipboard, then you have to paste it into an image editing program like "Paint" before saving it. After that, you can export and save the screenshots on any location on Windows as you like.
Further Reading
3. Game Bar Screenshots Location on Windows - Captures
Game Bar in Windows 10 is another convenient way to take a screenshot on Windows. To access it, just press the "Windows + G" keys and click the "Capture" button. Then the screenshots are automatically saved. Where do these screenshots go on Windows? Go to "This PC" and click "Videos "pane, and then open the "Captures folder" to see all the screenshots.
Further Reading
How to Find and Change the Location of Windows Screenshots
The time you have to look for the screenshots can be shortened if you change the default folder where the screenshots go. Moreover, since screenshots are saved in different locations according to the method you use for taking a screenshot, please follow the next steps to change and manage the location of Windows screenshots.
Step 1.Firstly, you need to create a new folder to save screenshots on Windows 11/10/8/7. Then you can rename it and move it to the desired location as you like.
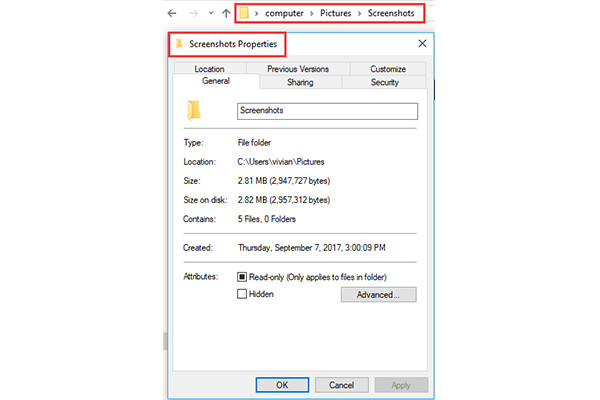
Step 2.After that, you should find the default "Screenshots" folder to save Windows screenshots in the "Pictures(“C:/Users/your_name/Pictures/Screenshots”)". Right-click on it and click the "Properties" button.
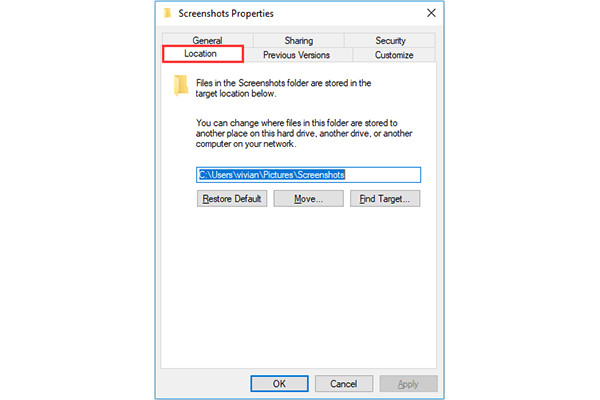
Step 3.Go to the "Location" tab and click the "Move" button to change where your screenshots go. Just save your changes by clicking the "Select Folder" button.
Step 4.Go back to the Properties and you will see that the location to save screenshots on Windows is changed, click the "Apply" or "OK" button. Click the "Yes" button to move and save all your files to the new folder.

Note: The moving might take a while depending on the number of your screenshots from the old location. After the moving is done, the old screenshots folder will disappear, and your new folder for the screenshots will be the default location for Windows screenshots. If you have other accounts on your computer, you need to repeat the procedure to the other accounts if you want to relocate and manage your files.
Best Alternative to Take Windows Screenshots and Manage Files
No need to find where do screenshots go on Windows, just rely on the best alternative - AnyRec Screen Recorder to take and manage screenshots easily. It is a powerful tool that has a lot of built-in features that can help you quickly capture screen with the desired area, add annotations to the screenshots, and more. You can also change the output format to JPG, PNG, and even GIF.

Take a screenshot with the full-screen or selected regions freely.
Have a set of drawing tools to edit the screenshots with shapes, lines, etc.
Enable you to change the location folder before saving your screenshots.
Customized hotkeys for you to capture screenshots easily at any time.
Secure Download
Secure Download
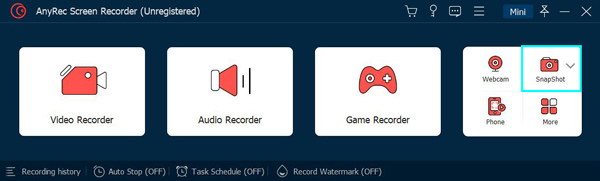
Step 1.Once downloaded, click the "Snapshot" option from the home interface. You can customize the way you want to capture your screen, including clicking a window or gliding your cursor through the screen.
Step 2.If you move your cursor, just left-click your mouse to confirm the screenshot. Once you have captured the screenshot, edit it with the widget menu that has painting tools. Changing the color and adding shapes and lines are available here.

Step 3.Then click the "Save" button and choose a desired folder to store your screenshots on Windows. In this way, you can change the location of Windows screenshots every time.

AnyRec Screen Recorder will crop screenshots on Windows and save them in the chosen folder as the default location. However, you can change it whenever you save another screenshot.
Watch: Where Windows Saves Your Screenshots
Can't find your screenshots? This video shows how to take scrolling screenshots on Windows and where to find the save location.

Secure Download
Secure Download
FAQs about the Location of Windows Screenshots
-
1. What if the PrtScn key is not working?
First, you need to stop OneDrive and other programs as they might take over the PrtScn without asking for your permission. Or if there is no way to salvage the PrtScn key, you can press "Windows + G" as an alternative for taking screenshots.
-
2. Can I still change the default screenshot folder on Windows?
Certainly yes, you can do this when you open the Paint app and you will be able to save your screenshot anywhere in your local file. Otherwise, you can also change the default location by right-clicking your mouse then going to the Properties and Location tab. Relocating how you save your file is without limit.
-
3. How to take screenshots through Game Bar?
Press Windows + G buttons on your keyboard, and the Game Bar will pop up. Click the "Capture" button to capture the full screen easily. And you can find the location of Windows screenshots on the "Captures" folder.
Conclusion
You never expected that even finding the screenshot and managing your files is kind of a difficult task to do. Thus, if you can't find the screenshot location on Windows, this article has helped you find where to find Windows screenshots and sort out your screenshots. This article also provides the best software AnyRec Screen Recorder to take and save the screenshots in the desired folder on Windows (as well as Surface Pro tablets). Questions or suggestions you have in mind? Contact us now!
Secure Download
Secure Download
Related Article
About Our Author