Hot
AnyRec Screen Recorder
Capture every moment. Record like a pro.
Secure Download
Know All about Snipping Tool Shortcuts on Windows 11/10/8/7
Knowing Windows Snipping Tool shortcuts will make your capture much easier. You don’t need to launch the app to take a screenshot. As a powerful built-in screenshot tool, Windows Snipping Tool enables you to effortlessly take screenshots of your sweet conversation, important information, favorite movies, and more by merely pressing on the keyboard. Thankfully, this page will teach you how to use the different Windows Snipping Tool shortcuts to edit, save, and choose different modes. Moreover, here are more alternatives for you to capture screen quickly.
Guide List
Introductions to the Snipping Tool Shortcuts on Windows 11/10/8/7 The Best Alternative Snipping Tool to Capture Screen on Windows FAQs about Windows Snipping Tool ShortcutsIntroductions to the Snipping Tool Shortcuts on Windows 11/10/8/7
Snipping Tool is a preinstalled screenshot application on Windows devices. It has the ability to capture screens in different screen sizes. Moreover, it supports various keyboard shortcuts to make capturing screens on Windows easier. If you want to utilize the snipping tool shortcuts on Windows 11/10/8/7 and be familiar with them, you can depend on the details below.
Since there is no short key to open Snipping Tool on Windows 11/10/8/7, you should click the "Start" button with the "Windows" icon to launch. Or you can press the "Windows" and "R" keys on your keyboard to open the Run program, and then enter the "Snipping Tool" program. After that, you can use the following Snipping Tool shortcuts now.
| Windows Snipping Tool Shortcuts | Functions |
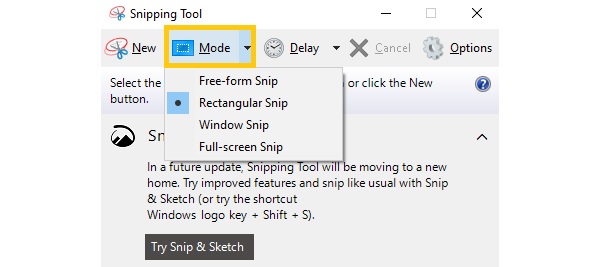
| 1. Alt + M | Allows you to select a snipping mode. You can choose Free-form Snip, Rectangular Snip, Window Snip, or Full-screen Snip. |
| 2. Alt + N | This keyboard shortcut will enable you to take a new snip with the last mode you selected. |
| 3. Esc | Press this on your keyboard if you want to cancel snipping. |
| 4. Alt + D | It will let you copy the screenshots to the clipboard. |
| 6. Ctrl + S | Press this key combination to save your snip immediately. |
| 7. Ctrl + E | This method will allow you to edit the captured screen on Paint 3D. With it, you can add effects and crop screenshots on Windows. |
| 8. Ctrl + P | This procedure will let you print your snap instantly. |
Bonus Tip: You can also use the key combination "Windows", "Shift", and "S" to take screenshots on Windows 11/10/8/7 if you do not want to open Snipping Tool. This snipping tool shortcut on Windows will allow you to capture your screen in Free-form Snip, Rectangular Snip, Window Snip, or Full-screen Snip.
The Best Alternative Snipping Tool to Capture Screen on Windows
Perhaps you are tired of Crtl + E - the Windows snipping tool shortcut for editing and want to edit your snaps immediately; you can download AnyRec Screen Recorder on your device. This tool will allow you to snap your screen and edit them instantly. You can add texts, drawings, lines, shapes, and more to your captured photos. Like the Windows snipping tool shortcut, it also has a keyboard shortcut that will make snipping easier. So, hurry up and download this trusted tool on your Windows 11/10/8/7 device.

Capture Windows screen in full screen or customized screen size freely.
Support keyboard shortcuts to snapshot and save screenshots quickly.
Able to export the screenshots in GIF, PNG, JPG, BMP, and TIFF.
Apply texts, lines, drawings, numbers, and more to your screenshots.
Secure Download
Secure Download
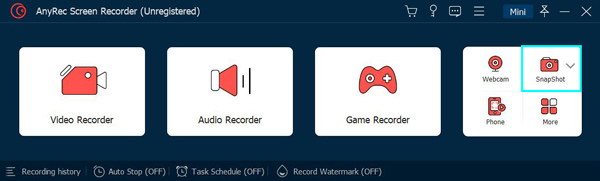
Step 1.Launch AnyRec Screen Recorder on your Windows 11/10/8/7 and click the "SnapShot" button. You can also use the snipping tool shortcut "Ctrl", "Alt", and "C" buttons.
Step 2.After that, you can point your mouse to the area you want to capture. Moreover, you can adjust the sides of the rectangular shape if you're changing the captured location.

Step 3.To edit the screenshots, you can apply drawings, texts, shapes, lines, numbers, arrows, and more. Finally, click the "Save" button on the right side to choose the desired folder.

FAQs about Windows Snipping Tool Shortcuts
-
1. What is the Windows Snipping Tool shortcut key?
The Windows snipping tool shortcut key is "Windows", "Shift", and "S". This method allows you to make use of the snipping tool without opening the application. You have the option to capture the screen in Free-form Snip, Rectangular Snip, Window Snip, or Full-screen Snip.
-
2. Can I use the shortcut key of Snipping Tool to capture partial screen?
Unfortunately, no. You can't use the Windows snipping tool shortcuts to select the desired mode to take screenshots. However, you can use the best alternative AnyRec Screen Recorder to capture any screen with hotkeys.
-
3. Where are my screenshots captured by snipping tool go?
Since there's no Windows snipping tool shortcut to save the screenshots, you need to click the Save button to choose the desired file folder. So, you can decide where to save the screenshots on Windows. By the way, the default storage path is the Capture file folder under the Picture menu.
Conclusion
There you have it! Surely by now, you know the different Snipping Tool shortcuts on Windows 11/10/8/7. Have you tried using them on your Windows device? If not, try them now and see if it will work on your end. And if you want software that will help you effortlessly take snaps on your Windows screen, don't hesitate to download the famous AnyRec Screen Recorder on your device. It is a screenshot and screen recorder tool that many users highly recommend. If you still have questions about capturing your screen, you can freely message us. We promise to respond as soon aswe receive your queries.
Secure Download
Secure Download
More Related Articles
About Our Author


