Hot
AnyRec Screen Recorder
Capture every moment. Record like a pro.
Secure Download
6 Ways to Screenshot on Surface Pro, Laptop, Go, and More
Do you need to screenshot on Surface laptops and tablets? There are multiple ways to do so on Microsoft Surface models. Check the following table to quickly find the suitable solution.
| Method | Works on | Pros | Cons |
| AnyRec Screen Recorder | All Surface models | Screenshot on Surface in scrolling, full, or custom region. | Need a license to use its editor. |
| Snipping Tool | All Surface models | Flexible screen capture options. | Need to save screenshots manually. |
| Power + Volume Up | Surface Pro, Go (tablet mode) | Free and quick to operate. | Need to save screenshots manually. |
| Windows + PrtScn | Surface laptop, Pro (with keyboard), Book | Take a full-screen screenshot instantly. | No screen selection. |
| Xbox Game Bar | All Surface models with Windows 10/11 | Good for game screenshots. | May slow down your device. |
| Surface Pen | Surface Pro, Go, Book (with Surface Pen) | Fast to screenshot. | You need to buy paired pen. |
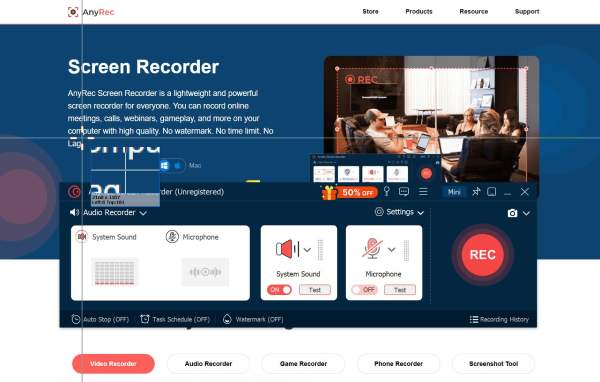
#1. AnyRec Screen Recorder
Best for: Full control screenshot and screen recording options on Windows and Mac.
You can use AnyRec Screen Recorder to screenshot the entire webpage, program window, full screen, and custom region on your computer. Moreover, you can annotate the screenshot with text, highlights, lines, arrows, and other shapes in custom sizes and colors. In short, it is your one-stop tool to take and edit screenshots on Surface.
1. Free download AnyRec Screen Recorder. Open it. Click the "Screen Capture" mode. To access all modes, you can click the dropdown arrow at the top left corner of the program.
Secure Download
Secure Download
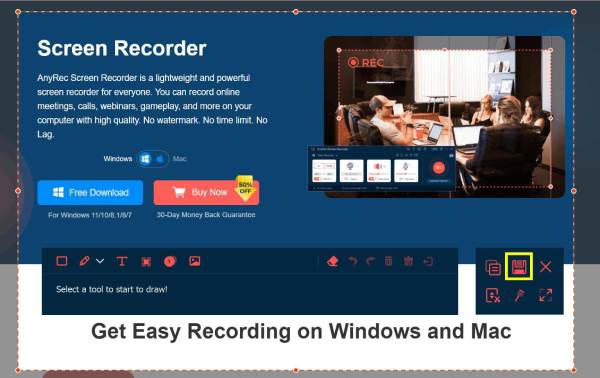
2. Drag with your left-click mouse to select which area you want to capture. When you release the mouse, you can see the captured image with annotation tools.
3. Here you can add text, rectangular, blur, and more to this screenshot. You can also save, share, or copy it to the clipboard directly.
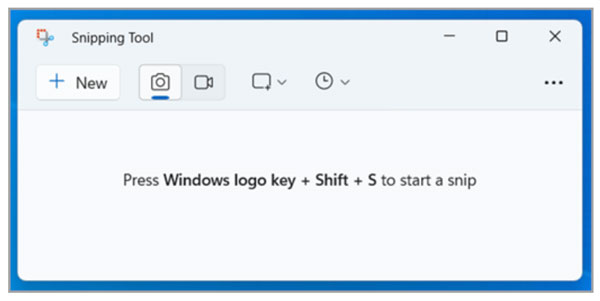
#2. Snipping Tool (Snip & Sketch)
Best for: Capture a part of screen or full screen on Surface Pro.
Snipping Tool is a pre-installed program you can refer to. Follow steps below to screenshot on Surface Pro with Snipping Tool.
- 1. Open Snipping Tool.
- 2. You can press Windows, Shift, and S keys on your keyboard simultaneously to start a snip.
- 3. Take a screenshot in freeform, rectangle, window, entire screen, or video snip.
- 4. The captured screenshot is copied to the Snipping Tool window automatically. You can make changes, save, or share it based on your need.
#3. Power + Volume Up Buttons
Best for: Take a screenshot on a Surface tablet and save it to the Screenshots folder by default. But it does not work on Surface Laptop, Studio, or Surface Book in laptop mode.
If you detach a keyboard from your Microsoft Surface Pro and Go tablet, you can use this screenshot shortcut. Just press two buttons at the same time.
- 1. Hold and press the Power and Volume Up keys simultaneously on your keyboard.
- 2. The screen flashes.
- 3. Go to the Pictures folder and then open the Screenshots folder to find it.
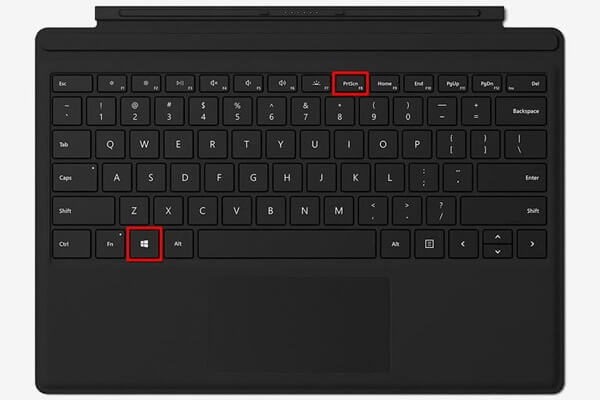
#4. Windows + PrtScn
Best for: Screenshot on a Surface in full screen (not selective).
It is another Surface screenshot shortcut combination you can try. Press the shortcuts and go to the Screenshots folder to find your picture. If you want to edit or annotate it, you need to use other photo editors.
- 1. Press the Windows and PrtScn keys simultaneously. (If there is no PrtScn key, you can use Fn and Space keys as an alternative.)
- 2. It takes a full-screen screenshot on Surface.
- 3. Go to the Pictures and then Screenshots folder to have a check.
#5. Xbox Game Bar
Best for: Takes screenshots on Surface games and apps. Suitable for Windows 10 and 11.
You can use Xbox Game Bar to screen record and screenshot gameplay and apps. But it cannot capture on desktop. And it requires system resources heavier than other programs. So check the system performance before trying it.
- 1. Open Xbox Game Bar. Or you can press Windows and G shortcuts to activate it.
- 2. Click the Screenshot button with the Camera icon. (One more alternative way: press Windows + Alt + PrtScn keys.)
- 3. Find your captured Surface screenshot in the Screenshots folder.
#6. Surface Pen Double-Click
Best for: No Surface Pro keyboard but have a Surface pen? You can take a screenshot of entire Surface screen or selected portion here.
The combination of a Surface Pen and Screen Sketch (Windows 10) lets users take screenshots on the Surface easily. You can send this screenshot to OneNote or Snip & Sketch for markup. However, if the pen battery is dead or disconnected, this method does not work.
- 1. Make sure your Surface Pen is connected properly.
- 2. Double-click the "Eraser" button on the top of your Surface Pen. So the Screen Sketch function is activated.
- 3. You can see a captured screenshot on your display.
- 4. Click the "Save as" button on the screen to edit and save the screenshot.
Conclusion
With those 6 solutions (screenshot software, buttons, keyboard shortcuts, built-in programs), you can take screenshots on Surface laptops, Pro, tablets, and new models flexibly. No matter which Microsoft Surface model you use, you can capture anything on the screen with the above steps. Just pick the one that meets your style. If you need to screenshot and record video/audio on Surface frequently, AnyRec Screen Recorder is a smart choice. It works best in easy and powerful recording routines. Click the Free Download button below to try now!
Secure Download
Secure Download
Related Article
About Our Author


