Hot
AnyRec Screen Recorder
Capture every moment. Record like a pro.
Secure Download
Windows 11 Snipping Tool Not Working? 6 Fixes That Work
You hit that familiar Print Screen key or Windows + Shift + S shortcut, but nothing happens. Where's the Windows 11 Snipping Tool? While this tool is a staple for productivity, the Windows 11 Snipping tool not working issue is possible due to major system conflicts. The good news is that you don't need to be techy to get screenshots again. From simple toggles to deeper resets, scroll down to fix Windows 11 Snipping Tool crashing with these 6 easy solutions.
Guide List
Fix 1. Update Windows 11 Fix 2. Adjust the Default App in Settings Fix 3. Try AnyRec Screen Recorder to Screenshot Fix 4. Restart Windows Explorer Fix 5. Disable Focus Assist Fix 6. Reset Snipping ToolFix 1. Update Windows 11
Keeping your system up to date is the most effective way to eliminate bugs that might be causing the Windows 11 Snipping Tool no longer working issue. Once you run an update, you are not just getting new features; you're ensuring that all system dependencies are working in harmony.
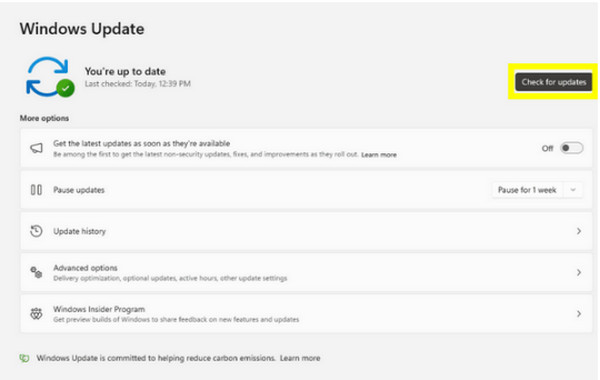
Step 1.Open "Settings" quickly by pressing the "Windows + I" keys. There, click on "Windows Update" at the bottom of the left-hand sidebar.
Step 2.Next, click the "Check for updates" button. Please wait for the system to scan for available patches.
Step 3.If there are updates found, click "Download & Install", then restart your PC.
Fix 2. Adjust the Default App in Settings
If you still have the Snipping Tool not working on Windows 11 problem after updating OS, it might lie in how Windows handles the Print Screen shortcut. Sometimes, it needs a manual adjustment in your accessibility settings, ensuring that every time you hit the shortcut, the system knows which app to trigger. (Solutions you may need to fix Print Screen not working.)
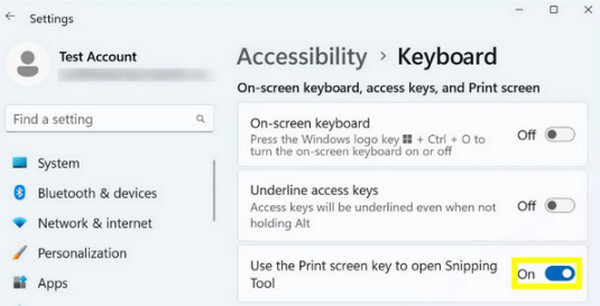
Step 1.Head to "Settings" and choose the "Accessibility" tab from the left menu.
Step 2.Scroll down until you locate the "Interaction" section; click on "Keyboard".
Step 3.Find the "Use the Print screen button to open screen snipping" option, and toggle the switch to ON.
Step 4.Now, exit the "Settings" and try pressing the "PrtScn" key to see if it works.
Fix 3. Try AnyRec Screen Recorder to Screenshot
In case you've grown tired of the Windows 11 Snipping Tool not working problem, it might be time to move toward a stable alternative. Relying on another tool provides a much smoother experience, like AnyRec Screen Recorder. Unlike basic utilities, this tool is made to handle high-resolution displays, whether you need a full-screen grab or a specific window capture. It also features a built-in editor that allows you to annotate your screenshots in real-time, perfect for quick tutorials and marking up documents. Since it functions as an independent app, it remains unaffected by the usual bugs that affect the Windows 11 Snipping Tool from working.

Quickly grab a full screenshot or choose a specific portion of your display.
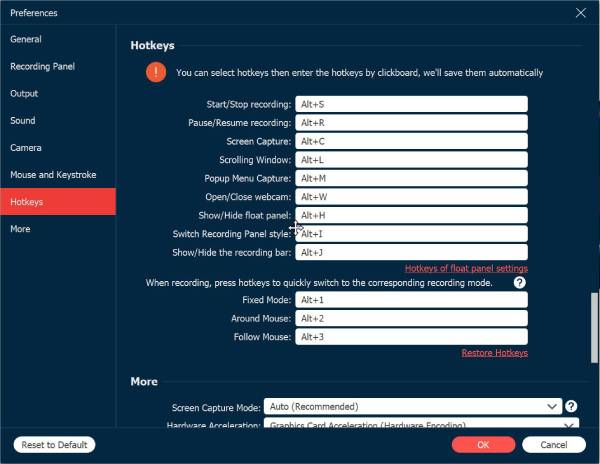
Set up your own keyboard shortcuts to trigger screenshots in instant.
Save images in stunning high definition and manually tweak the settings.
Versatile file exports including JPEG, PNG, BMP, and GIF.
Secure Download
Secure Download
Step 1.Start by launching AnyRec Screen Recorder and selecting the "Screen Capture" button from the main dashboard. You'll see your cursor change into a crosshair; simply click and drag to frame the exact area you want to save.
Otherwise, you can bypass it entirely by using the customized hotkeys to pull up the frame selector instantly.
Step 2.The moment you release the mouse, the software captures the region and opens the built-in editor. Here, polishes your screenshot by adding text, lines, callouts, and more.
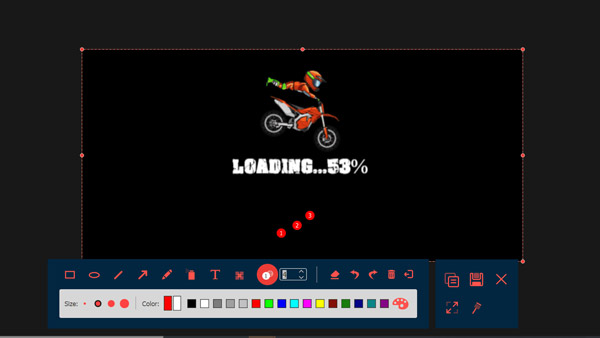
Step 3.When your edits are complete, click the "Save" button to finalize the process. Select your preferred folder and the best file format for your needs, e.g., PNG or JPEG.
Secure Download
Secure Download
Fix 4. Restart Windows Explorer
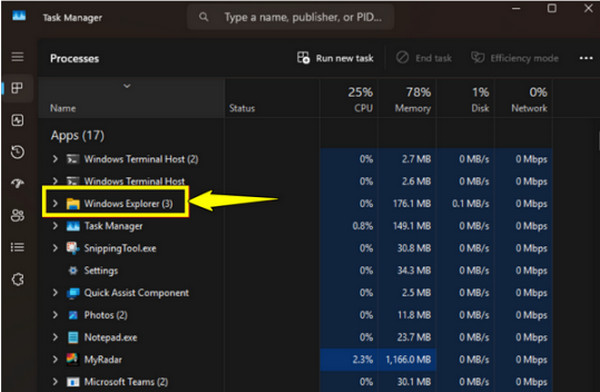
Suppose you prefer to stick with the built-in solution for the Windows 11 Snipping Tool not working issue. A quick refresh of the system's interface might be all that's needed, and Windows Explorer controls much of what you see on your desktop. Sometimes, this process becomes stuck, stopping new windows from launching correctly over your active apps.
Step 1.Right-click the "Start" button and pick "Task Manager" or press "Ctrl + Shift + Esc" keys.
Step 2.Then, under the "Processes" tab, locate "Windows Explorer".
Step 3.Afterward, right-click on the "Windows Explorer" app and choose "Restart". Your taskbar will then disappear for a moment and then reappear.
Step 4.Try accessing the Snipping Tool again.
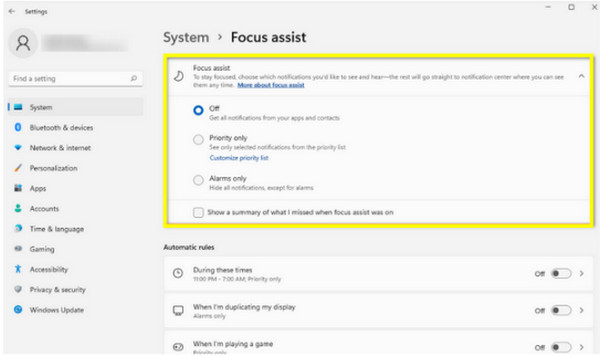
Fix 5. Disable Focus Assist
Beyond visual glitches, your system's notification settings may be the one blocking the screenshot tool, leaving you with the Windows 11 Snipping Tool not working. If your screen dims but no screenshot tool shows up, it is a strong sign that your focus settings are preventing the capture overlay.
Step 1.Launch the "Settings" app and navigate from "System" to "Focus", and select the "Off" radio button. If a session is running, click the "Stop focus session" button.
Step 2.Then, head to "System" and click "Notifications"; make sure the "Do not disturb" is turned off.
Step 3.Attempt to screenshot to see if the overlay displays properly.
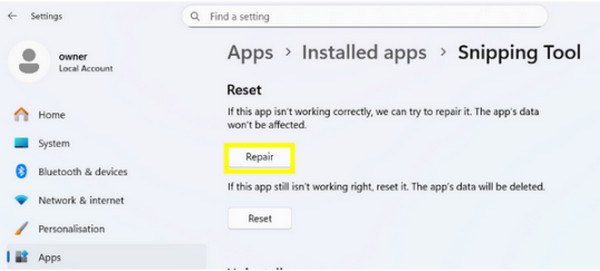
Fix 6. Reset Snipping Tool
When everything fails, and the screenshot tool appears to be corrupted, performing a factory reset to fix the Windows 11 Snipping Tool not working issue is the last logical step. It is a more direct approach than a system update, targeting a certain file linked only with the capture utility.
Step 1.Run "Settings", go to "Apps", click on "Installed apps", and search for "Snipping Tool". Click the "three dots" beside the app name and choose "Advanced options".
Step 2.Scroll down and click "Repair" to try to fix the app without data loss.
Step 3.If that does not work, click the "Reset" button to completely refresh the app's state.
Conclusion
The Snipping Tool doesn't work on Windows 11 is a frustrating hurdle, but it is not a permanent problem. Thanks to the six steps, starting with simple updates and then app repairs, you can pinpoint the conflict and get back to screen capturing. But if the system tools are becoming too inconsistent for you, time to look at AnyRec Screen Recorder. This screen recording software provides a solid solution for all your screenshots and recording needs, ensuring that a system bug or glitch never stands between you and your task again.
Secure Download
Secure Download
More Related Articles
About Our Author