Hot
AnyRec Screen Recorder
Capture every moment. Record like a pro.
Secure Download
How to Screenshot on ASUS Laptop: 5 Ways & Troubleshooting
Taking screenshots on ASUS laptop is crucial for capturing meaningful conversations, saving information, or sharing what's on screen quickly. Luckily, ASUS laptops have multiple built-in tools and shortcuts that make capturing so simple. From the entire display and scrolling to game screenshots, the following parts include five easy ways to screenshot on an ASUS laptop. Also, it explains how to fix the ASUS screenshot not working issue.
Guide List
How to Take a Scrolling Screenshot on ASUS Laptop How to Screenshot on ASUS Laptop with the Print Screen (PrtSc) Key How to Take a Screenshot on ASUS Laptop with Snipping Tool How to Take Game Screenshots on ASUS Laptop with Xbox Game Bar How to Capture Screenshots on ASUS Laptop with an On-Screen Keyboard Troubleshoot ASUS Screenshot Not WorkingHow to Take a Scrolling Screenshot on ASUS Laptop
Capturing long web pages or extended documents on ASUS laptop is effortless when using AnyRec Screen Recorder. While the program is best known for its powerful screen recording features, it is also an impressive Snapshot tool that is capable of taking scrolling screenshots on ASUS laptops. Using it, you can grab full pages, long chat threads, or any vertically lengthy content without combining images manually. Even better, the process is very straightforward and is perfect for students, professionals, and anyone who needs to save lengthy information in one clean image.

Screen capture on ASUS laptops in long, full, and custom areas.
Allows you to take screenshots while screen recording without quality loss.
Set custom shortcuts to screenshot on webpages and videos.
Saved images come without any watermarks, keeping your final image clean.
Secure Download
Secure Download
Step 1.Open AnyRec Screen Recorder and then from the "Video Recorder" screen, click the "Split" button of the "Camera" icon, then select "Scrolling Window" from the list.
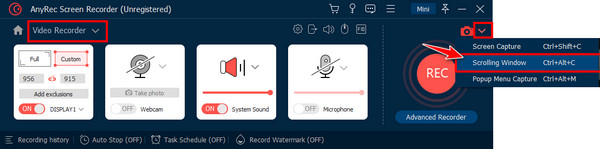
Make sure the page or window you wish to capture is already open. If not, you can activate the capture tool quickly by pressing the "Alt + C" keys inside the desired window.
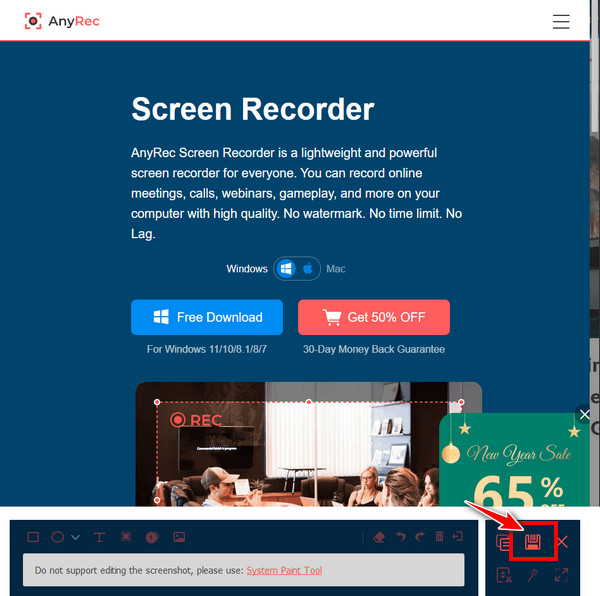
Step 2.A long screenshot is captured immediately. The "Preview" window shows. Here, you can annotate your screenshot with drawing tools to highlight and label important sections.
Step 3.Once you're satisfied with your edits, click the "Save" button. Pick a destination folder and select your desired image format, then click the "Save" button again to store the scrolling screenshot on your ASUS laptop.
Secure Download
Secure Download
How to Screenshot on ASUS Laptop with the Print Screen (PrtSc) Key
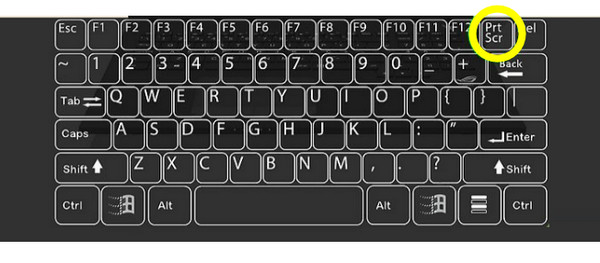
One of the fastest and most convenient ways to capture screenshots on an ASUS laptop is by using the Print Screen key, which may be labeled differently as PrtSc, PrtScn, or others. This key works smoothly with Windows' built-in screenshot functions, letting you capture the entire display, an active window, etc.
Here's a complete table showing all the Print Screen key-based shortcuts on an ASUS laptop. So you can snap screenshots on ASUS via hotkeys.
| Print Screen Shortcut | What It Captures |
| PrtSc | Entire screen capture and copies to the clipboard automatically. |
| Fn + PrtSc | Entire screen capture on some ASUS models and copies to clipboard automatically. |
| Alt + PrtSc | Active window capture and copies to clipboard automatically. |
| Fn + Alt + PrtSc | Active window on some ASUS models and copies to clipboard automatically. |
| Windows + PrtSc | Entire screen and saved in the "Pictures" folder, then "Screenshots". |
How to Take a Screenshot on ASUS Laptop with Snipping Tool
If you want to screenshot on ASUS laptop without Print Screen, you can use Snipping Tool. It is a pre-installed Windows screenshot capture software for all Windows 11/10 users. With its several capture modes, Snipping Tool is a flexible option for everyday use.
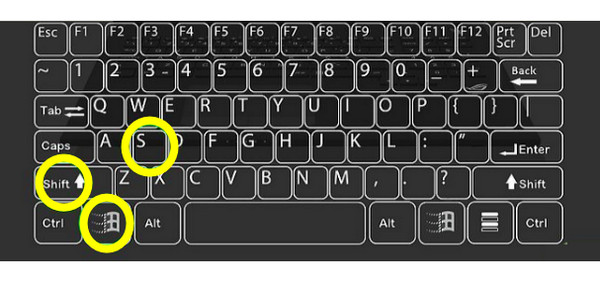
Step 1.Press the "Windows + Shift + S" keys to access the Snipping Tool overlay quickly. Then, choose a snip mode: Rectangular, Freeform, Window, or Fullscreen.
Step 2.Support you choose "Rectangular", drag your cursor to select the area. Once done, a preview appears in the corner; click on it to open the Snipping Tool.
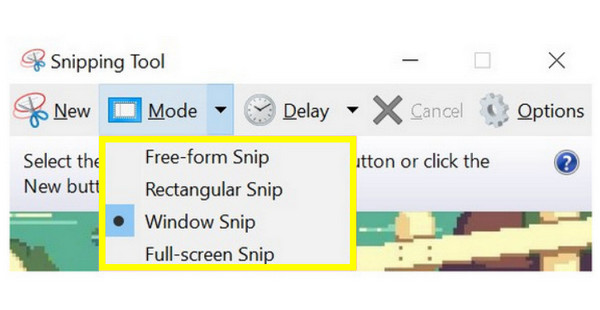
Step 3.From there, edit, annotate, or highlight the captured image as needed. Later, click the "Save" button, choose your folder, and save your screenshot.
How to Take Game Screenshots on ASUS Laptop with Xbox Game Bar
Moving on to gaming solutions, especially ASUS ROG, TUF Gaming, and ProArt StudioBook models, you can screenshot on ASUS laptop without interrupting gameplay using the Xbox Game Bar. This tool works even when games are running in full-screen or borderless mode, so you never miss a moment.
Step 1.Start your game on your ASUS laptop, then press the "Windows + G" keys to open the Xbox Game Bar overlay. Click the "Camera" button in the panel for a quick screenshot.

Step 2.After that, your screenshot is saved to the "Videos" then "Captures" folder.
Step 3.Open the "Gallery" widget to see your captured image. You can then share or edit directly from the Game Bar as needed.
How to Capture Screenshots on ASUS Laptop with an On-Screen Keyboard
As another practical method, when your physical PrintScreen key is malfunctioning, the On-Screen Keyboard is an alternative way to screenshot on ASUS laptop. This virtual keyboard replicates all standard keys, letting you take screenshots on ASUS without the hardware keys. It also works conveniently for touchscreen ASUS models such as VivoBook Flip or ZenBook Flip.
Step 1.Press the "Windows + Ctrl + O" keys to enable the On-Screen Keyboard. When the OSK appears, locate the Print Screen key.
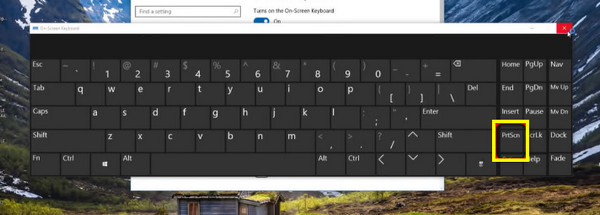
Step 2.Select the capture area, and click the "PrtScn" key on the OSK to capture the whole screen.
Step 3.Next, open any image editor, then press "Ctrl + V" keys to paste your screenshot.
Step 4.Edit and save the image to your desired location.
Troubleshoot ASUS Screenshot Not Working
Do you encounter the screen capture (FN+F6) on ASUS laptop not working problem? Don't worry, you can use quick troubleshooting methods to fix ASUS laptop screenshot keys not working, not saving anywhere, or sudden black screenshots easily.
| Issue | Quick Solution |
| Print Screen key not responding | Try pressing "Fn + PrtScn" or disabling apps like Dropbox or OneDrive that use the Print Screen key. |
| Screenshot is not saving | Check "Pictures" then "Screenshots or Videos" then "Captures", or check OneDrive settings; reset Xbox Game Bar. |
| Snipping Tool is not opening | Update Windows; restart Snipping Tool or try using the "Windows + Shift + S" shortcut. |
| On-Screen Keyboard not working | Restart the Windows Explorer; clear clipboard using "Windows + V" keys, then select "Clear". |
| Black screenshot | Use the "Windows + Alt + PrtScn" keys via Xbox Game bar; disable hardware acceleration in browsers or update drivers. |
Conclusion
Taking screenshots on ASUS laptop is incredibly versatile, thanks to various built-in tools and shortcuts available. From the Print Screen key, Snipping Tool, to OSK, each way here is convenient to capture everything on your screen. All these options save information and share content across scenarios like gaming or working on important tasks. However, if any of these built-in methods fail or if you need scrolling screenshots, use AnyRec Screen Recorder. This tool is more flexible and a powerful screenshot solution, offering smooth scrolling capture and advanced editing tools that elevate your ASUS screenshot workflow.
Secure Download
Secure Download
Related Article
About Our Author


