Hot
AnyRec Screen Recorder
Capture every moment. Record like a pro.
Secure Download
Screenshot on Mac Not Working? 5 Fixes and 6 Reasons
Whether you're saving crucial information, capturing images for presentation, or documenting an issue, having a problem of screenshot on Mac not working can disrupt your workflow. Thankfully, you can know why and how to fix macOS screenshot problems in this guide. Begin now!
Guide List
Possible Reasons Caused Mac Screenshots Not to Work A Reliable Alternative to Taking Screenshots on Mac 5 Built-in Methods to Fix Mac Screenshot Not Working Tips for High Quality Screenshots on MacPossible Reasons Caused Mac Screenshots Not to Work
Why is my screenshot on Mac not working? When your Mac suddenly can't take screenshots, it can be confusing and inconvenient at the same time. Understanding what might be causing the issue is the first step toward fixing it with no hassle. See below for the most common reasons that prevent screenshots from working correctly on a Mac.
- • Incorrect Keyboard Shortcuts. Your Mac screenshot shortcuts may have been disabled or changed.
- • Full or Restricted Storage. If your Mac's storage is nearly full, screenshots won't be saved.
- • Disabled Screenshot Settings. In macOS settings, the screenshot options may be turned off.
- • App Permissions Blocking Screenshots. Some apps restrict screenshot actions for privacy.
- • Conflicts with Some Apps. Security apps or recording tools might interfere with the screenshot shortcut.
- • Temporary macOS Glitches. System bugs and outdated macOS versions may affect the screenshot function.
A Reliable Alternative to Taking Screenshots on Mac
AnyRec Screen Recorder can be your best Mac Screenshot Toolbar alternative. While it is known for its recording features, this program also has a precise screenshot utility that works flawlessly on macOS. After capturing, a built-in editor appears where you can annotate your screenshots using text, arrows, highlights, and more. Plus, this alternative, when screenshot on Mac is not working, ensures a smooth compatibility with various projects, supporting popular formats like PNG, JPG, GIF, and more.

Capture your full Mac screen or any custom portion effortlessly.
Create personalized hotkeys to take screenshots instantly.
Save screenshots in high resolution with adjustable output settings.
Export images in formats such as PNG, JPG, BMP, or GIF.
Secure Download
Secure Download
Step 1.Open AnyRec Screen Recorder on your Mac. From the main dashboard, select "Screen Capture" to activate the screenshot function. Your cursor will then change into a crosshair. Please click and drag it to the area you want to capture.
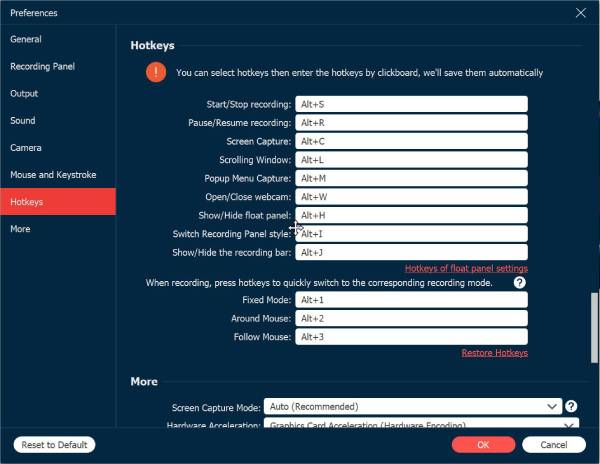
You can also launch the screenshot tool quickly using your custom hotkey. To see the hotkey, just go to "Settings", and then click "Hotkeys".
Step 2.After choosing the area, the screenshot will be taken immediately. Choose text, lines, arrows, or highlights from the toolbar to enhance your image.

Step 3.When you're done editing, click the "Save" button (Floppy Disk icon) to store your image on your Mac. Pick the folder and file format you like, and your high-quality Mac screenshot is ready.
5 Built-in Methods to Fix Mac Screenshot Not Working
When you're having screenshot not working or saving on Mac issues suddenly, you can try the built-in tools and settings first. These solution addresses common issues like conflicting apps, outdated settings, and many more. See below the five reliable built-in methods you can try to restore the Mac screenshot function. So, you can take, copy and paste screenshots on Mac again.
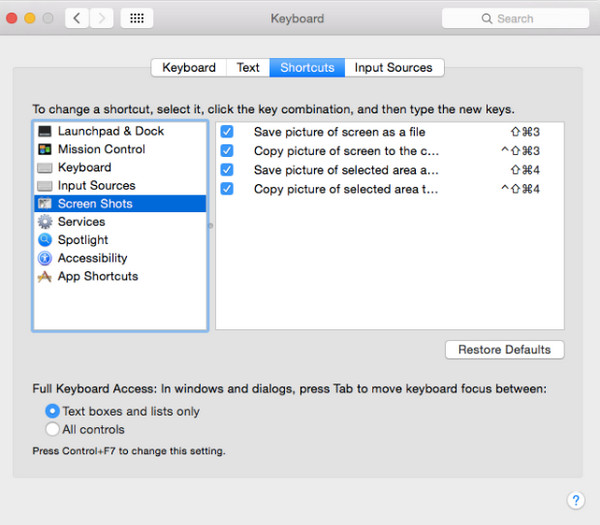
Method 1. Check Screenshot Shortcut Settings
- 1. Open "System Settings", then head to "Keyboard".
- 2. There, select "Keyboard Shortcuts", click "Screenshots" on the left panel.
- 3. Check the shortcuts, e.g., Shift + Command + 3 is enabled.
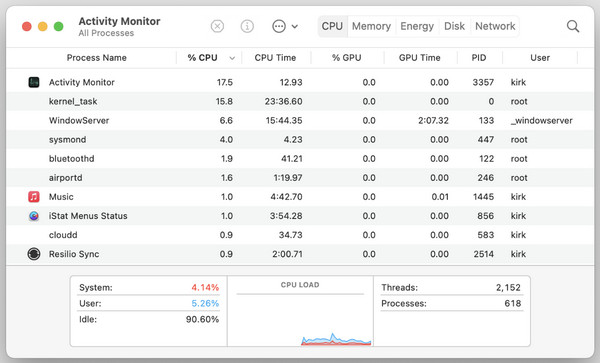
Method 2. Restart the Screenshot Tool
- 1. Open Spotlight using the "Command + Space" keys.
- 2. Type "Activity Monitor" and open it.
- 3. Next, search for "SystemUIServer" in the process list, select it, and click the "Close" button.
Method 3. Ensure the Screenshot Saving Location is Valid
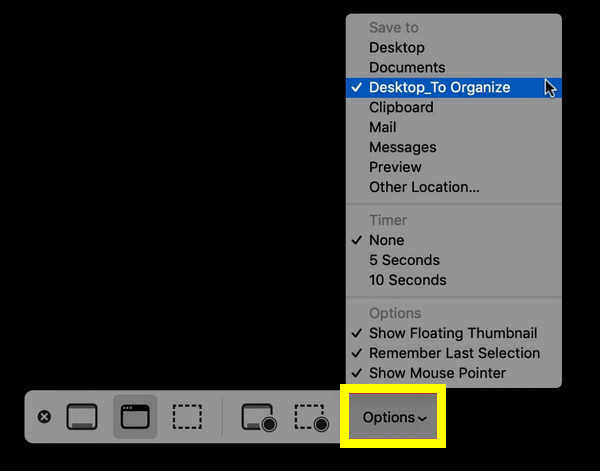
- 1. Press the "Shift + Command + 5" keys to access the screenshot toolbar, then click "Options".
- 2. From the "Save to", select another location folder like "Desktop" or "Documents".
- 3. Try to take a screenshot now to check.
Method 4. Check App Permissions for Recording
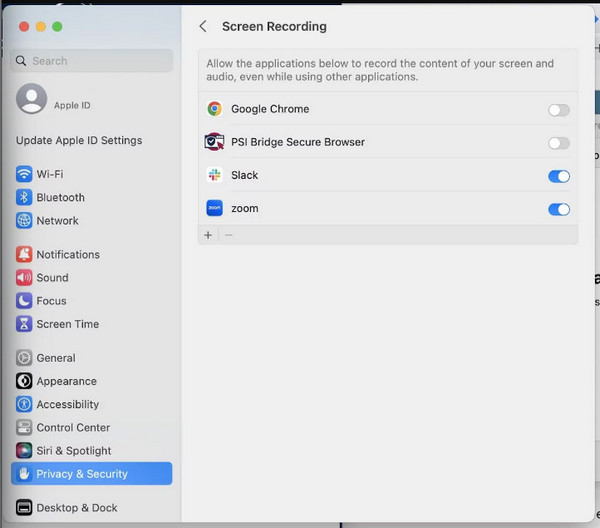
- 1. Go to "System Settings", select "Privacy & Security", then click "Screen Recording".
- 2. From there, make sure "Screenshot", "Finder", and other required apps are allowed.
- 3. Please restart your Mac after.
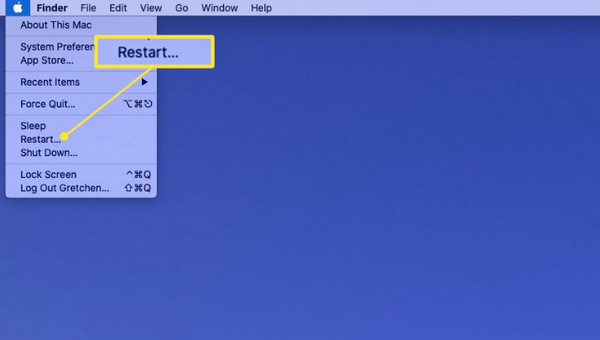
Method 5. Restart Your Mac
- 1. Click the "Apple menu" above, then select "Restart".
- 2. After that, try to take a screenshot on your Mac using the shortcuts.
Tips for High Quality Screenshots on Mac
After all those reasons and fixes for your screenshot on Mac not working, you may want to know how to get a sharp, professional-looking screenshot on your Mac. Before ending this post, check out the following tips for high-quality screenshots on Mac.
- • Capture a Screenshot in Full Resolution. Always capture your screen on your device's naive resolution; keep the display at its full resolution and avoid zooming in.
- • Keep Brightness Consistent. Higher brightness will result in clearer screenshots, especially when the content has color-rich elements.
- • Use macOS Shortcuts. Instead of cropping the images later, use the built-in screenshots like Shift + Command + 3 (full-screen), Shift + Command + 4 (selected area), and Shift + Command + 4 + Space (window capture).
- • Clean Up the Desktop Before Capturing. A desktop screen free from clutter will make your screenshots look more polished.
- • Disable Night Shift/True Tone. Since these two adjust the screen to warmer tones, they may distort the color accuracy of your screenshots.
- • Preview and Edit with the Built-in Tools. Don't forget to use the preview or markup tools to make quick enhancements before saving your Mac screenshots.
- • Save the Image in PNG Format. For a clear and detailed image, save your screenshots in PNG format.
Conclusion
When you rely on the Mac built-in tools and settings, the problem of can't take screenshots on Mac won't trouble you too much. Whether the problem starts from disabled shortcuts or a system glitch, the simple five methods mentioned can help you restore the screenshot functionality. If the Mac screenshot not working problem still exist, try AnyRec Screen Recorder! This alternative delivers precise results, customizable hotkeys, and built-in editing options, making it a dependable friend whenever your Mac cannot take screenshots.
Secure Download
Secure Download
Related Article
About Our Author


