Screenshot on Lenovo Guide: 4 Ways to Capture Your Screen
Capturing a Lenovo screenshot is a crucial skill for anyone who needs it for school, work, or personal use. With screenshots, you can save images, use them in tutorials, or share information quickly. Fortunately, Lenovo devices running Windows have multiple ways to capture your screen. This post shares with you the four easy ways to screenshot on Lenovo, from shortcuts to capture software. Quickly grab your screen efficiently today!
Guide List
How to Screenshot with Lenovo Limited Shortcut Use Windows Snipping Tool to Screenshot on Lenovo Screenshot on Lenovo with Powerful Recorder How to Take Screenshots with a Browser Plug-inHow to Screenshot with Lenovo Limited Shortcut
For Lenovo laptop users, one of the quickest ways to take a screenshot is by using the keyboard shortcuts. These shortcuts in Windows are convenient and don't need any extra tools, making them perfect for quick captures of your entire screen or a specific window. Depending on your device model, you can take screenshots on Lenovo using the Print Screen key, or some may need the Function key to screenshot.
See below the detailed steps to screenshot on Lenovo laptop or desktop:
Step 1. To capture the full screen of your Lenovo device, press the "PrtScn" key (or "Fn" + "PrtScn" on some models).
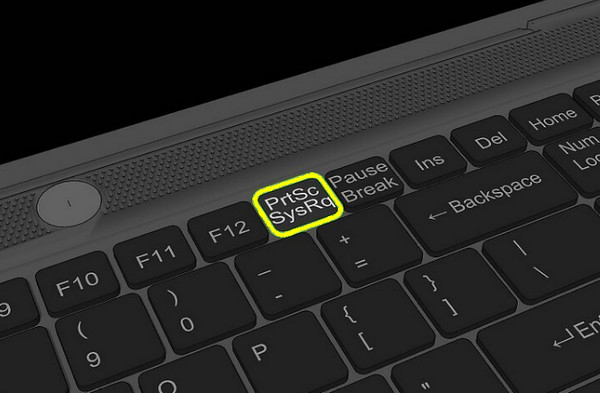
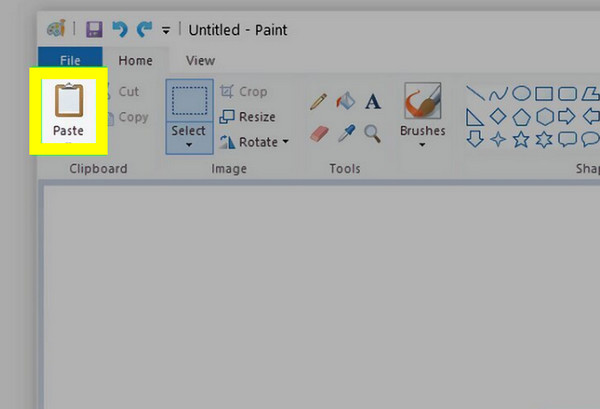
Step 2. The screenshot will be copied to your clipboard. You can paste it into image editing apps like Paint, Word, etc.
If you wish to save the screenshot automatically, you can press the "Windows + PrtScn" keys instead. Or, to screenshot the active window only, press the "Alt + PrtScn" keys, and paste it.
Use Windows Snipping Tool to Screenshot on Lenovo
If you prefer more freedom over what you take Lenovo screenshots, use the Snipping Tool. This Windows built-in feature allows you to take custom screenshots of areas of your choice, like windows, specific regions, or even the whole screen. Afterward, you can even highlight and annotate parts of the image before saving.
So, if you have a Lenovo laptop running Windows 10 or later, see below the steps on how to screenshot on Lenovo Windows 11/10 using the Windows Snipping Tool:
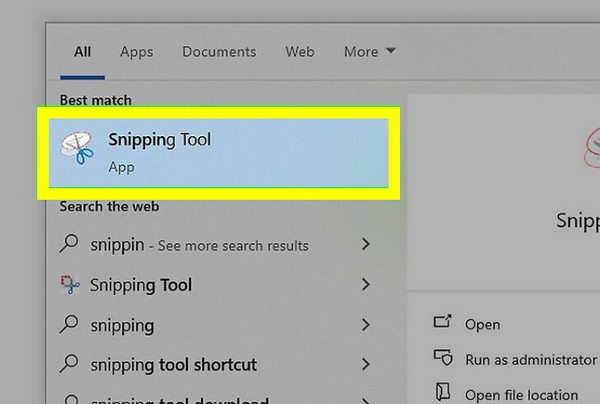
Step 1. Go to the "Start menu" button and type "Snipping Tool" in the search bar and select it from the results. In the window, click the "New" button to begin capturing.
Step 2. Select a snip mode, like Rectangular, Window, Free-form, or Full-screen. Drag your mouse over the area you wish to capture.
Step 3. Once the captured image appears in the editor, you can draw, highlight, or crop it. Click the "Save" button to save the image to your preferred folder.
Screenshot on Lenovo with Powerful Recorder
AnyRec Screen Recorder can be your best screenshot software for Lenovo. You can screenshot the entire screen, custom region, program window, or scrolling webpages within the program. What makes it even better is its built-in editor, letting you annotate screenshots with text, arrows, highlights, and more right after capturing them. Also, it enables you to save images in popular formats like PNG, JPEG, GIF, etc., ensuring compatibility for all types of your projects. This tool indeed has the best combination of flexibility, speed, and precision for every Lenovo user.

Can take a screenshot of the full screen or a selected area on your Lenovo device.
Save images in high resolution and adjust settings as needed.
Has customizable hotkeys to take screenshots instantly.
Export screenshots in several formats like JPEG, PNG, BMP, or GIF.
Secure Download
Secure Download
Step 1. Launch AnyRec Screen Recorder on your Lenovo computer. On the main menu, click the "Screen Capture" button to open the screenshot tool. Your mouse pointer will transform into a crosshair, letting you click and drag to choose the exact area you wish to capture.
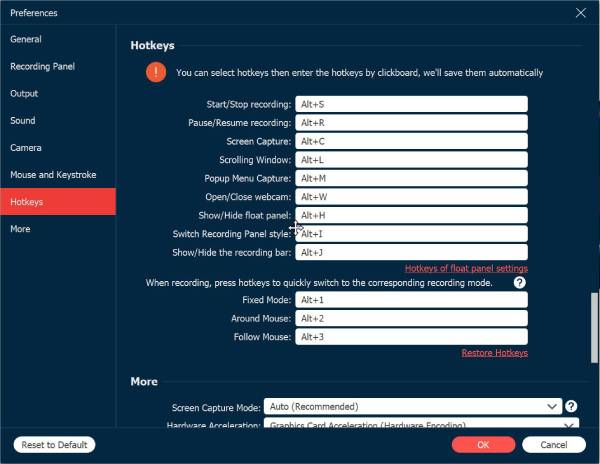
Alternatively, you can quickly activate the screenshot tool with the custom keyboard shortcut. You can see this in "Settings", then the "Hotkeys" section.
Step 2. Once you select the area, the screenshot will be taken instantly. The built-in editor will open to allow you to add text, shapes, arrows, or highlights to your images.

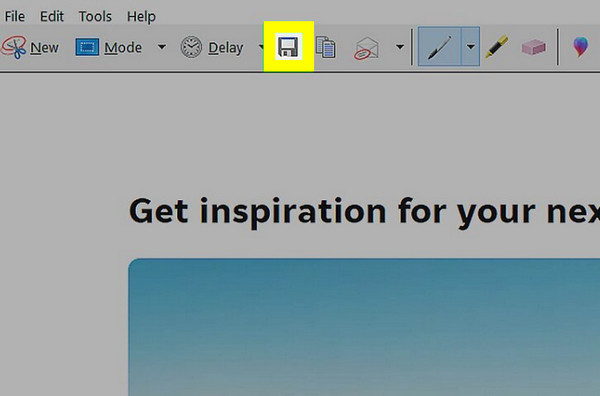
Step 3. After editing, click the "Save" button (Floppy Disk icon) to store your screenshot on Lenovo computer or laptop. Choose your save location and desired format. And that's it! You have captured a high-quality Lenovo screenshot.
Secure Download
Secure Download
How to Take Screenshots with a Browser Plug-in
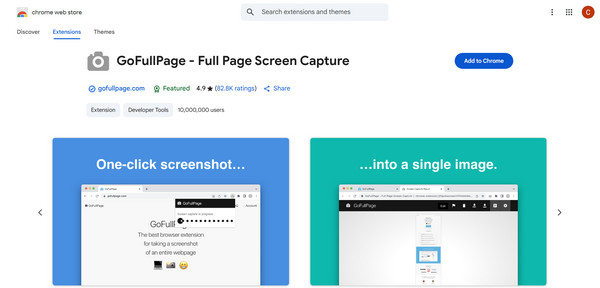
To take screenshots on Lenovo directly from a web page, using a browser plug-in can help. You can rely on GoFullPage for Chrome, which lets you screenshot the entire webpage, even the parts that are not visible on your screen, which is helpful for full articles or long chats. This plug-in also has simple options to edit, crop, or download your screenshots in various formats, e.g., PNG, JPG, or PDF.
Step 1. Open the "Chrome Web Store" on your Google Chrome browser. Search for "GoFullPage - Full Page Screen Capture", then click the "Add to Chrome" button.
Step 2. Next, navigate to the webpage you wish to capture. Click the "GoFullPage" icon in the above toolbar, and the tool will automatically scroll through and screenshot the page.
Step 3. Once it is ready, it will open in a new tab to crop, edit. Or you can download the webpage as an image or PDF file. Select your desired format, and save the screenshot to your Lenovo device.
Conclusion
You've seen here today all the easy and effective methods to take a screenshot on a Lenovo laptop or desktop. Whether you use the keyboard shortcuts, the Snipping Tool, or a browser plug-in, capturing your Lenovo screen can be quick, simple, and convenient. Each tool has its strengths and makes full-page, selected area captures so easy. But if you want even more flexibility and professional-grade results, AnyRec Screen Recorder is an excellent choice. It lets you capture any part of your screen effortlessly. You may need it for tutorials, presentations, or reports; this tool will still serve, making it ideal for Lenovo users who want the best results.
Secure Download
Secure Download


