How to Take a Screenshot on Toshiba Laptop [Windows 11]
How to take a screenshot on a Toshiba laptop? This question may bother you a lot especially if you update from Windows 10 to 11. Some trivial changes occur, and screenshot skills are very important when you are trying to capture valuable messages on your Toshiba laptop. But no need to worry anymore since this post will give you detailed steps on how to screenshot on Toshiba with 3 quick methods. And you may also add some notes or blur private messages while taking screenshots with the first method below.
Guide List
Screenshot on Toshiba with Illustrative Notes Take a Screenshot on Toshiba via Built-in Features FAQs about Screenshot on ToshibaScreenshot on Toshiba with Illustrative Note
No matter you are taking a screenshot on a Toshiba laptop or any other laptop, a good screen-capture app can always help you out. As one of the best screenshot apps, the AnyRec Screen Recorder can save you from cropping the images after capturing the screen. Meanwhile, your privacy is well protected with the blurring tool in this app and the quick shortcut keys enable you to activate the screenshot on Toshiba in just a second.

Customize capturing area on your screen.
Offer several editing tools after taking the screenshot.
Capture both the audio and picture on your device.
Take a long complete screenshot of a document easily.
Secure Download
Secure Download
How to Take a Screenshot on Toshiba Laptop with Screen Recorder
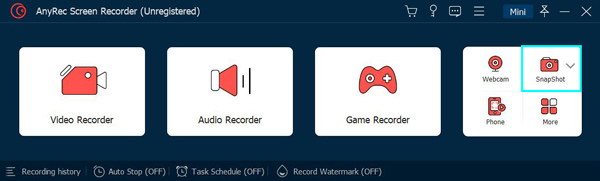
Step 1.Get a free download and installation of the program. Launch it on your Toshiba laptop and click the "SnapShot" button to choose a screenshot mode. Or your can press the "Ctrl, Shift, and C" keys to capture.
Step 2.Then, use the pop-up cursor and move your mouse to select the area you want to capture on the screen. After selecting, you can also move the area to make sure the information you want is all in it.
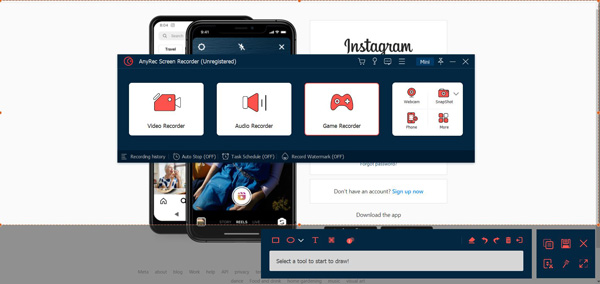
Step 3.You can add text, blur information, make marks, and pin it to the screen after capturing. Finally, you can click the "Save" button to choose a destination folder to store this screenshot on your laptop.

Take a Screenshot on Toshiba via Built-in Tools
Not all laptops with Windows systems have the same way of capturing the screen. If you just switch from another Windows computer to a Toshiba laptop, taking a screenshot on Toshiba might be a new field for you since it is slightly different from the way you use other laptops. Luckily, it is still easy to take a screenshot on a Toshiba laptop with the built-in features like shortcut keys and the pre-installed Snipping Tool app. Check out the steps below and learn.
1. Take a Screenshot on Toshiba with Key Combinations
The default key combinations setting may not give you too many advanced features, but it enables you to get a screenshot on Toshiba as quickly as possible. Whether it is a flying moment in a movie or essential information on your screen, learning the shortcut keys can help you capture them all quickly.
How to screenshot the entire screen on Toshiba
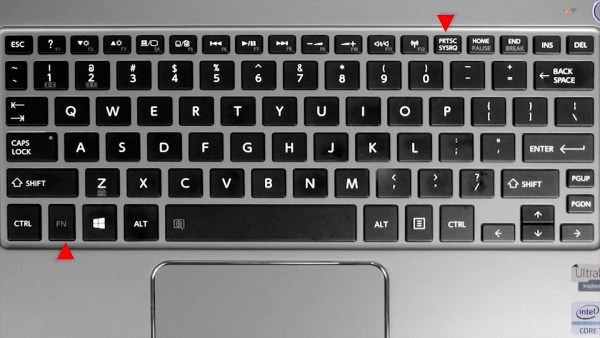
Step 1.To catch the whole screenshot on the Toshiba laptop, you can directly press the "Fn and PrtScr" keys. For some laptops, you may only need to press the PrtScr key to capture.
Step 2.Then your screenshot will be sent to the clipboard, you can press "Ctrl and V" keys to paste it to any editing or document app.
Step 3.To find the screenshot, open "File Explorer" and go to "This PC". Then open the "Pictures>Screenshots" folder.
How to capture part of the screen on Toshiba
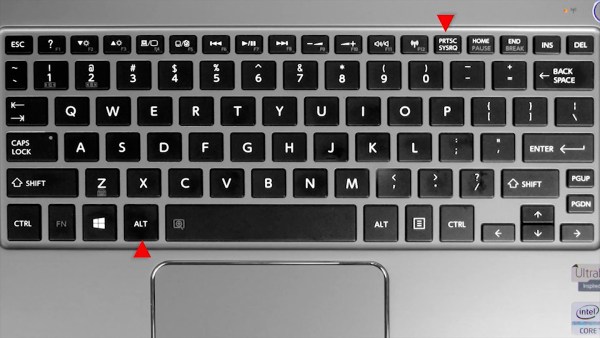
Step 1.Press the "Alt and PrtScr" keys on your keyboard can capture only the active window on your desktop.
Step 2.The screenshot also goes to your clipboard, and you can paste it to "Paint" to edit or crop it.
2. Take a Screenshot on Toshiba with Snipping Tool
The above methods are useful and efficient for screenshots on Windows 11. But if your Toshiba laptop has a less advanced Windows version like 8 or 7, you may need to follow the steps below to manually launch the Snipping Tool app on your computer to take a screenshot on Toshiba.
Step 1.On Windows 11, click the "Search" button on the taskbar or press the "WIN" key to activate the search bar on the lower Windows version.
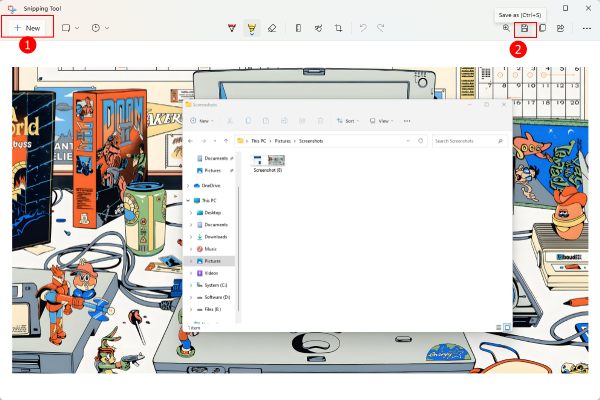
Step 2.Search Snipping Tool and open this app. Click the "New" button on the pop-up window.
Step 3.Now, you can use the mouse to circle the area you want to capture on your Toshiba laptop.
Step 4.Once your release the mouse, the screenshot will show in the Snipping Tool window, and you can edit or crop it.
Step 5.Next, click the "Save As" button to save this screenshot on your device.
FAQs about Screenshot on Toshiba
-
Can you screenshot on a Toshiba TV?
Yes, if your Toshiba TV has a screenshot feature, you can open the TV and press the "Power and Volume -" buttons together on your TV remote. Then the screen you see on TV will be captured and saved.
-
How to take a screenshot on a Toshiba Chromebook?
The shortcut keys on a Toshiba Chromebook are different from a normal Toshiba laptop. For example, to take a whole screen, you need to press the "Ctrl and Show Windows" keys. To capture part of the screen, press the "Ctrl, Shift, and Show Windows" keys.
-
Where are the screenshots on the Toshiba laptop?
If you use the default shortcut keys to take a screenshot on Toshiba like "Fn and PrtSrc" keys or the "Alt and PrtSrc" keys, then your screenshot will be in your clipboard for you to copy and paste. But if you press the "WIN and PrtSrc" keys to capture, the screenshot will go to the "Screenshots" folder under "Pictures" on "My PC".
Conclusion
To draw a conclusion, these 3 methods above are all pretty quick and you can easily take a screenshot on a Toshiba laptop with them. But if you want to make some notes or marks directly on your screenshot, then the AnyRec Screen Recorder is the best solution for you.


