Hot
AnyRec Screen Recorder
Capture every moment. Record like a pro.
Secure Download
Know about Snipping Tool on Windows 10/11[with Alternatives]
AnyRec Screen Recorder - Best Snipping Tool Alternative
Without further finding, get the best Windows Snipping Tool alternative to take screenshots with high quality. It can also capture scrolling screenshots, record video/audio/gameplay, and more. The output settings are also customizable, including the screenshot format, quality, etc. For taking annotations, the shapes/lines/callouts are also useful.
Secure Download
Secure Download
How to use the snipping tool on Windows when you want to keep tabs or store an essential image? Whether it is an announcement from your company or funny memes, the built-in snipping tool on Windows is provided for you. Get to know more details about how to use it and other alternatives you can try to take a screenshot on your computer.
Guide List
What's New in Snipping Tool Real Test Results After Using Snipping Tool for 7 Days How to Get the Snipping Tool on Windows 11/10 Top 5 Alternatives to Snipping Tool on Windows FAQs about Snipping Tool WindowsWhat's New in Snipping Tool
The Windows 11 Snipping Tool got a serious upgrade. Here's what changed:
- OCR. You can copy text straight from any screenshot.
- Color picker. Spot a color on screen and grab its hex code instantly.
- Markup Tools. Edit your image with pens, highlighters, erasers, rulers, and shapes.
- Screen recorder. Get 4 capture modes of different overlays, including rectangle snip, window snip, full-screen snip, and freeform snip.
- Perfect Screenshot (AI Crop). Adjust your capture area for the best capture automatically. It works on Copilot + PCs now.
Real Test Results After Using Snipping Tool for 7 Days
We tested Snipping Tool on a real machine to see how it holds up.
Test Setup
| Spec | Detail |
| OS | Windows 11 24H2 |
| Processor | Intel i5 |
| RAM | 16GB |
Screenshot Speed Test
| Task | Result |
| Launch speed | ~1 second |
| Area screenshot | Instant |
| Save PNG file | ~2 seconds |
| OCR text extraction | Worked well on large text |
| Screen recording | Smooth at 1080p |
Problems We Found During Windows Snipping Tool Testing
Not everything was perfect. Here are the drawbacks of Snipping Tool on Windows, based on our experience.
- No scrolling capture. You can't grab a full webpage in one shot on Windows.
- Lack basic annotations. You can use a pen and a highlighter only.
- Weak recording editor. There is no built-in video trimmer or editor after recording.
- Game issues. Some full-screen games caused failed screenshots.
Verdict: Snipping Tool is great for everyday tasks. It is fast and reliable. However, if you need a professional recorder, you had better seek alternatives.
How to Get the Snipping Tool on Windows 11/10
The default snipping tool on Windows takes screenshots in different methods and provides the user with essential editing tools, including a pen, highlighter, eraser, and more. Then, you can send the screenshots via email or copy it to clipboard. Keep reading to know how to get the snipping tool and use it.
Check the quick keyboard shortcuts for using Snipping Tool:
- Win + Shift + S: Open the Snipping Tool's screen capture overlay.
- Win + Shift + R: Open the screen recording feature in Snipping Tool.
- Print Screen (PrtSc): Copy a snapshot of the entire screen to your clipboard.
Or you can use the steps below to open Snipping Tool for screen capture.
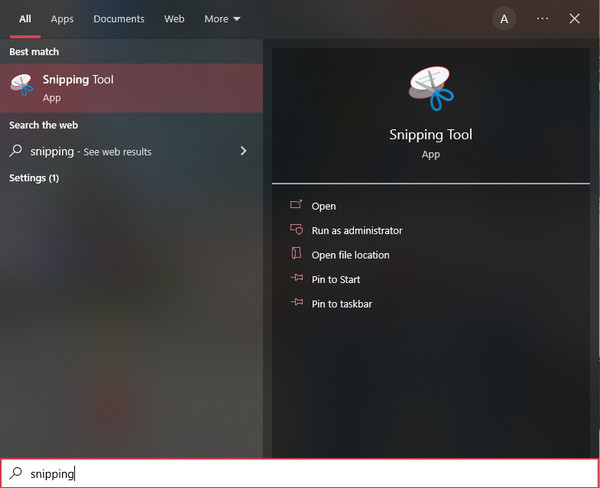
Step 1.To see if you have a pre-downloaded Snipping Tool on your computer, click the "Windows" button and input its name. If you don’t see any app, go to the Microsoft Store and type Snipping Tool.
Step 2.Once Windows snipping tool is launched, you can start taking a screenshot by clicking the "New" button. You can also click the "Mode" button and choose other capture options.
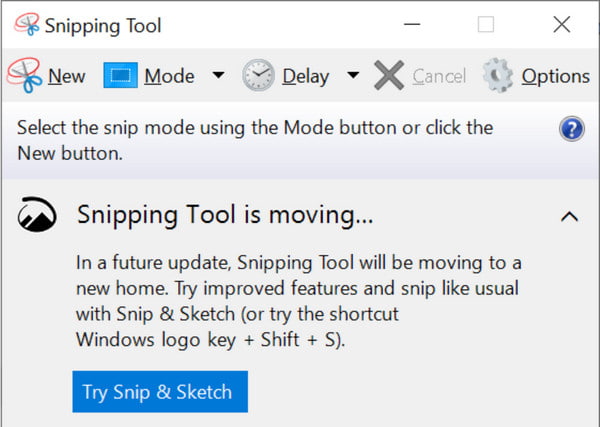
Step 3.Drag your mouse to decide the screenshot area. You can also edit the image by clicking the pen, eraser, and highlighter. Once done, click the "Save" button and choose the designated folder path.

Top 5 Alternatives to Snipping Tool on Windows
Although you can always use the Snipping Tool on Windows to take a screenshot on Windows, its features are only on the average level and still lack some functions that most users like. You can try these five alternatives for Snipping Tool on Windows/Mac.
1. AnyRec Screen Recorder (Windows/Mac)
This Snipping Tool on Windows alternative is a multi-functional program you can download on Windows and Mac. It has professional features to take a screenshot with high image quality with customizable hotkeys for more accessible taps on your keyboard whenever you need to use the screenshot feature. Moreover, AnyRec Screen Recorder offers you the best interface to fully utilize its video, audio, and game recorders. Try it and see other unique features for any recording matters.

Excellent alternative for Snipping Tool on Windows to capture images on any screen region.
Enable you to take screenshots of fullscreen, partial, and custom screen size.
Provide professional editing tools to apply the brush, text, and more to the captured screenshots.
Offer more functional features, including long-screenshots, schedule recording, and more.
Secure Download
Secure Download
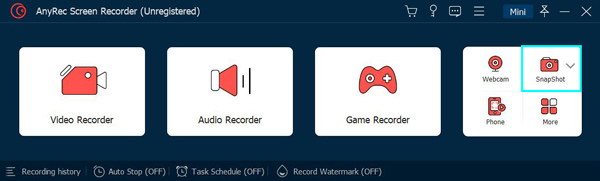
Step 1.Launch AnyRec Screen Recorder and click the "Snapshot" button from the main interface of this alternative snipping tool on Windows.
Step 2.Point your mouse to the desired window to take a screenshot. You can also customize the screen region by clicking and holding the left button of your mouse.
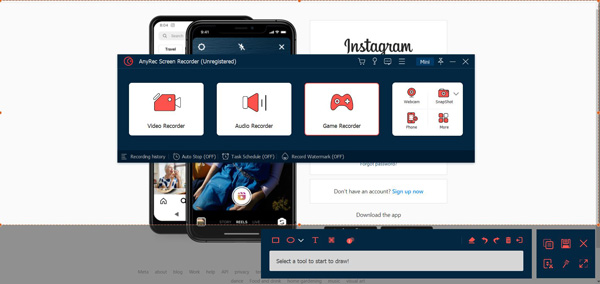
Step 3.If you are done, click the "Save" button and choose the folder path. You can also use this video capture software to record any activity on your screen.
Note: You can also edit the screenshots with the widget menu that will appear on your screen. Try applying the paint, text, number, and shapes to the picture.

2. Snip & Sketch (Windows)

If you are still using Windows 10, it has another built-in snipping tool on your Windows PC. Snip & Sketch helps you to capture images on your screen and input annotations. It is free to download and use all of its features. However, it lacks cloud storage space, which will fill up your desktop if you always need to take a screenshot. Another problem is that looking for the screenshot on your file is challenging, and it might consume time.
- Pros
- Able to add annotations to the captured screenshots.
- Provide eraser, highlighter, and measurement tools.
- Save or export the screenshots to social platforms directly.
- Cons
- Lack of video and audio recordings.
- No advanced editing features.
3. Snagit (Windows/Mac)
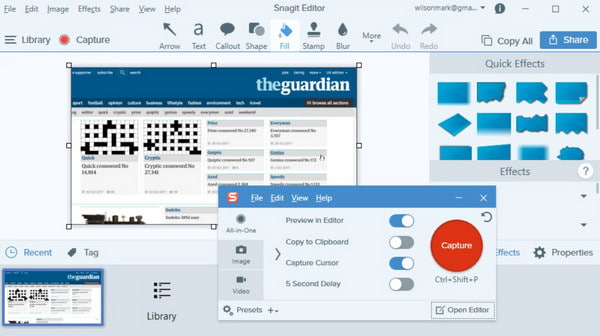
This alternative to snipping tool on Windows is for you if you want to execute a professional way to take a screenshot. You can use this tool for businesses that use visual instructions to deliver a message to your colleagues or customers. It enables you to capture panoramic shots that can take screenshots on web pages. Another powerful thing about it is it can extract text from a screenshot and paste it to a blank page. You will not run out of functions to edit an image because of Snagit’s custom templates, text editing, and other presets.
- Pros
- Provide OCR technology to extract the text from screenshots.
- Preset templates to take screenshots with desired area.
- Cons
- Too expensive, which costs $62.99 for a single license.
- The menu shortcuts is not easy to use.
4. Droplr (Windows/Mac)
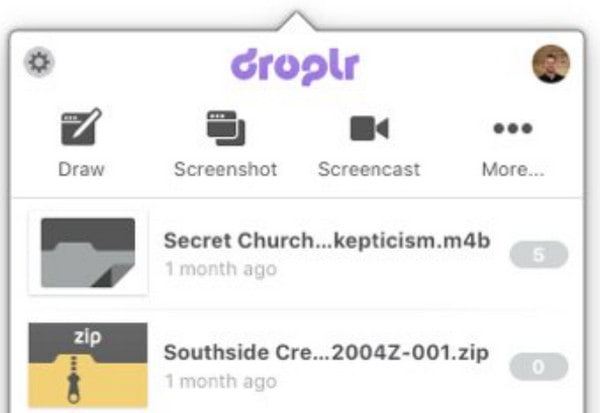
Do you want a high-resolution screenshot to send to potential customers or business partners? Droplr is another ideal snipping tool on Windows. It offers more than an average screenshot tool as it extends its cloud storage capabilities, secures data at an enterprise level, and records onscreen activities. This tool is hailed as a highly-rated tool with a screen recorder to capture short clips. Its GIF features allow you to compile images and turn them into a complete segment. Moreover, it will enable you to change the privacy settings to your screenshots, boards, and tags to limited access.
- Pros
- Support 4K resolution to capture the screen.
- Provide many add-ons to make it more powerful.
- Also available on your Android and iPhone.
- Cons
- The screenshots can only be saved in JPG format.
- Provide no free-trial version for you.
5. CloudApp (Windows/Mac)
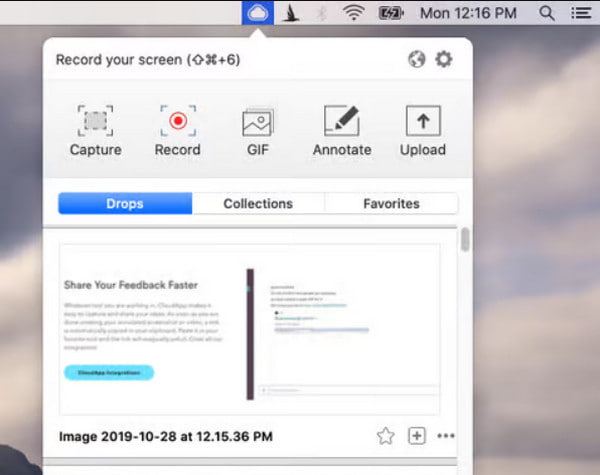
This last recommended snipping tool on Windows is a cloud-based snapshot similar to Droplr. It also has a GIF maker and screen recorder, making the tool more convenient for enterprises. CloudApp helps you to upload files to your account and even lets you create a shareable URL for every screenshot. The mark-up tools consist of many functions, including emojis, essential drawing effects, and blurring features. With over 30 apps integrated, you will not run out of ideas to edit the images. If you are not a fan of installing a desktop tool on your Windows device, you can use its Chrome extension, which is also available on iPhone, Mac, Linux, etc.
- Pros
- Capture a screenshots on Windows in URL for sharing.
- Able to set password to protect your screenshots.
- Quick screenshots capture to save your time.
- Cons
- Should always use it with Dropbox or Google Drive.
- Lack of editing features.
FAQs about Snipping Tool Windows
-
What is the best snipping tool for Mac?
The built-in screenshot function of the Mac is free and uses different methods to take a screenshot on your screen. It has default shortcut keys that can be customized through the settings. It also offers basic editing tools for you to apply arrows, shapes, and other add-ons.
-
Where do my screenshots go?
This is a common question when using a snipping tool. Using the built-in Snipping Tool or Snip & Sketch, you can find your screenshots to the last location used or the This PC folder. However, if you do not intend to save the screenshot, the image is automatically copied to your clipboard. You can paste and send it to email.
-
Is it possible to take a screenshot while screen recording?
Absolutely, yes. If you want to take a screenshot while recording, you can use AnyRec Screen Recorder. This professional screen capture tool provides real-time snipping, which you can utilize anywhere between recordings. It perfectly captures onscreen activities with just a click of the Snapshot button.
Conclusion
Snipping tools manage to help many people in taking screenshots on Windows. They make everything easier as everyone has many things to do. But you can be more thankful for AnyRec Screen Recorder because it will help you take high-quality images and screen record activities without trouble. Try its free trial version and see how it will positively affect your workflow.
Secure Download
Secure Download
Related Articles
About Our Author


