5 Ways to Screenshot One Monitor on Windows and Mac
One of the simplest yet most practical tasks you can do on your computer is to screenshot one monitor. Whether it is for saving work progress, capturing a message, or sharing something important, doing so can get tricky, especially if you have multiple displays. Luckily, today's guide is here to share with you the top five tools you can use to take a screenshot of just one monitor on both Windows and Mac. Know exactly how to capture only the content you need with ease.
Guide List
Easy and Useful Method to Screenshot One Monitor Snipping Tool - Built-in Way to Screenshot One Monitor ShareX - Open-Source Tool to Screenshot One Monitor LightShot - Fast Way to Screenshot One Monitor Monosnap - Cross-Platform Tool to Screenshot One MonitorEasy and Useful Method to Screenshot One Monitor
AnyRec Screen Recorder is a perfect solution to take a screenshot on a single monitor! Unlike other built-in methods, this tool offers better control over your screenshot area, whether it is one or multiple monitors. Moreover, you can preview, edit, and save your captured screenshots in formats you like with just a few clicks! Overall, this screenshot tool for Windows and Mac is an efficient way to screenshot one monitor with flexibility and precision.

Capture full screen, a single monitor, or selected regions.
Preview and manage all screenshots before saving them.
Built-in editing tools for adding text, drawings, arrows, and more.
Customize output settings such as quality, formats, name, etc.
Secure Download
Secure Download
Step 1.Launch AnyRec Screen Recorder on your computer. Navigate to the "Screen Capture" button from the main menu. Once you select it, your pointer will transform into a "Crosshair", letting you click and drag across the screen area.
If you want a faster method, press the assigned hotkey for taking screenshots to achieve the "Capture" tool without opening the menu.
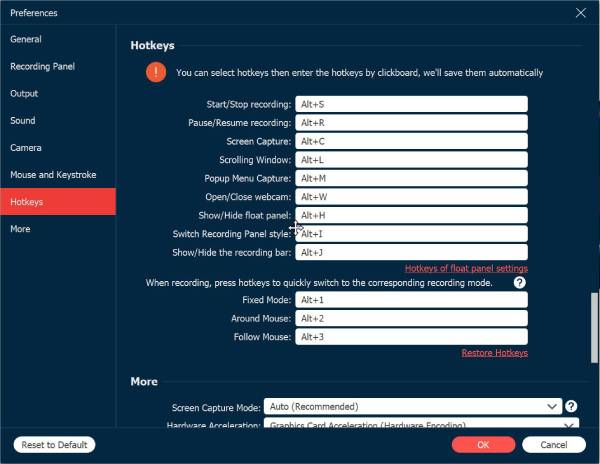
Step 2.After you choose the desired monitor, the program will automatically take the screenshot. You'll then be directed to the editing window, where you can refine your image as needed. Here, add annotations, highlights, and more.

Step 3.When you are satisfied with your edits, click the "Save" button to store your screenshot. Select your desired folder and format, such as JPG or PNG. In just a few clicks, you'll have a clear, customized screenshot of one monitor saved on your PC.
Secure Download
Secure Download
Snipping Tool - Built-in Way to Screenshot One Monitor
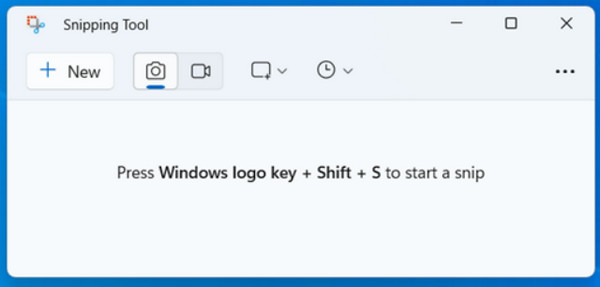
The Snipping Tool is built into Windows, which allows you to capture what is actually seen on your screen without downloading anything. It is perfect for anyone who wants a no-fuss solution to screenshot one monitor and make quick edits. It offers several modes like Rectangular, Windows, and Full-screen, allowing you to decide how much of your monitor screen will be captured.
Step 1.On your Windows PC, press the "Windows + Shift + S" keys to activate the Snipping Tool shortcut. Once opened, select "Full-screen Snip" to screenshot the active monitor.
Step 2.If you have multiple ones, click on the one you want before capturing. After the screenshot, edit it using the markup tools provided, like highlighter, erase, pen, etc. Click the "Save As" button and select your destination and format.
ShareX - Open-Source Tool to Screenshot One Monitor
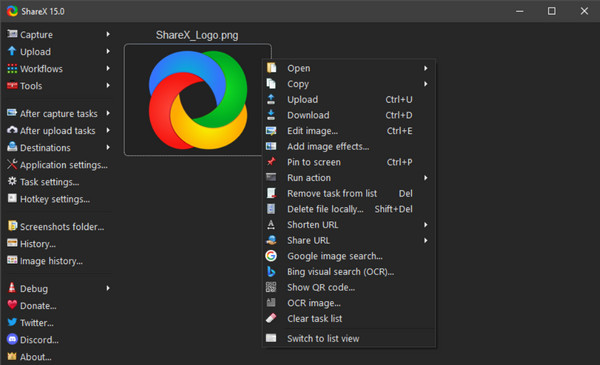
ShareX is a free and open-source Windows screenshot software for both beginners and experts. Here, you can take screenshots on one monitor, record videos, and even upload screen captures to cloud services directly. The multiple capture modes (such as Active Monitor) make it ideal for multiple screen setups. Plus, it has a robust image editor for highlighting, annotating, and blurring sensitive data.
Step 1.Run the ShareX app and head to the "Capture" menu. There, pick "Fullscreen (Monitor)" or the "Active Monitor" option. Then, use the preset hotkey to quickly capture the chosen monitor.
Step 2.Afterward, the image will open in the built-in image editor, and you can edit the screenshot as needed. Once done, save the image locally or share it online.
LightShot - Fast Way to Screenshot One Monitor
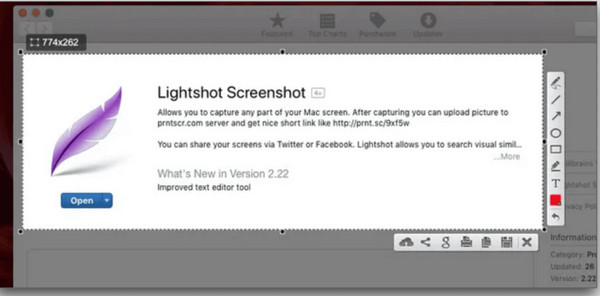
LightShot is a simple yet powerful way to screenshot one monitor for both Windows and Mac. It is made for anyone who wants to take and share images instantly without facing complicated menus. Once you screenshot one monitor here, you can drag and choose precisely what you want to capture with a click. Furthermore, it has a built-in editor where you can add text, an arrow, and a highlight right after taking a one-monitor screenshot.
Step 1.Get Lightshot open on your device now. Then, press the "Print Screen" key or other shortcut to start capturing. Click and drag to choose the entire screen area.
Step 2.After that, edit your screenshot directly by adding shapes, text, or highlights. Later, save it to your computer or upload it using the sharing option. To share it right away, copy the generated link.
Monosnap - Cross-Platform Tool to Screenshot One Monitor
Lastly, Monosnap works as a versatile and professional screenshot tool for both Windows and Mac. The tool has several capture modes, like full screen, window, or selected region, making it flexible for whatever workflows besides screenshotting one monitor. Moreover, it provides powerful editing tools, including arrows, blur, and shapes for important details. Then, you can save your captures locally or upload them directly to the cloud.
Step 1.Open "Monosnap" on your computer. Then, choose "Fullscreen Capture" to take a screenshot of one entire monitor. Otherwise, select "Capture Area" and drag the cursor across the desired capture area.
Step 2.Next, edit the image via the built-in annotation tools like arrows, text, blur, etc. Save it to your computer or upload it to the cloud.

Conclusion
Now you can take a screenshot on one monitor with the above tools easily! For an all-in-one solution that provides flexibility, editing tools, and high-quality screenshot output, try AnyRec Screen Recorder. This tool provides a powerful option for taking screenshots, recording your screen, and editing all captured images, making it ideal for beginners and professionals.
Secure Download
Secure Download


