Hot
AnyRec Screen Recorder
Capture every moment. Record like a pro.
Secure Download
How to Record a Webinar with 5 Effective Tools for PC and Smartphone
If you are required to record a Webinar when you are participating in a virtual meeting on it. As you may know, only the host can record and send a copy of the captured meeting. So, you may think that there is no possibility to record the meeting as an attendee. Don’t worry; this post will give you free record webinar tools for computers and smartphones to record your meetings as you want.
Guide List
How to Record Webinar on Windows/Mac How to Record Webinar on Android/iPhone Things to Notice When Recording Webinar FAQs about Recording WebinarHow to Record Webinar on Windows/Mac
A high-resolution recorded video can bring you back to the meeting, which can help you thoroughly analyze the topic you had. Suppose you don’t know how to record a webinar; you can try the suggested tools below.
1. AnyRec Screen Recorder
This desktop software is a brilliant tool for recording a webinar. It has a video recorder that allows you to capture with high quality. You can change the video settings where you can set your preferred format, resolution, quality, codec, and audio settings. It also provides a configurable recorder to capture the desired area and region of your screen—free download AnyRec Screen Recorder on Windows or macOS.

Suitable software for real-time recording a webinar, gameplay, movies, and online meetings with lossless quality.
Provide a webcam recorder with a quick set to capture the user and their onscreen activities.
Customizable hotkeys, soundcheck system, and other features to elaborate a better recording experience.
No recording time limitation while keeping the best image quality with the help of AI technology.
Secure Download
Secure Download
How to record a webinar with AnyRec Screen Recorder:
Step 1.Visit the AnyRec official website. Download and install the Screen Recorder by clicking the "Free Download" button. Once done installing, launch the software to start recording a webinar. Click the "Video Recorder" button from the main interface and proceed with setting up.
Secure Download
Secure Download
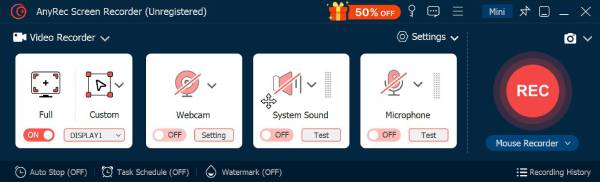
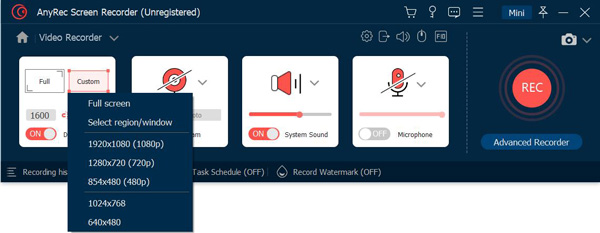
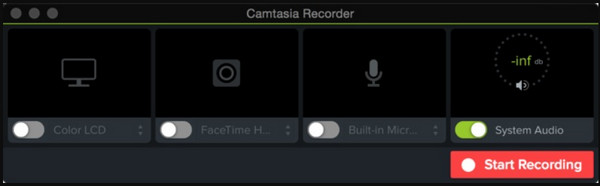
Step 2.Adjust and select the desired region to capture. You can also set the recorder’s aspect ratio to fullscreen or specify the width and height. Then, click on the "System Sound" button to record the audio from your device. Toggle on the Microphone option if you are required to speak in the meeting.
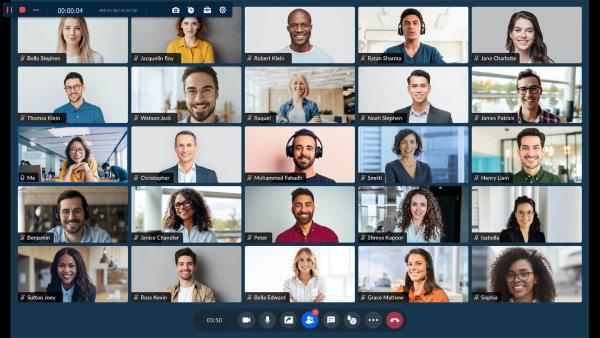
Step 3.After setting up, click the "REC" button to start recording the webinar. A widget menu will appear on your screen. It gives you real-time drawing effects, a recording schedule, and other functions to stop and pause the recording.
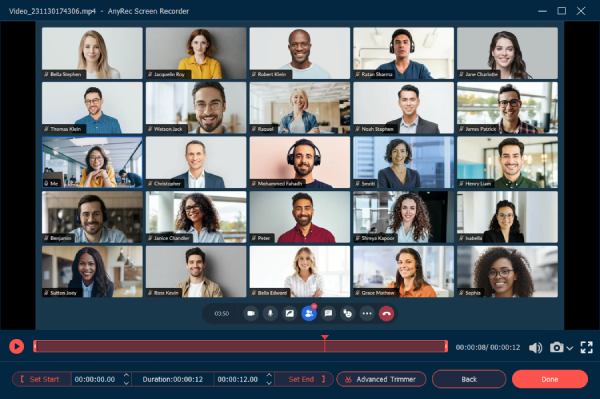
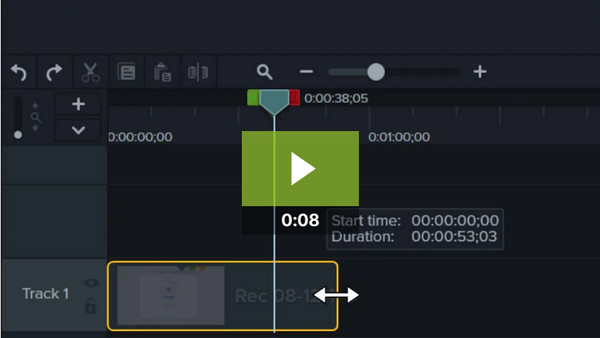
Step 4.When you finish recording, the Preview window will appear. Trim the video file by moving the parameter, then click the "Next" button. Browse for the designated folder path where you want to save it. You can also rename the file on this part. Finally, click the "Done" button to finish.
Secure Download
Secure Download
2. Snagit
Snagit is a practical screen recorder for webinars. It allows you to quickly capture meetings with unique features like annotations and a Step Tool to document workflows in an organized way. The best part of the Snagit is you can customize the interface to have all your favorite tools in one spot. Although the software is not entirely free, you can still try its free trial version for 15 days.
Snagit is a practical screen recorder for webinars. It allows you to quickly capture meetings with unique features like annotations and a Step Tool to document workflows in an organized way. The best part of the Snagit is you can customize the interface to have all your favorite tools in one spot. Although the software is not entirely free, you can still try its free trial version for 15 days.
Step 1.Download and install Snagit to your computer. Launch the software to capture the webinar meeting. Click the "Video" button from the left part of the interface. In this part, you can select a region, turn on your webcam, and record the microphone.
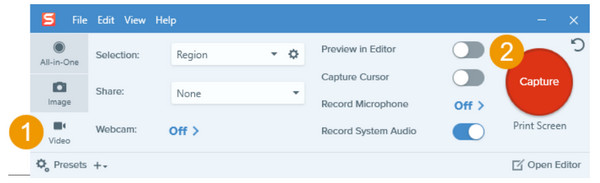
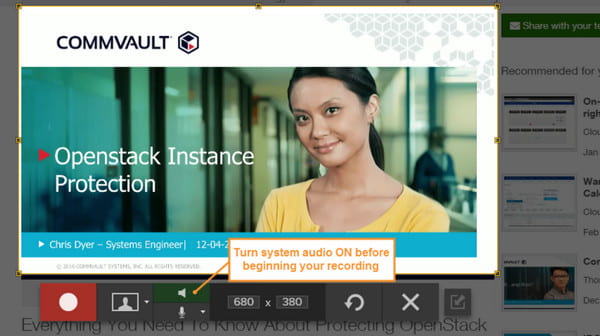
Step 2.It is also essential to click the "Record System Audio" button to capture the discussion. If you forgot to toggle on some options, you could still activate them from the widget menu after you click the "Capture" button.
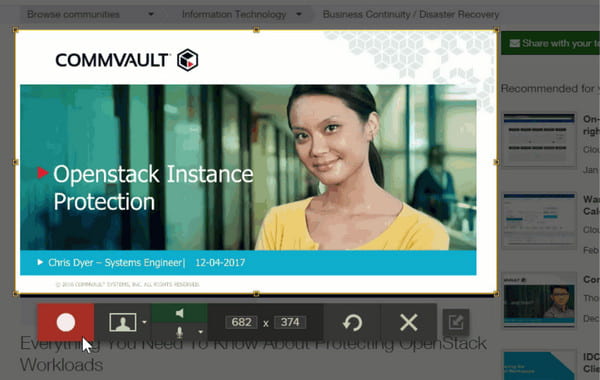
Step 3.Finally, click the "Record" button, and a three-second countdown will start. Ensure that you are not going back and forth through applications within the selected region of the screen recorder. To stop the recording, click the "Stop" button or use the default hotkeys to stop the recording.
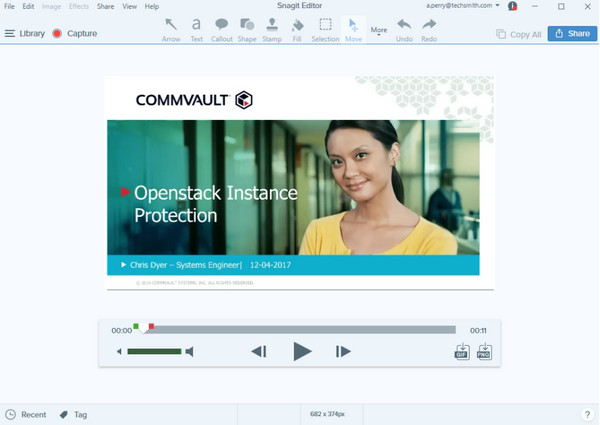
Step 4.You will be directed to the "Snagit Editor" to preview and edit the video. You can cut, trim, or pull a screenshot from the footage. After that, you can save the webinar recording by clicking the "Share" button. You can share the video on YouTube, Google Drive, etc.
3. Camtasia
Camtasia is another alternative to recording a webinar on Windows and Mac. The software is a user-friendly tool and is very easy to use. Besides capturing good-quality webinars, you can also use Camtasia to record how-to, tutorials, demos, and other onscreen activities. One thing you can look forward to with this screen recorder is its greenscreen effect of removing the background.
How to record a webinar using Camtasia:
Step 1.After downloading and installing Camtasia, set up the recording. First, enable the screen recording, then click the "Dropdown" button to choose the region you want to capture. You can drag the handles and adjust the selection.
Step 2.Do not forget to turn on the "System Audio and Microphone" for external and internal audio recording. Then, click the "Record" button or press "F9" key on your keyboard. You can add a table of content or apply themes that suit your preferences.
Step 3.Click the "Stop" button once done recording. You can also stop the screen recording by clicking the "Camtasia" button in the taskbar. Trim the footage and browse for the folder to save it. Click the "OK" button to confirm.
How to Record Webinars on Android/iPhone
It is not impossible to record a webinar through a smartphone, thanks to a few free screen recorders you can get from the App Store or Play Store. Let’s look at which apps are effective for recording a webinar on Android or iOS.
1. XRecorder
A free screen recorder with abundant features that you can use for free. XRecorder enables users to capture smooth and clear footage with 1080p resolution. Although the app is free, you can use it to capture longer videos like live game shows, tutorials, and webinars. Moreover, the built-in video editor allows you to edit the recorded file by cropping, trimming, rotating, and adding elements.
How to screen record a webinar with XRecorder:
Step 1.Open the XRecorder app on your device. Tap the "Add" button and choose the "Record Video" option. A floating ball will appear on the side of your screen. Additionally, a widget menu will appear on your notification panel.
Step 2.Go to the webinar and set up everything you need. Tap the "floating ball" button to pull up a list, then tap the "Record" button. A three-second countdown will start then.
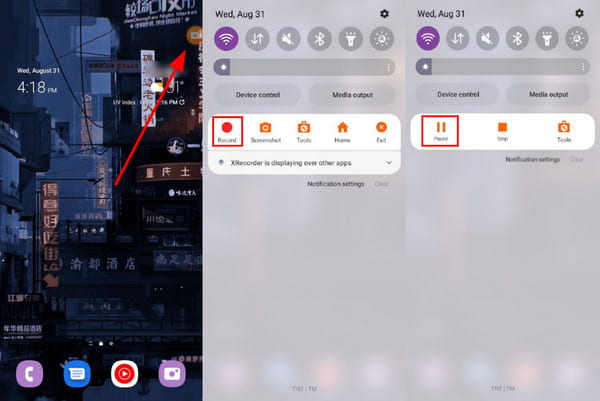
Step 3.You can pull down the notification panel and tap the "Stop" button to stop the recording. Proceed to edit the video and save it to your gallery. The app can perform audio extraction and media merging.
2. iPhone Built-in Screen Recorder
Apple has the features you need for screen recording. Unlike Mac, iOS can capture internal audio without needing a third-party capture software. Of course, the output video is saved in high quality, which you can also edit on the Camera roll. Moreover, there is no time limit for screen recording. Only you need to keep in mind your storage space.
How to screen record a webinar using iOS:
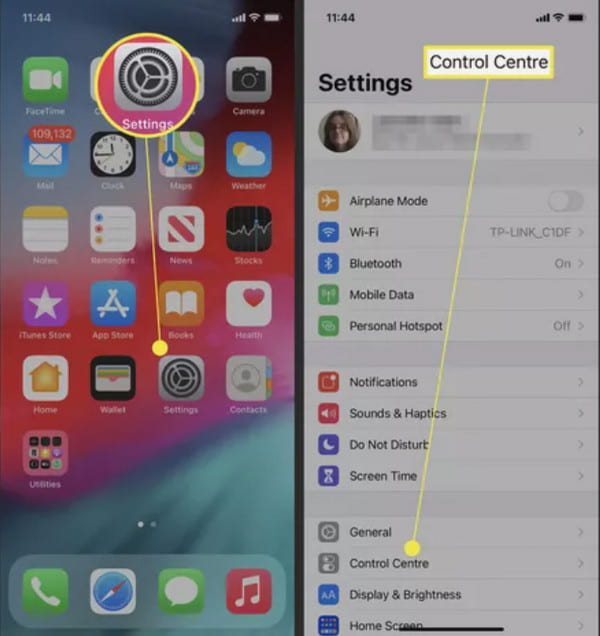
Step 1.Go to Settings and tap the "Control Center" button. Tap the "Screen Recording" button and tap the checkmark beside it.
Step 2.Pull the "Control Center" on your device and tap the "Record" button. Wait for the three-second countdown to begin capturing.
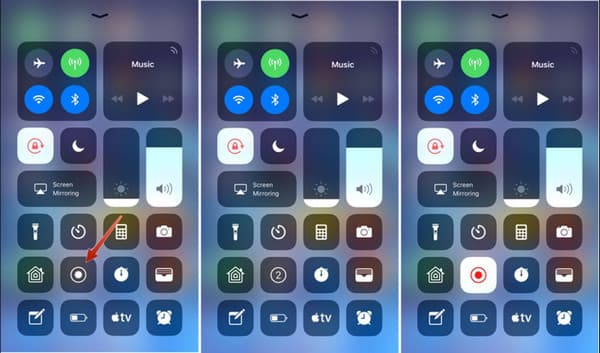
Step 3.When you want to stop the recording, go to the Control Center again and tap the "Record" button. Confirm the action by tapping the "Stop" button. The footage will then be saved on the Photos app.
Things to Notice When Recording Webinar
When recording a webinar, there are several things you should pay attention to in order to ensure a high-quality recording that will engage your audience and effectively convey your message. Here are some key things to keep in mind:
Audio Quality: Make sure that the audio is clear and easy to understand. Test the microphone and ensure that it's positioned correctly. Avoid background noise, and consider using a separate microphone if the one built into your computer is not sufficient.
Video Quality: Check that the video is clear and in focus. Ensure that the lighting is adequate, and avoid distracting backgrounds. If possible, use a high-quality camera to capture the video.
Test Run: Do a test run of the webinar to ensure that everything is working properly. This will help you to identify any potential issues and make necessary adjustments before the final recording.
Note: If you want to have audio and video quality, you can use AnyRec Screen Recorder as the tool to record webinars. This software can ensure you have excellent recorded output.
Secure Download
Secure Download
FAQs about Recording Webinars
-
Is it legal to screen record webinars through a third-party app?
Yes, it is legal to record virtual meetings like webinars. Most participants wouldn’t spend money to have the recording feature on Zoom, so the easiest way to record is through screen recorder software. This is also an advantage to saving the output in different formats and share to other platforms.
-
Which screen recorder extension is best to use for webinars?
A bunch of screen recorder extensions are available on Chrome Web Store. You can try Nimbus, Loom, Droplr, Awesome Screenshot, Vmaker, and Vidyard
-
What is the best resolution for recording a webinar?
The most suggested resolution for recording a webinar is 1280 × 720 pixels. Fortunately, most screen recorders offer this resolution for HD footage. If you wish to store video on 1080p, AnyRec Screen Recorder is the best tool to pick.
Conclusion
A free screen recorder can save you from purchasing lousy software that might be unable to record a webinar. Moreover, it gives you options to capture the screen from different angles, output formats, and high quality. All these powerful features are available on AnyRec Screen Recorder. Free download it today and experience another level of the recording!
Secure Download
Secure Download
Related Articles
About Our Author


