Hot
AnyRec Screen Recorder
Capture every moment. Record like a pro.
Secure Download
6 Ways to Record Voice on Mac with/without External Mic
Thanks to Apple's built-in options, recording voice on Mac is easier than ever! You have Voice Memos to create a podcast, capture meeting notes, or narrate a presentation. However, you may still want a more powerful option. Therefore, this post here gives you the best tools to do voice recording on Mac, from simple to professional-grade software.
Guide List
AnyRec Screen Recorder - All-in-One Recorder with High-Quality Capture QuickTime Player - Built-in Voice Recorder for Simple Audio Needs GarageBand - Professional-Grade Audio Recorder and Editor Audacity - Open-Source Tool for Multi-Track Voice Recording WavePad - Feature-Rich Audio Recorder and Editor How To Record a Voice Memo with Voice Memos AppAnyRec Screen Recorder - All-in-One Recorder with High-Quality Capture
A professional yet friendly software to record voice on Mac, AnyRec Screen Recorder lets you record voice, screen, webcam, or all three simultaneously. It works perfectly for content creators, podcasters, or anyone who wishes precise control over recording quality. Whether you are capturing system sound, external mic input, or both, the program delivers crystal-clear results with adjustable audio settings.

Record system sound and mic input at once without losing quality.
Adjust audio levels and output settings for better clarity.
Do noise cancellation and voice enhancement.
Save audio recordings in MP3, AAC, M4A, and more audio formats.
Secure Download
Secure Download
- Pros
- Record internal and external audio on your computer from all sources.
- Trim, compress, merge, and edit metadata of your recording file.
- Schedule recording tasks to start and stop recording automatically.
- Cons
- Need to upgrade to the full version to record videos for hours.
Step 1.
Turn on "System Sound" to include your Mac's internal audio, and toggle on "Microphone" to capture your voice. You can set which microphone to use and adjust both volumes before recording.
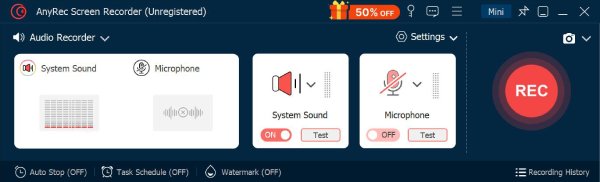
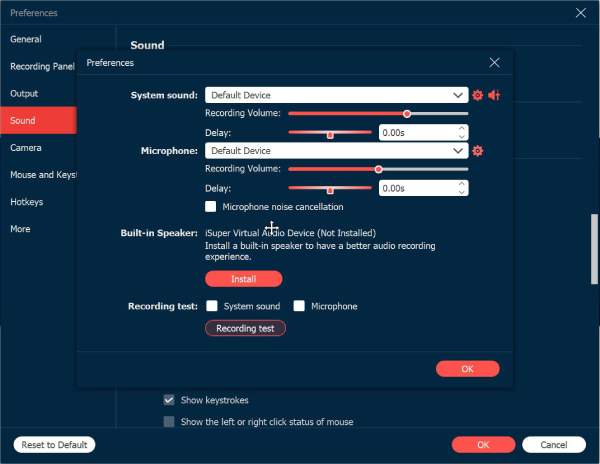
Step 2.Before you start, click the "Settings" button and go to the "Sound" tab. From there, click the "Noise Cancellation" box to reduce background noise. Click the "OK" button to apply and go back to the main window.
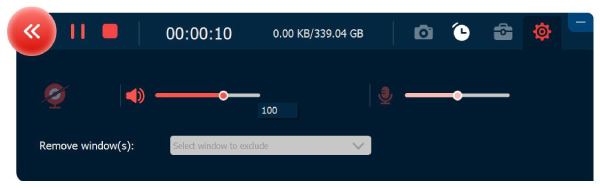
Step 3.When everything is set, click the "REC" button to begin recording your voice. A small floating bar shows. You can pause, stop, and adjust volume levels in real-time as you speak with it.
Step 4.Once you're done, click "Stop" to end the voice recording. You can replay it instantly, trim unwanted noises, then click "Save" to export your clean audio file on Mac.
Secure Download
Secure Download
QuickTime Player - Built-in Voice Recorder for Simple Audio Needs
QuickTime Player is pre-installed on every Mac and is a straightforward solution for doing a quick voice recording on Mac. It works ideally for voice memos, notes, or short podcasts without needing extra software. Moreover, you can use QuickTime to record screen video with audio on Mac for free too.
- Pros
- Free and pre-installed on Mac.
- Comes with a straightforward interface.
- Good for quick voice memos.
- Cons
- Has limited features for audio editing.
- It does not easily capture internal audio.
Step 1.Launch QuickTime Player. Click the "File" menu. Then click "New Audio Recording". Then, choose your input device from the drop-down arrow.
Step 2.Click the "Record" button. Now you can start Mac voice recording. Later, click the "Stop" button to finish. Save your file to your preferred location.
GarageBand - Professional-Grade Audio Recorder and Editor
Another powerful Apple tool, GarageBand, is great for anyone wanting a high-quality voice recording alongside professional editing tools. Not only can you record voice on Mac, but you can also refine your sound, which is perfect for podcasters, singers, and audio producers.
- Pros
- Built-in effects, compressors, and equalizers.
- Multi-track recording with advanced editing controls.
- Supports export to multiple audio formats.
- Cons
- Only available for Apple devices.
- It may be complex for a simple voice recording.
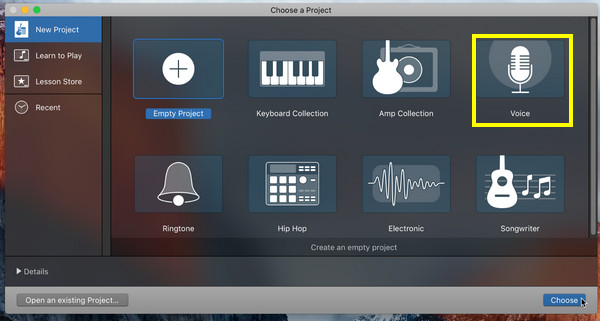
Step 1.Run GarageBand on your Mac, and aim for "Voice Project". Determine your input device from "Preferences", then "Audio/MIDI".
Step 2.Click the "Record" button to begin. Speak into your mic and click the "Stop" button when done. Edit your audio and save it to your desired format later.
Audacity - Open-Source Tool for Multi-Track Voice Recording
One of the most popular free Mac voice recorder is Audacity. It offers excellent balance of power and accessibility, supporting plug-ins and letting you layer, edit, and mix multiple audio recordings.
- Pros
- Works free and open-source.
- Covers many formats with many effects.
- Has community support and tutorials.
- Cons
- Multitrack editing is limited.
- Less polished than other software.
Step 1.Upon opening Audacity on Mac, set your microphone input. If ready, click the "Record" button to start capturing your voice.
Step 2.Later, click the "Stop" button to finish recording. Edit your track now using tools like trimmer, fade, etc. Save it through "File" then "Export" and select "Export as MP3" or other formats.

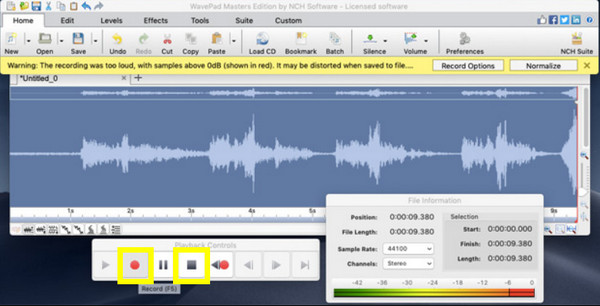
WavePad - Feature-Rich Audio Recorder and Editor
Lastly, WavePad works primarily as an advanced audio recording and editing program for Mac, perfect for those who want detailed control over their sound. This voice recorder for Mac supports audio cleanup, batch processing, and tons of effects.
- Pros
- Easy to use with good features.
- Perfect for voice recording and general audio editing.
- Cons
- Fewer advanced features, like multitrack mixing.
- The free version has lots of limitations.
Step 1.Open WavePad on your Mac, and start by clicking the "New Files", then choose "Record". Select your mic as the input source.
Step 2.Click the "Record" button now, and later click the "Stop" button to finish. Now, you can edit your audio using the tools provided.
How To Record a Voice Memo with Voice Memos App
Usually, the Voice Memos app is the one that has been used for recording audio. Whether you're here to save quick reminders or capture meeting notes, this built-in tool on Mac allows you to record audio files in just a few clicks. Plus, it supports simple trimming and replacing sections of your memo. Your voice memos will be exprted in M4A format. If you want to get more compatibility, you can convert Voice Memos to MP3.
So, before concluding this post, here's how to record voice on Mac using Voice Memos:
Step 1.Use the "Spotlight Search" or "Applications" to launch Voice Memos. Once opened, you can see the large "Record" button; click on it to begin capturing your voice.
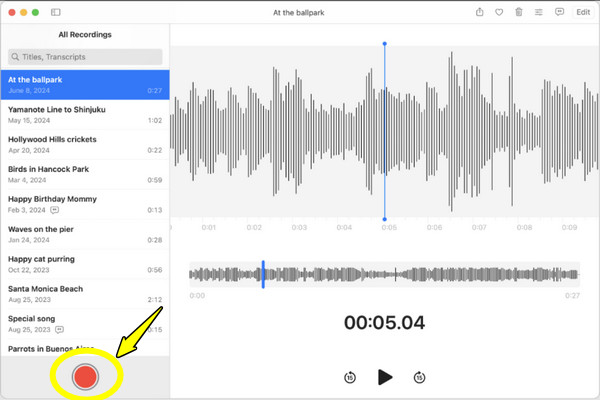
Step 2.Anytime, you can click the "Pause" button if you need a break, then continue the recording with the "Resume" button. Later, click the "Done" button when finished.
Step 3.The recording appears on the left side of the app. You can rename it and even trim unwanted parts. Once done, right-click on it to "Share" via AirDrop, Mail, or Messages, or save it to your desired location.

Conclusion
With so many tools available, you can easily find one that matches your recording needs on Mac. From the simple Voice Memos to the powerful features of GarageBand, each tool mentioned offers something unique to record microphone voice on Mac. AnyRec Screen Recorder is your best voice recording for Mac. It not only captures your microphone voice abut also offers noise reduction, trimming, and adjustable output settings. Moreover, you can record system audio along with microphone voice within the program. Whether for professional or personal recordings, the program is ready for any purpose.
Secure Download
Secure Download
Related Articles
About Our Author


