Hot
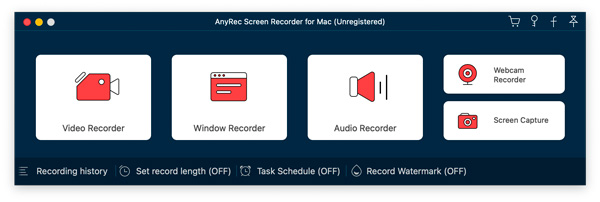
AnyRec Screen Recorder
Capture every moment. Record like a pro.
Secure Download
[3 Solutions] How to Record Screen with Internal Audio on Mac
Here you can get 3 easy ways to record system audio on Mac. If you want to know the best situation to use each tool quickly, here are some suggestions you can refer to.
- AnyRec Screen Recorder: Easy audio recording software for all Mac users.
- QuickTime Player: Install BlackHole before recording system audio on Mac.
- Audacity: A free audio recorder with old-fashioned interface. Also, need to install BlackHole first.
Secure Download
Secure Download
In 2026, Mac still lacks default internal audio recording software. If you want to record system sound on Mac, use third-party programs or install add-ons. Don’t worry about that. Now you can use the following 4 methods to seamlessly record program audio, gameplay audio, notification sound, Internet audio, etc.
Guide List
1.AnyRec Screen Recorder 2.QuickTime Player + BlackHole 3. Audacity + BlackHole Troubleshoot Common Problems While Recording System Audio on Mac FAQs1. AnyRec Screen Recorder: Record All Sound on Mac Flexibly
Best for: Users who want a simple one-click Mac internal audio recording solution without any audio driver configuration.
If you want to record both screen video and audio on Mac with high quality, AnyRec Screen Recorder is your wise choice. It provides audio recorder, video recorder, window recorder, and more that can suit different recording scenarios. Its advanced editing tools are also suitable for quick editing before saving.
Pros
Record internal sound on Mac with/without screen video losslessly.
Save your audio recording to MP3, M4A, WMA, CAF, FLAC, OGG, or OPUS.
Cons
Need to upgrade to access advanced video/audio editing tools.

Record Mac screen with the internal or external audio tracks from system and microphone.
Provide the noise cancellation and voice enhancement to make clean audio.
Adjust the volume separately and the output video parameters to keep high quality.
Clip, and edit the recordings easily according to your need.
Secure Download
Secure Download
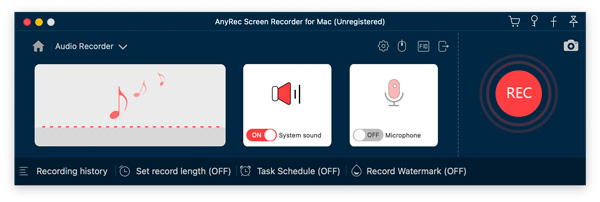
Step 1.Free download AnyRec Screen Recorder and launch it on your Mac. Click the "Audio Recorder" button.
Step 2.Enable the toggle button before "System Sound". Later, click the "REC" button to start recording internal sound on Mac.
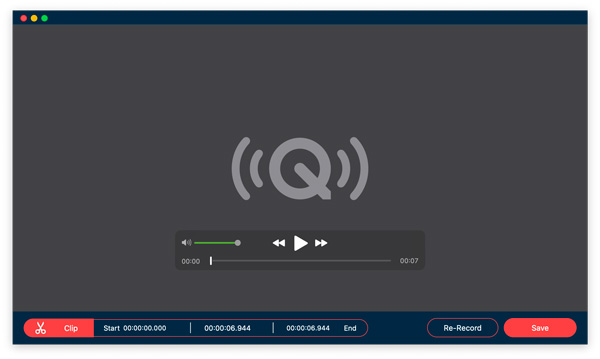
Step 3.Once stop, you can preview or trim the audio recording. At last, click the "Save" button to export it.
Secure Download
Secure Download
2. QuickTime Player: Install BlackHole Before Audio Recording
QuickTime Player can be your free choice for Mac recording. But if it is the first time you record audio in QuickTime Player, you must first download and install BlackHole. Otherwise, QuickTime cannot detect the audio source.
Pros
Default Mac screen recorder that works on all MacBook Air and Pro.
Trim the audio recording file to delete unwanted clips.
Cons
Need to install BlackHole for internal audio recording with QuickTime.
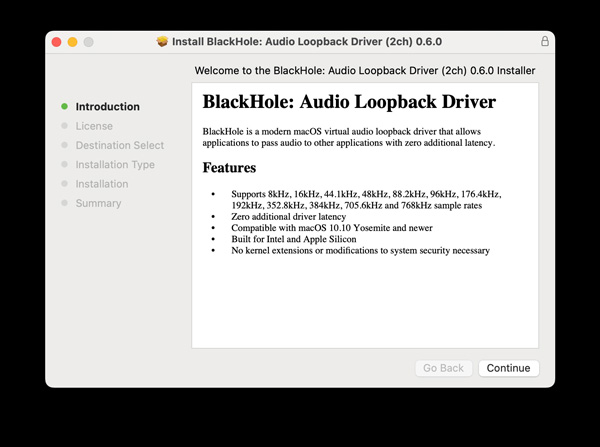
Step 1.Free Download BlackHole 2ch modern macOS virtual audio loopback driver. Open Audio MIDI Setup (Go to Applications, then open Utilities). You can find BlackHole in the left pane.
Step 2.Click the "+" button on the lower left corner. Then click "Create Multi Output Device". Go to this newly created tab. Select "Built-in Output" and "BlackHole 2ch".

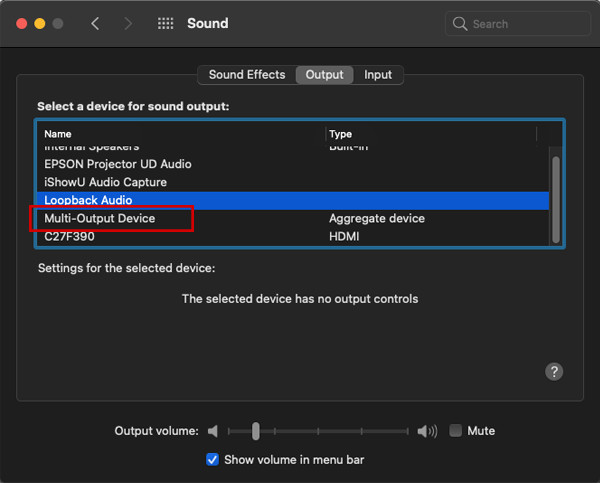
Step 3.From the top Apple dropdown, click "System Settings" (Or System Preferences). Go to the "Sound" tab. In the "Output" tab, click "BlackHole 2ch".
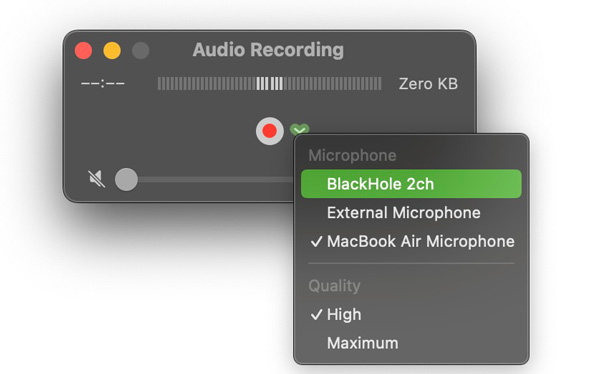
Step 4.Open QuickTime Player. Click "New Audio Recording" from the top "File" dropdown list. Then, unfold the down-arrow icon. Select "BlackHole 2ch". Now, you can click the "Record" button to record internal audio on Mac with QuickTime Player.
After recording, go back to System Settings. Click the "Sound" button, then click the "Output" button. Switch back to "Built-in Output"or your headphones. Leaving it on "Multi-Output Device" keeps your volume keys disabled.
3. Audacity: Need BlackHole to Record System Audio on Mac
Audacity is also a free audio recorder for Mac, Windows, and Linux users. To record Mac computer audio with Audacity, you need to install BlackHole add-on. What’s more, its complicated interface is not friendly to beginners. You need to spend some time getting used to it.
Pros
Record, edit, and play audio on Mac with basic features.
Trim a recorded audio within Audacity.
Cons
BlackHole is required for Mac internal audio recording with Audacity.
Record audio only. Lack of screen video recording function.
Step 1.First, you should download and install BlackHole on your Mac, then click the "Audio HDMI Setup" button to change the audio settings. Click the "Internal Audio Rec" button in the left pane and click the "Built-in Output" and "BlackHole" buttons.
Step 2.Go to the System Preferences and click the "Sound" button. In the Output option, click the "Multi-Output Device" button as the output sound to record your Mac screen with the internal audio.
Step 3.Open Audacity. Click the "Record" button to start recording system sound on Mac. After recording, you can edit and save audio in MP3 format.
Troubleshoot Common Problems While Recording System Audio on Mac
1. I can't hear audio through my speakers after setting up BlackHole.Check that "Built-in Output" is included, then check in your Multi-Output Device in Audio MIDI Setup. If only BlackHole is checked, audio routes to the virtual device only.
2. QuickTime audio recording is silent.Make sure BlackHole 2ch is selected as the input in the QuickTime audio recording dropdown (the arrow next to the record button). Also, verify your System Sound output is set to the Multi-Output Device.
3. My volume keys stopped working.It is an expected behavior with Multi-Output Devices. Switch your output back to Built-in Output when not recording. Volume keys will work again immediately.
4. BlackHole stopped working after a macOS update.Major macOS updates occasionally reset the system extension approval. Go to System Settings, click the "Privacy & Security" button, and re-approve BlackHole's system extension. You may also need to recreate the Multi-Output Device.
5. SoundFlower won't install on my M1/M2/M3/M4 Mac.SoundFlower doesn't support Apple Silicon. Download BlackHole 2ch to screen record on Mac with internal audio instead.
6. Audacity shows no signal when BlackHole is selected.Make sure the Multi-Output Device is selected as your system Sound Output (not just BlackHole alone). Audio must be actively playing on your Mac for Audacity to pick up a signal from BlackHole.
FAQs of Recording Screen with the Internal Audio on Mac
-
1. Can I use BlackHole to record internal audio only on Mac?
Yes, you can. With the help of BlackHole, you can change the output sound to the internal audio. Just click the "BlackHole" button when recording the Mac screen with internal audio. Since it changes the audio settings of your computer, you need to restore settings for daily use.
-
2. Why is there an echo when recording internal audio on Mac through QuickTime?
After you click the "Rec" button and start recording the internal audio on Mac, you can't adjust the volume of the sound. Otherwise, there will be an echo in the recordings. Please set all parameters in advance.
-
3. How to record the internal and external audio together on Mac?
You need to add the microphone and BlackHole in the Internal Audio Rec option. And then choose the Multi-Output Device when recording. Besides, the easiest way is to use professional screen recorders, including AnyRec Screen Recorder.
Conclusion
Though QuickTime Player and Audacity are free for Mac audio recording, you need to install BlackHole and change the built-in audio output first. If you want to record Mac sound from all sources easily, you can free download AnyRec Screen Recorder to get a great experience. It can be your intelligent Mac screen video and audio recorder in all acenarios.
Secure Download
Secure Download
Related Article
About Our Author


