Hot
AnyRec Screen Recorder
Capture every moment. Record like a pro.
Secure Download
The Topmost Methods to Print Screen on Mac You Need to Know
Want to capture the precious moments with your friends on Mac but don’t know how to print screen on Mac? This article will make a detailed guide on how to take screenshots on your Mac. There are different keyboard shortcuts for capturing different screens through the default ways. You can choose to print the screen on Mac with the full-screen, a specific window, or the desired region. Moreover, you can use the professional snapshot tools to take screenshots on Mac with the original high quality. Keep reading to learn the detailed ways to print screen on Mac.
Guide List
The Best Way to Print Screen on Mac [Full-screen and Selected Area] How to Print Screen on Mac through the Default Shortcuts Two Easy Ways to Prints Screen on Mac with Built-in Tools FAQs about How to Print Screen on MacThe Best Way to Print Screen on Mac [Full-screen and Selected Area]
If you are looking for an app to print screen on Mac aside from its built-in function, AnyRec Screen Recorder recommended as an ideal program for Windows and Mac. You can use it to print screen on Mac with the desired capture mode. Moreover, it enables you to add annotations with the shapes, lines, callouts, and other tools. It also provides you with different recorders to capture video, audio, gameplay, webcam, and phone screen according to your need. The hotkeys are very convenient for you to print screen on Mac.

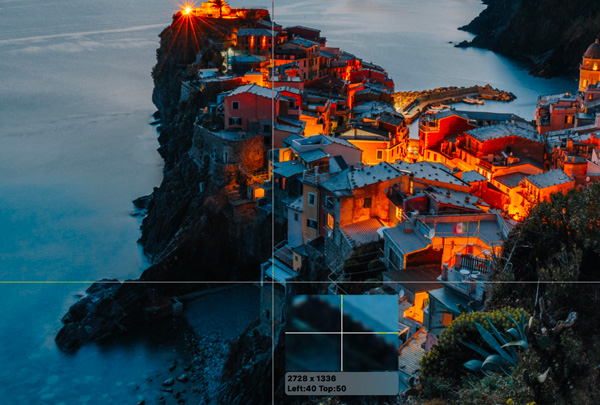
Print the screen on Mac with the desired region by dragging your mouse.
Change the screenshot settings, including the format and quality.
Provide customized hotkeys to take screenshots quickly at any time.
Can do real-time drawings on your recordings and screenshots.
Secure Download
Secure Download
Steps on how to Print Screen on Mac using Anyrec Screen Recorder.
Step 1.Launch AnyRec Screen Recorder on your Mac. On the main interface, click the "Screen Capture" button to start taking screenshots on the right part of the interface.

Step 2.You will use your mouse cursor to adjust the frame for the aspect ratio of your screenshot or select a specific area of your screen. You can also drag the cursor to print screen on Mac of the desired region.
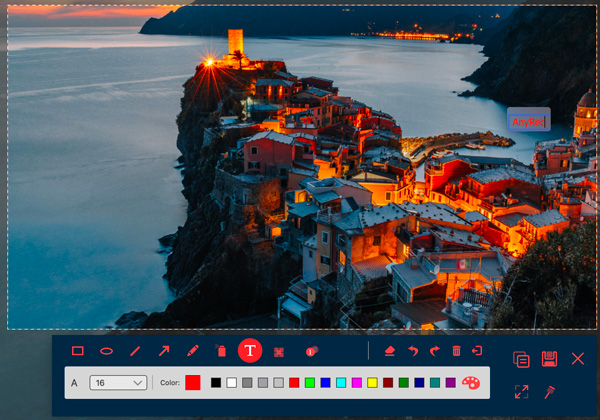
Step 3.After taking a screenshot, you can edit the photo using the control bar. You can add shapes, lines, blur effects, and watermarks. Moreover, you can add texts and customize the fonts and colors.
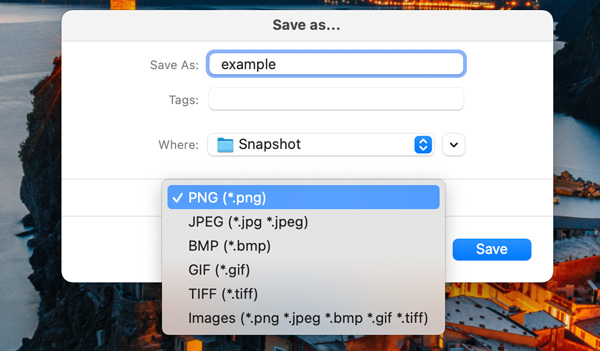
Step 4.Click the "Save" button on the right side of the toolbar to store your edited photo. Then you can choose to save the screenshot in JPG, PNG, GIF, BMP, etc.
How to Print Screen on Mac through the Default Shortcuts
| Keyboard Shortcut | Function |
| Shift+Command+3 | Snip on Mac of the entire screen. |
| Shift+Command+4 | Customize the screenshot by dragging your cursor to capture a specific screen area. |
| Shift+Command+4+Spacebar | Print screen on Mac of a specific application window. |
| Shift+Command+5 | Open the Screenshot tool to record video and edit your screenshot. |
| Shift+Command+6 | If you have a Touch Bar on your Mac, you can take a screenshot of its display. |
1. Shift+Command+3: Full-screen Capture
By pressing and holding down Shift+Command+3, you can print screen on Mac with the full-screen. If you have multiple monitors, it will simultaneously take and save screenshots of every monitor.
When you try to take a snapshot, a thumbnail will appear on the bottom-right part of your screen. You can click the screenshot to do some further editing before saving it.
2. Shift+Command+4
By pressing and holding down Shift+Command+4, your mouse cursor will turn into a crosshair. This function enables you to print a screen on Mac with a customized region. You click and drag the crosshair across your screen to take a screenshot of the highlighted area.
3. Shift+Command+4+Spacebar
This additional method is for capturing a specific window. The crosshair turns into a camera which enables you to capture the window you desire by clicking on it.
4. Shift+Command+5
This method applies to Macs with Mojave, Catalina, Big Sur, and Monterey OS versions with a built-in Screenshot app. By pressing the Shift+Command+5 keys, a menu panel appears on the bottom part of the screen.
On the menu panel, the first three buttons are for printing screen on Mac of the entire screen, window size, and selected area of the screen. The next two buttons are for recording the entire screen and chosen part of the screen. And the last two buttons are Options and Capture. The Options button has settings to add a timer and select the file output location. Click the "Capture" button to take screenshots.
5. Shift+Command+6.
This last method is only applicable to Mac computers with Touch Bar. By pressing the Shift+Command+6 keys, you will print screen on Mac with the buttons and shortcuts displayed in the Touch Bar.
Two Easy Ways to Prints Screen on Mac with Built-in Tools
1. Preview
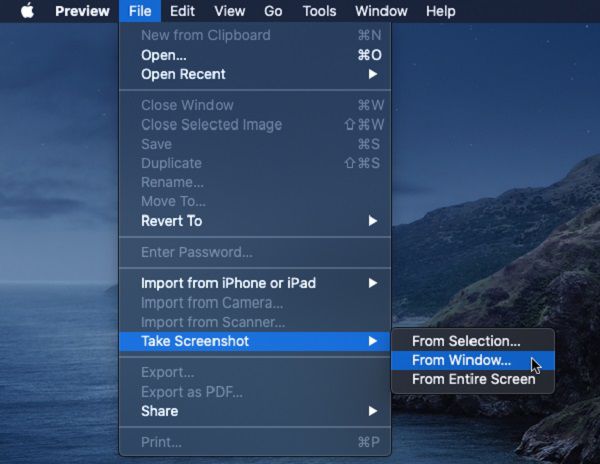
Use the Preview app to print screen on Mac, which is a built-in tool on Mac. To start, look for the app using the search toolbar on your Mac located on the top-right part of the screen. After you open the Preview app, head over to the File tab, where you can find the "Take Screenshot" button. You can choose to capture in full-screen, or in a selected area of the screen, or print screen on Mac of an active application window.
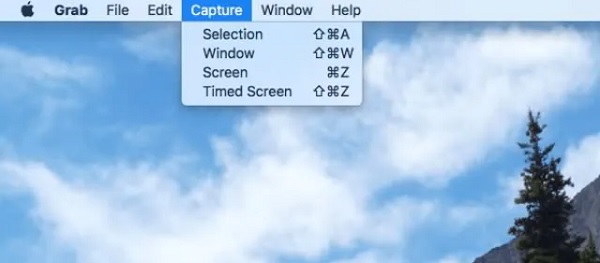
2. Grab
The Grab app is also a built-in tool on Mac that you can use for screen capturing. You can locate it on the utility subfolder under the Application folder of your Mac.
FAQs about How to Print Screen on Mac
-
1. Why can’t I use the Grab tool to print screen on Mac?
That’s because the Screenshot app has replaced the Grab app on Mac. It captures the activity of your screen in Mac OS 10.14(Mojave). But rest assured, it is still the same software but with an updated interface and additional features.
-
2. Can I edit the screenshot on Mac?
Yes, you can edit your screenshot using the built-in tool on Mac. By clicking the thumbnail after you take the screenshot, it allows you to edit the photo. You can add shapes, texts, and highlights to your screenshot.
-
3. Where can you find the screenshots you take on your Mac?
Your screenshots are automatically saved on your Mac by using the keyboard shortcuts, which is the default setting. If your Mac is not saving screenshots, have a try on AnyRec Screen Recorder now.
Conclusion
Here you have known 8 easy ways to print screen on Mac. There are many different hotkeys to meet your requirements of captured regions. However, to get high-quality screenshots with the desired image format, you’d better have a try on AnyRec Screen Recorder to print screen on Mac with customized settings.
Secure Download
Secure Download
More Related Articles
About Our Author