Hot
AnyRec Screen Recorder
Capture every moment. Record like a pro.
Secure Download
8 Best Snipping Tools for Mac in 2025
The only good thing about Windows 7 is the snipping tool. That’s some nifty stuff right there. Does anything similar exist for the Mac?
From Mac ForumsMaybe you are also searching for a handy snipping tool for Mac and have the same question as the poster above when just changing from Windows to macOS. There does have a built-in snipping tool for Mac that can help you take a screenshot easily. However, not everyone is satisfied with the default tool since there are not so many advanced features in it. This post has found for you the 8 best snipping tools for Mac that are all worth a try. Move along to check the detailed features.
Guide List
Top 8 Best Snipping Tools for Mac Quick Comparison of 8 Mac Snipping Tools Built-in Sniping Tool for Mac FAQs about Snipping Tool for MacTop 8 Best Snipping Tools for Mac
For those of you who are looking for the best snipping tools for Mac with more advanced features than the default one. You’ve come to the right place because the content below will provide a detailed analysis of the 8 best snipping tools for Mac including their features, advantages, and disadvantages. Once knowing these snipping tools for Mac, it will be a piece of cake for you to capture the important information on your Mac screen.
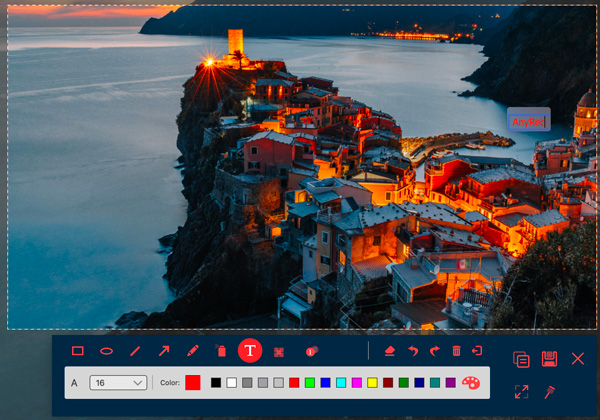
1. AnyRec Screen Recorder
AnyRec Screen Recorder ranks NO.1 among the list of the best snipping tools for Mac. There are several screenshot modes for you like: customized snapshot, scrolling window capture, and pop-up menu capture. The latter two modes can better assist you with capturing the whole webpage or capturing an instant message in the pop-up menu. Besides, other advanced features like recording your Mac screen for gameplay or online meeting.

Check screenshot history to regain information.
Take screenshots for Mac with high output quality.
Blur private message while capturing the Mac screen.
Record the iPhone screen remotely with audio on Mac.
Secure Download
Secure Download
How to Screenshot with the Best Snipping Tool for Mac
Step 1.Free download this snipping tool for Mac on your device. Then install and launch it on your Mac computer. On the main interface, click the "Screen Capture" button to take a screenshot on Mac. Or press the default key combination: "Ctrl, Command, and C".

Step 2.This snipping tool on Mac can detect the windows on your device. Therefore, you can pop up a window, or left-click and hold your mouse to draw and get a rectangular screenshot of your window. Then release the mouse to finish capturing.

Step 3.After that, you can simply edit your screenshot with the pop-up tools. You can add text to illustrate certain parts of your snapshot, blur the private info on the screenshot, etc. Then, click the "Copy or Save" button to copy to the clipboard or store the screenshot on your Mac.
2. Greenshot
Greenshot is a lightweight snipping tool for Mac. You can directly get this application from Mac App Store for $1.99. Just like other normal snipping tools for Mac, you can annotate your screenshots easily and quickly. One big highlight of it is that you can directly share your screenshot to sites like Flickr or Picasa.
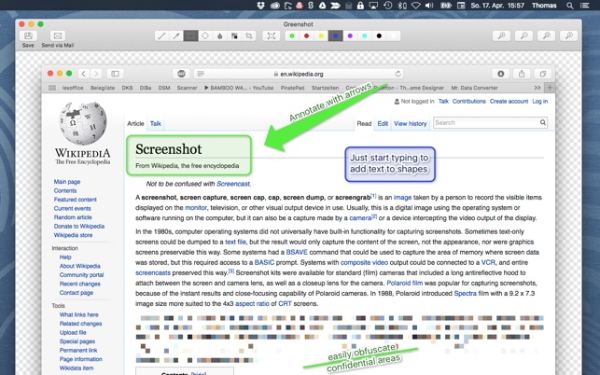
Main Features:
◆ Capture with a full screen, customized area, or scrolling window.
◆ Export your screenshot to the printer or share it on photo sites.
◆ Attach your screenshot to the email to send directly.
◆ Magnify the details on your screenshots.
3. Monosnap
Monosnap is an online snipping tool for Mac. The biggest advantage of an online snipping tool is that you can upload your screenshots to the cloud anytime you want. This enables you to access your previous screenshots from any device. You can rely on this online snipping tool for Mac when the default screenshot on Mac not working.
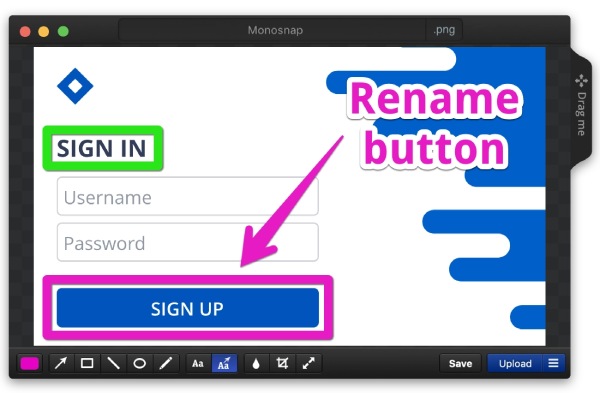
Main Features:
◆ Create screenshots with perfect pixels of high quality.
◆ Upload to several cloud services like Google Drive.
◆ Share screenshots directly on Twitter or Facebook.
4. Lightshot
Lightshot can be your desired snipping tool for Mac as the fastest way to take a customized screenshot. Besides the simple editing function and uploading services, you can also search for the similar picture on the Internet while taking a screenshot. With this free snipping tool for Mac, your snapshot will surely become more interesting and intuitive.
Main Features:
◆ Save your screenshots on any platform with a link.
◆ Access more powerful features with browser extensions.
◆ Take a screenshot quickly with only two clicks.
◆ Find images that are similar to your screenshots.
5. SnapNDrag
SnapNDrag has two versions: free and paid. You can get this snipping tool for Mac on App Store as well and you may also see many good reviews from other users. You can activate this snipping tool anytime you want from the menu bar. There is a unique screenshot mode (Capture Timed Screen) that enables you to set a time for when to take a screenshot on Mac.
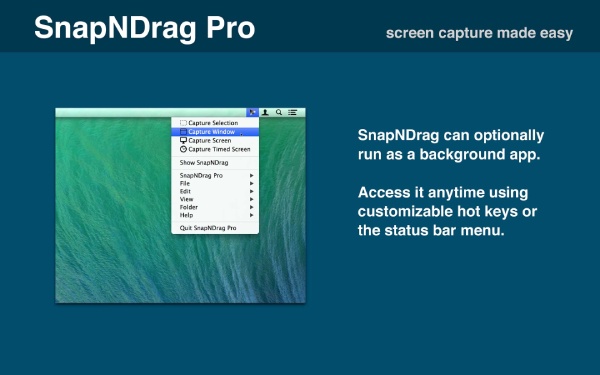
Main Features:
◆ Rename multiple screenshots at the same time.
◆ Drag and drop your screenshot to any acceptable app.
◆ Save your screenshots in several image formats.
◆ Recover a screenshot from its own Trash bin.
6. Capto
Capto is another snipping tool for Mac. Taking a screenshot becomes very simple with the Capto. You can record a tutorial video and make the annotation on your screenshots. Compared to other snipping tools for Mac, there are more editing tools for capturing the screen. The price for accessing the full functions of this snipping tool is $26.99.

Main Features:
◆ Explain your screenshots with multiple annotation tools.
◆ Create, crop, and edit your screenshot with a few clicks.
◆ Share your screenshots to popular social media like Tumblr.
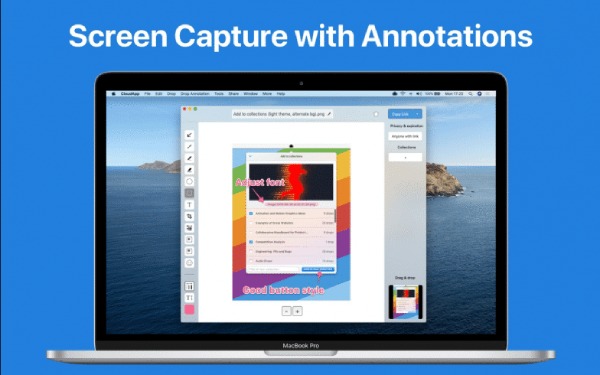
7. CloudApp (Rebranded as Zight in 2023)
CloudApp (Now Zight) focuses more on recording your screen instead of merely taking screenshots on Mac. But you can also use it as a handy snipping tool for Mac especially when you have extensive needs to illustrate and capture screen. Aiming to offer users a better workflow, this program is most suitable for office workers who do lots of online meetings regularly.
Main Features:
◆ Work on screenshots with your team via a link.
◆ Capture and share your screen in a minute.
◆ Share ideas with workmates by creating a GIF.
8. Snagit
Snagit is also one of the popular snipping tools for Mac. As a comprehensive snipping tool, this software can even grab texts from your screen with its OCR technology. When you want to copy a text from a picture, you can make a screenshot with Snagit, and it will automatically recognize the words.
Main Features:
◆ Record your screen in several modes.
◆ Identify texts and characters from your screenshot.
◆ Copy and paste words from screenshots easily.
◆ Integrate with other enterprises like Microsoft Office.
Quick Comparison of 8 Mac Snipping Tools
| Tool | Pros | Cons | Best For |
|---|---|---|---|
| AnyRec Screen Recorder | Take screenshots in full, scrolling, or selected area; add annotations; hotkeys. | The advanced editor is not free. | Good for educators, content creators, and general users. |
| Greenshot | Lightweight screenshot tool; built-in annotations & sharing. | The macOS version lacks basic editing and customization feature. | Quick capture with basic edits. |
| Monosnap | Integrate with cloud services, GIF/video, annotation features. | Can be slow; need to pay for advanced functionality. | Feature-rich free screenshot tool. |
| Lightshot | Fast capture with basic annotation; fast sharing via hotkeys. | Limited editing; all uploaded screenshots are public not encrypted. | Simple grabs and fast sharing. |
| SnapNDrag | Multiple capture options; folder organization; drag-and-drop. | No scroll capture; some Silicon compatibility issues. | Organized screenshots, minimal interface. |
| Capto | Flexible screenshot options; get a built-in image editor. | Complex interface; occasinoal crashes. | Content creators who needs versatility. |
| CloudApp (now called Zight) | Screenshot with share links; cloud sharing; integrate with collaboration tools. | Occasional sync/upload issues. | Team collaboration and sharing.. |
- For easy and everyday use: Go with AnyRec Screen Recorder, Greenshot or Lightshot.
- Need advanced annotation and cloud features? Try AnyRec Screen Recorder, Monosnap, or CloudApp.
- Want to create screencasts or tutorial content? Capto is ideal.
- Prefer drag-and-drop simplicity and organization? Choose SnapNDrag.
Built-in Sniping Tool for Mac
Apart from the best snipping tools for Mac, you can also enjoy the convenience while capturing your screen with the default screenshot app on Mac. With a few presses on your keyboard and a little adjustment, you can find the most suitable way to master this default snipping tool for Mac without hassle. Move on to learn the shortcuts of this snipping tool as well as how to access more options for screenshots.
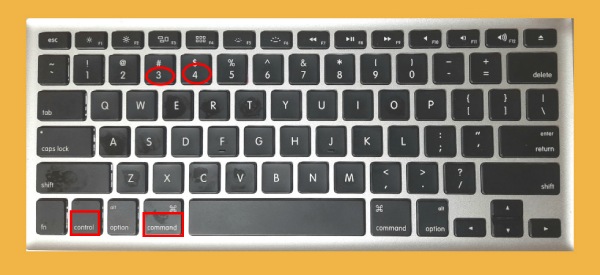
1. Shift + Command + 3
This key combination above allows you to capture the whole screen on your Mac. Then a thumbnail will appear in the corner of your screen. You can click it to edit or simply drag it to a folder or document to save it. Otherwise, the screenshot will automatically save on the desktop.
2. Shift + Command + 4
You can also screenshot part of the screen on Mac by using this shortcut of the default snipping tool for Mac. After pressing these keys, you will see a crosshair appearing on your screen. Then drag it over your screen to select an area you want to capture. Release it to confirm and capture.
You can always cancel the screenshot while dragging. Just press ESC on your keyboard to quit. Moreover, if the selected area is not right, you can press the space bar and drag the area to adjust.
3. Shift + Command + 4 + Space Bar
If you think that dragging the crosshair manually costs too much trouble when you try to capture a certain window or menu, use the key combination above to go quicker. Open any window or menu you want to screenshot and press those keys. Then, a camera icon will appear on the screen, and you just click the window or menu to capture it. To hide the window’s shadow when screenshotting, press and hold the Option key when clicking to capture.
Tips
You can activate the control panel before taking a screenshot. Simply press Shift, Command, and 5 keys to see more options for screenshots. Then, you can click to choose more options and even record your screens. Moreover, if you want to change where the Mac stores your screenshots. Open the Screenshots app and click the Options button on the menu bar to change the settings.
FAQs about Snipping Tool for Mac
-
How to fix the snipping tool for Mac not working?
The simplest way to fix such a situation is to restart your Mac device. Or you can click the Apple button on the menu bar. Then, click the System Preferences button. After that, click the Keyboard button. Next, find the Screen Shots button on the following window and check if everything is enabled. If not, click to enable them.
-
Where does the snipping tool on Mac save screenshots?
Normally, after screenshotting with the build-in snipping tool for Mac, you will see a floating screenshot at the corner of your screen. If you do not click it, it will store on your desktop. Therefore, you can click and drag on that thumbnail to drop it to a folder to change the storage place.
-
How to record videos with the snipping tool on Mac?
You can press the key combination Command, Shift, and 5 to record videos on Mac instantly. This shortcut also enables you to choose screenshot mode to capture the Mac screen. With this key combination, you can also decide where to save the file after recording.
Conclusion
To simply conclude, taking screenshots on Mac can be super easy with the 8 best snipping tools for Mac. You can always find a trustworthy one based on your purposes. Then, your efficiency can be improved greatly when capturing information on the screen. Meanwhile, if you intend to capture pictures with audio on the screen, have a try and download the AnyRec Screen Recorder.
Related Articles
About Our Author


