3 Ways to Make a Photo Bigger without Losing Quality
You have a small image. Maybe it's a logo. Maybe it's a photo from your phone. You need to make the photo bigger for a website, print, and more. If you stretch the small image, it looks awful. Pixels show up everywhere. Lines turn jagged. Faces lose detail. This is a common problem. If you want a bigger photo that still looks sharp, just follow the steps below.
Guide List
Why Photos Go Blurry When Enlarged Make a Photo Bigger with AnyRec AI Image Upscaler Enlarge Photos with Lightroom Super Resolution Resize Photos with Photoshop Generative Upscale Tips to Make a Photo Bigger for Specific PurposesWhy Photos Go Blurry When Enlarged
Every photo has a fixed pixel count. For example, a 1000×800px photo has 800,000 pixels. That's all the data there is. If you stretch an image with a basic editor, and match just spreads those pixels wider. There are no new details, just softness. But AI image upscaling is different. It can generate new pixels that are contextually plausible. Faces look sharper. Textures look real. The honest ceiling is that AI upscaling can make a small image look good at 2× to 8×. But it cannot make a 300×300px thumbnail look like a professional 12MP photo.
Make a Photo Bigger with AnyRec AI Image Upscaler
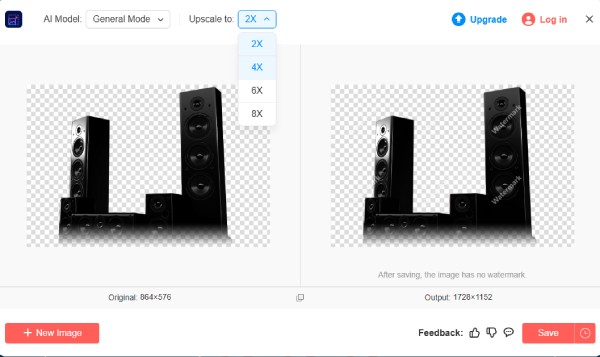
AnyRec AI Image Upscaler can enlarge and enhance images by 2×, 4×, 6×, or 8× online without blurry. It studies your photo's faces, edges, and textures. Then rebuilds them at a bigger size.
There is no pixelation or plastic-skin look. This online image enlarger works for portraits, family photos, product shots, and even anime art. Just upload your photo and make it bigger without losing quality.
- 1. Open AnyRec AI Image Upscaler on your browser.
- 2. Click the "Add Photo" button to upload your image.
- 3. Select the magnification from 2× to 8×.
- 4. Hover your mouse above the image to preview the before and after details.
- 5.Click the "Save" button to enlarge your image by up to 800%.
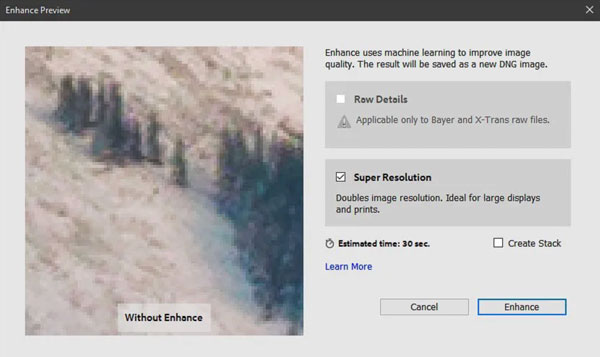
Enlarge Photos with Lightroom Super Resolution
Lightroom Super Resolution increases image resolution while keeping as much detail as possible. It works best with RAW files and high-quality JPEGs. But if the original photo is blurry or very small, don't expect a huge improvement.
- 1. Open your photo in the Library or Develop module.
- 2. Right-click on the photo, then click the "Enhance" button.
- 3. Check the "Super Resolution" box in the dialog to create a 2× upscaled DNG file.
- 4. Click the "Enhance" button to increase pixels with Lightroom.
Resize Photos with Photoshop Generative Upscale
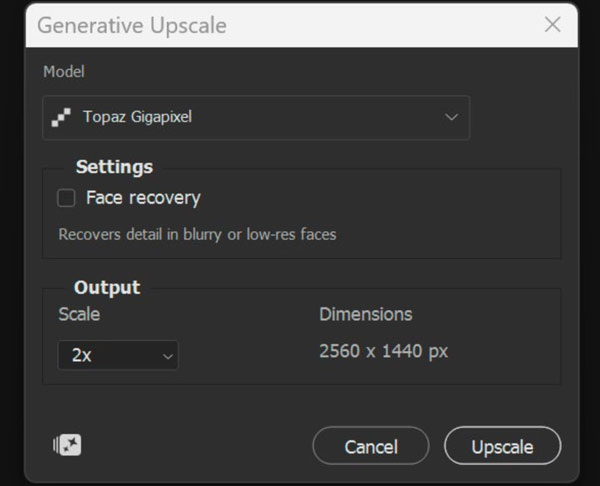
The Photoshop 2026 release Generative Upscale to recreate and enhance visual details using generative models. It does not just stretch pixels. You can get a few AI models to choose from, each one suited for different image upscaling. Follow the steps below to upscale an image in Photoshop.
- 1. Open your image with Adobe Photoshop. Click the "Image" button on the top menu. Then click the "Generative Upscale" button.
- 2. Choose your AI model in the dialog box. Topaz Gigapixel works well for detail-focused and high-resolution results. You can turn on Face Recovery for portraits. Firefly Upscaler is good for general photos. Topaz Bloom adds more creative and stylized detail.
- 3. Choose your scale to 2× or 4×. The maximum image output is 4096px, and the maximum width-to-height ratio is 1:4.
- 4. Click the "Upscale" button to create a new document with two layers.
- 5. Click the "Export" button from the "File" list to save your enlarged photo.
Tips to Make a Photo Bigger for Specific Purposes
Check the following photo sizes for different purposes.
For printing. Aim for 300 DPI. A 4×6 inch print needs at least 1200×1800px. An 8×10 print needs 2400×3000px. Less than that, and your print looks soft.
For Instagram or Facebook. Posts work best at 1080×1080px (square) or 1080×1350px (portrait). Don't upload anything smaller. The platform will stretch images. Then those images will look fuzzy.
For a website banner. Most banners need at least 1920×1080px for desktop. If you're using a small photo, upscale it first. Don't just drag the corners.
For a poster. Posters are viewed from a distance. So, you can get away with slightly less detail. But the 150 DPI is still needed at full poster size. A 24×36 inch poster needs roughly 3600×5400px.
For a passport or ID photo. These need to be sharp up close. Standard size is 2×2 inches at 300 DPI, which is 600×600px. Don't upscale too much, or facial features can look fake.
For a profile picture or resume headshot. 400×400px minimum. The bigger image is fine. But keep the face sharp and the background simple.
Match your online image enlarger to the job. Small image upscaling (2x) usually looks fine. Bigger image upscaling (4x–8x) needs AI tools to stay sharp.
Conclusion
You've probably tried resizing images manually before. However, it may look terrible using the wrong way. The blurry faces and jagged edges are annoying. Photoshop and Lightroom can resize and enlarge photos effectively. However, those Adobe tools are expensive and take time to learn. If you just want something fast that actually works, you can try AnyRec AI Image Upscaler first. This beginner-friendly photo enlarger handles the hard part for you. No complicated settings. You can get a sharper and bigger photo with a few clicks. Sometimes the simplest solution is the right one.
Related Articles
About Our Author


