Hot

AnyRec Screen Recorder
Take a screenshot on Mac with scrolling, full, or custom screen.
Secure Download
How to Copy and Paste Screenshots on MacBook Air and Pro
Taking screenshots on Mac, whether on MacBook Air or MacBook Pro, is made easy by Apple infusing the default shortcut keys. However, questions about copying and pasting screenshots on Mac began to be raised by various users. If you are one of those users searching for a way to do it, luckily, you found this page! Continue reading this post to see the 3 ways to screenshot to clipboard Mac. Explore them now!
Guide List
Part 1: How to Copy a Screenshot to Clipboard on Mac Part 2: How to Paste a Screenshot on Mac Part 3: Best Way to Copy and Paste All Screenshots on Mac Part 4: FAQs about Mac ScreenshotsPart 1: How to Copy a Screenshot to Clipboard on Mac
As we all know, taking screenshots on Mac is easy, and every screenshot situation you need takes a specific key combination. For refreshment, here are the most common critical combinations in taking screenshots on various Mac computers with their corresponding functionality.
| Mac Screenshot Shortcut Keys | Functionality |
| Command + Shift + 3 | Capture the entire screen of your Mac computer. |
| Command + Shift + 4 | Takes a screenshot of a specific portion of your screen. |
| Command + Shift + 4 + Space bar | Command + Shift + 4 + Space bar |
Now, the question is, how to copy the screenshot to the clipboard on Mac? You must execute those key combinations while pressing your keyboard's Ctrl or control key. Consider the shortcut keys below with their corresponding steps showing you how to screenshot to clipboard Macs such as MacBook Pro and MacBook Air.
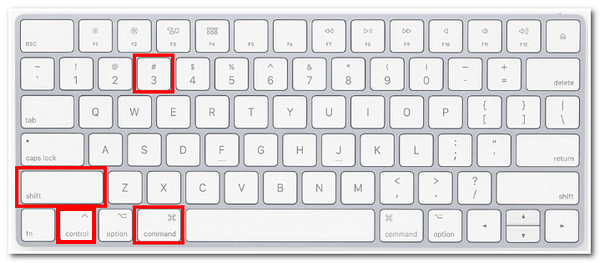
If you wish to screenshot your entire Mac screen to the clipboard, press Command + Ctrl + Shift + 3 keys simultaneously on your keyboard.
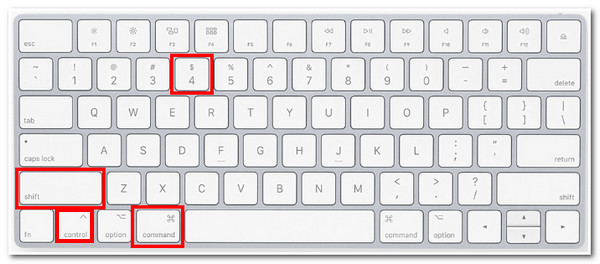
To capture a small portion of your screen, press Command + Ctrl + Shift + 4 keys. Then, use the cursor and move it to the location of the area you wish to capture. The system will copy the screenshot on your clipboard. You can now paste the copied screenshot on other programs.
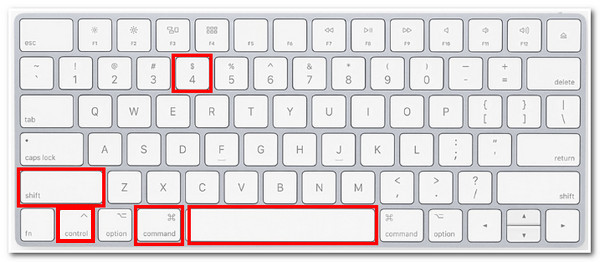
Alternatively, if you wish to take a screenshot of an active window to the clipboard, press the Command + Ctrl + Shift + 4. Then, press the Space bar on your keyboard. Your cursor will turn into a Camera; click the window you wish to capture.
Part 2: How to Paste a Screenshot on Mac
Step 1.Initiate a screenshot to clipboard process on your Mac screen by following the steps above, whether you want to capture an entire screen, a specific area, scrolling screenshot, or an active window.
Step 2.After that, the system automatically copies your screenshot on the clipboard. Access the program where you wish to paste the copied screenshot.
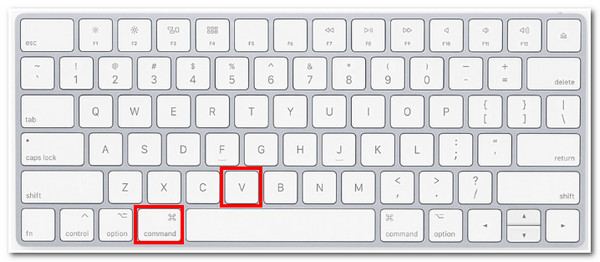
Step 3.Then, on your keyboard, press the "Command + V" keys simultaneously. The copied image will then be pasted on the program you have accessed.
Part 3: Best Way to Copy and Paste All Screenshots on Mac
Now those are the workable ways to screenshot to clipboard Mac and paste it on another program. Suppose there are instances that you couldn’t be able to perform a screenshotting process on Mac’s default screenshot feature on various applications. In that case, you can use the AnyRec Screen Recorder tool to be your best ally. This tool supports a built-in Screenshot Tool that enables you to capture your entire Mac’s screen, specific areas of it, and an active window. It is also infused with the ability to copy the screenshots you’ve taken and paste them into another program.

Offer various screenshot modes to copy and paste screenshots on Mac.
Support Real-Time Drawing Tools to add arrows, lines, text, stickers, etc.
Infused with a Copy feature to take a screenshot without the need to save it.
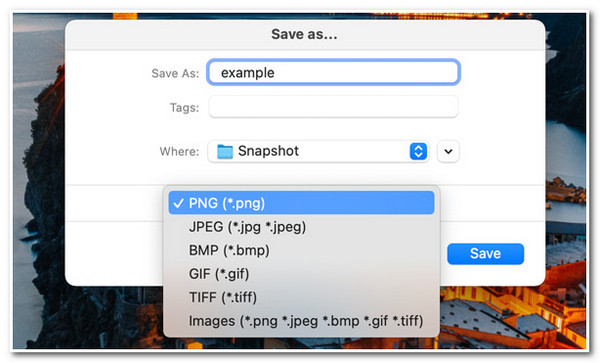
Export screenshot, which includes PNG. JPEG/JPG, BMP, GIF, and TIFF.
Secure Download
Secure Download
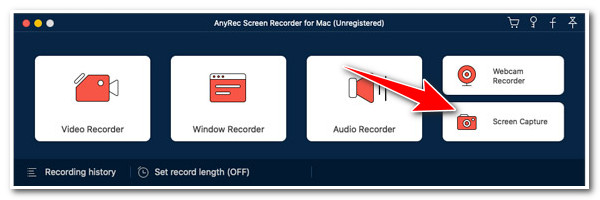
Step 1.Download and install the AnyRec Screen Recorder on your Mac computer. After that, launch the tool and click the "Screen Capture" option on the interface.
Secure Download
Secure Download
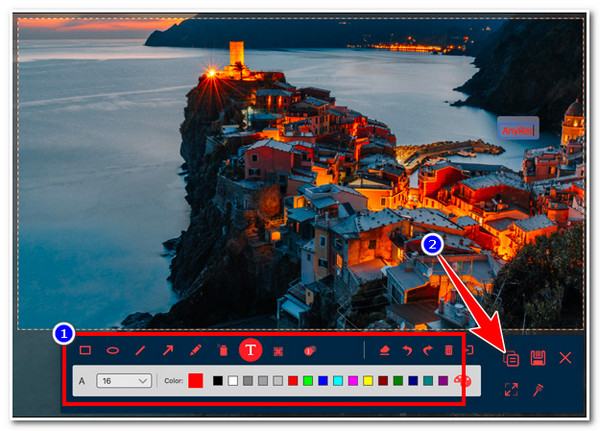
Step 2.You can adjust the "borderlines" by moving them to a specific area. Once you choose the area, release the "left-click mouse" to capture it.

Step 3.Then, you can add annotations to your screenshot on the tool's built-in pop-up toolbox. After that, click the "Copy" button to copy the screenshot on your Mac’s clipboard.
Step 4.After that, if you wish to save the file, click the "Save" button and select a specific option from the following prompts. Otherwise, you can paste it to other places.
Secure Download
Secure Download
See How to Take and Copy Mac Screenshots the Right Way
Watch this video to take screenshots, and then save it to your computer. Or you can copy Mac screenshots to the clipboard.
Secure Download
Secure Download
Part 4: FAQs about Mac Screenshots
-
Where can I find my screenshots on my Mac?
By default, after you take a screenshot, they are automatically saved on your Desktop. It was named Screen Shot [date] at [time].png. In macOS Mojave or later, you can change its location on the Screenshot Options menu in the Screenshot App.
-
Does taking a screenshot to the clipboard on Mac automatically save the image on the Desktop?
No, this Mac’s feature doesn’t go that way. If you press the Control key with other default shortcut keys in capturing Mac’s screen, the system will copy them on your clipboard instead of saving them directly on your desktop.
-
How do I change the default location where my screenshots are saved?
You can change its location using key combinations if your desktop looks cluttered due to many screenshots. Access the Screenshot app on your macOS Mojave or later by pressing the Command + Shift + 5 simultaneously. Then, click the Options button in the toolbar and select a file folder where you want to save your screenshots.
Conclusion
Now those are the 3 workable ways to copy and paste screenshots on Mac. Through them, you can now screenshot Mac with shortcuts based on your needs and paste them to other programs for either documentation compilation or image editing. If you are looking for an all-in-one snipping tool for Mac that offers you great capturing methods and excellent editing tools, then the AnyRec Screen Recorder tool is what you are searching for. This tool supports advanced features to copy and paste screenshots on Mac that are well-composed for an easy screenshotting process, which could also produce high-quality outputs. Feel free to visit this tool’s official website to discover its other capabilities!
Secure Download
Secure Download
Related Articles
About Our Author


