
How to Record Microphone on Any Device? (4 Ways Plus Tips)

Great voiceovers are not just for professionals; they are something you can now do using the gear you already have on your desk or in your pocket. While you can record microphone on desktop and mobile phones, you know how frustrating default setups can be. But as luck would have it, getting studio-style sound isn't that difficult. Today's guide shares four reliable ways to record audio from microphone, with essential tips to help you capture rich audio every single time.
Guide List
Record Microphone with Noise Cancellation Record Microphone on Windows Record Microphone on Mac Record Microphone on Android or iPhone Tips for Improving Microphone Recording QualityRecord Microphone with Noise Cancellation
When you desire to record microphone for crisp voiceovers, a podcast, or simple notes, background hums can quickly ruin an otherwise great track. Thus, to ensure no annoying noise before you finish your file, use AnyRec Screen Recorder for both Windows and Mac. This software comes packed with built-in noise cancellation and audio enhancement features that strip away background noise. It allows you to capture the mic independently or mix it smoothly with your system audio while adjusting volume levels in real-time. Furthermore, you can export your audio tracks in high-fidelity formats such as MP3, AAC, or WAV without worrying about watermarks or time limits.
Advanced noise cancellation to eliminate fan noise, hums, and echoes.
Microphone enhancements to make your voice sound richer.
Trim awkward pauses, intro noise, or mistakes after hitting stop.
Capture both your mic and system sounds together or separately.
Secure Download
Secure Download
Step 1.Start AnyRec Screen Recorder on your PC or Mac, then pick "Audio Recorder" mode on the main interface.
Step 2.Toggle the "Microphone" switch to ON. Check "Microphone Noise Cancellation" and "Microphone Enhancement" options from the "Settings" button.
Try speaking to test the sound levels to ensure your audio meter stays comfortably in the green zone.
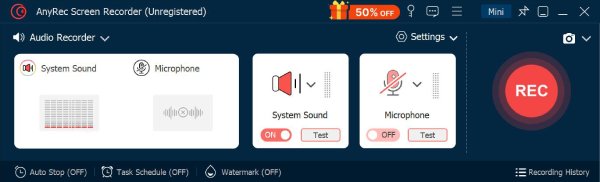
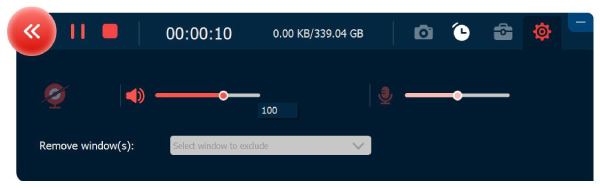
Step 3.Click the "Record" button and start speaking. After a while, click the "Stop" button, preview your audio, and trim off any unwanted parts, then save your track in your desired format.
Record Microphone on Windows
Moving away from desktop apps, here comes a pre-installed app on your Windows PC called Sound Recorder (Voice Recorder). This lightweight tool is perfect for recording vocals in seconds without installing anything extra. It offers a clean interface, basic audio waveform visuals, and simple file management in one place of Windows voice recording.
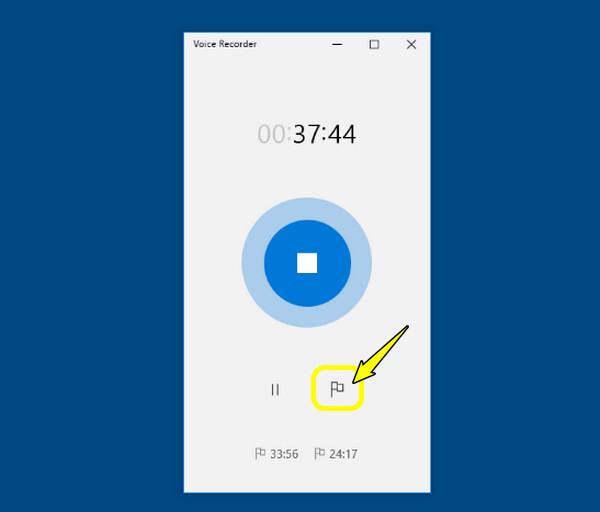
Step 1.Click the "Start" menu and open the Sound Recorder. Click the "Microphone" button to make sure your main microphone is selected.
Step 2.Then, start recording. Click the "Flag" button to mark moments while speaking. Later, click the "Stop" button when finished.
Step 3.Your file is saved to your Sound Recordings folder, where you can edit or share it directly.
Best for: Quick voice memos, reminders, and ideas. It is perfect for students or professionals who need a reliable tool for a simple mic recording.
Record Microphone on Mac
Apple users have their own set of tools to record microphones as well. If you wish to get that seamless experience that syncs across all your Apple devices, Mac has the native Voice Memos app. And for times when you need more control over your input, QuickTime Player has got you. Both offer a simple, reliable alternative to recording microphone on Mac.
Use Voice Memos:
- 1. Launch Finder on your Mac. Go to "Applications". Then double-click "Voice Memos". Click the "Record" button in the corner to start.
- 2. If you need to take a break, you can hit "Pause". Click "Done" once your session is finished.
- 3. Click on your new recording, then click the "Options" button in the corner (three sliders), and check "Enhance Recording" to lessen background noise instantly.
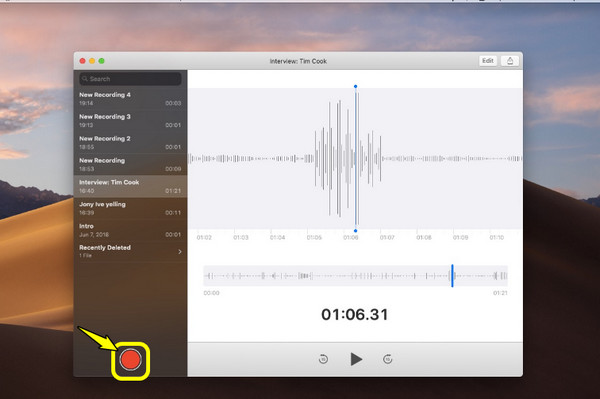
Best for: Perfect for Apple users who want their files accessible, and great for quick noise reduction.
Use QuickTime Player:
- 1. Start QuickTime Player from your Applications folder. Click on "File" at the top and choose "New Audio Recording".
- 2. Next, click the arrow beside the Record button. There, pick your desired microphone and choose your desired audio quality.
- 3. Now, click the "Record" button to initiate recording. When done, click the "Stop" button. Head to "File" then "Save", name your file, and select your location folder.
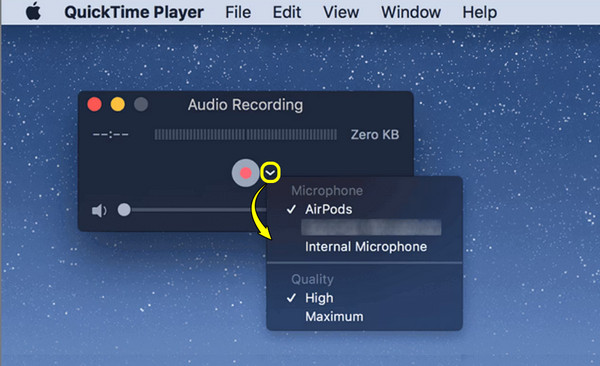
Best for: Switching between USB mics, audio interfaces, and built-in Mac mics, and also for creators who want exact output folders after recording.
Record Microphone on Android or iPhone
Modern smartphones are capable of picking up clear sound without any external hardware. For iOS users, you have Voice Memos, while Android users have the Voice Recorder app. Mobile recordings give you instant portability.
Best for: Capturing conversations, events, or sounds on the move.
How to Record Microphone on Android?
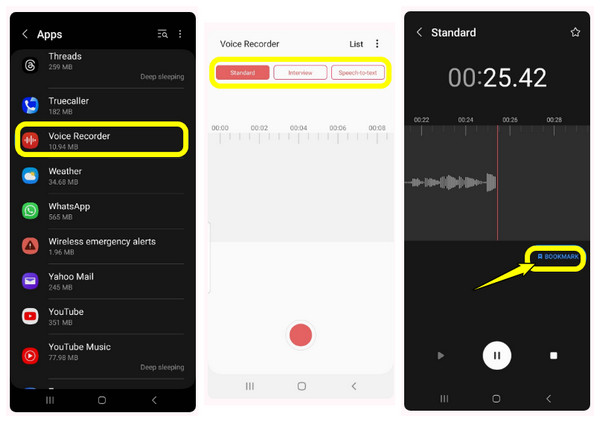
- 1. Swipe up to access your app drawer, then look for "Voice Recorder". You can then pick a recording mode like Standard or Interview if your Android phone supports it.
- 2. Next, tap the "Record" button. Use the "Bookmark" icon to tag important parts while you speak.
- 3. Tap the "Stop" button when done.
How to Record Microphone on iPhone?
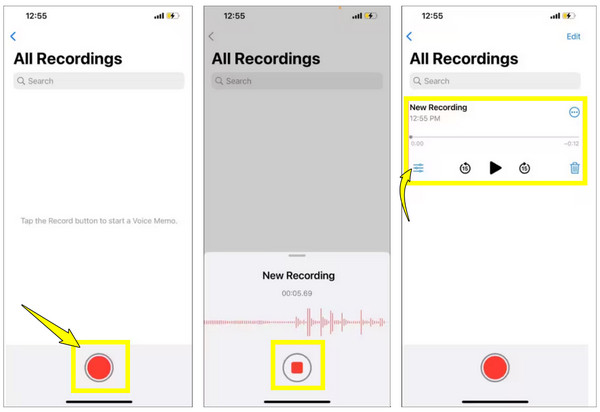
- 1. Open the "Voice Memos" app on your iPhone.
- 2. To start, tap the "Record" button. Use the "Pause" button to take a breather or tap the "Stop" button to finish the session.
- 3. Your newly saved clip is placed on your screen. Tap on it and select the "Options" button (three-slider icon), and toggle "Enhance Recording" to reduce noise.
Tips for Improving Microphone Recording Quality
Even the top-tier recording software can only do so much if your track comes with echoes or background noise. So, besides knowing voice recording, it's nice to see some practical tweaks too to ensure your audio recording always sounds clear.
- • Use an External Microphone. Upgrading your setup with a dedicated microphone instantly adds detail to your voice while reducing tinny distortion.
- • Record in a Quiet Room. Choose a soft room with soft furniture or even record near a closet to avoid hollow echoes.
- • Wear Headphones. Monitoring your audio with headphones stops the sound from your speaker from getting into your mic.
- • Use a Pop Filter and Mind Your Distance. Position your mic about 4 to 8 inches away from you. You can pair it with a pop filter to prevent harsh blasts of air.
Conclusion
You can nail microphone recordings across your computer and phone without a thousand-dollar gear! Thanks to the right recording tool and keeping a few tips in mind, you can record voice from microphones anywhere inspiration pops into your mind. When you need an effortless option on your desktop computer, try AnyRec Screen Recorder today. It takes all the complicated steps out of capturing professional computer audio, whether microphone or system. Head over to their site and download it to give your tracks the upgrade they deserve.
Secure Download
Secure Download
Related Articles:
About Our Author