Hot

AnyRec Screen Recorder
Take a screenshot on iPad without Home button.
Secure Download
How to Take Screenshots on iPad? 3 Ways and More Here
Whether you need to save a frame from a video on your iPad or annotate a webpage, the best method to take screenshots on iPad depends on your specific iPad model and workflow. To help you out, this comprehensive guide shows 3 easy-to-follow ways to screenshot iPad (Pro, Mini, Air, and more), with and without the Home button. You'll also learn reasons for a sudden iPad screenshot note working issue, and the editing steps after capturing your iPad screen instantly and effectively.
Guide List
Take a Screenshot on iPad with Home Button How to Take a Screenshot on iPad without Home Button The Reason iPad Screenshot Not Working Use Alternative on PC to Screenshot on iPad How to Edit Screenshots with the Default ToolTake a Screenshot on iPad with Home Button
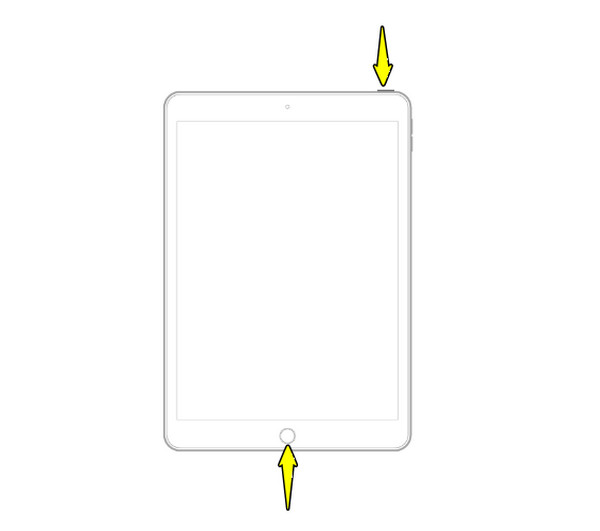
Older iPad models that include the physical Home button offer a straightforward, two-button combination for capturing screenshots of the iPad screen. This approach is quick, so reliable, and instantly saves the image to the Photos app.
See below to take screenshots on iPad with the Home button:
Step 1.Go to the content you wish to capture on your iPad.
Step 2.Then, press and release quickly both the "Power" and "Home" buttons.
Step 3.A thumbnail will appear in the lower-left corner of the screen. Tap on it to enter the ding mode, or swipe left to dismiss it, and it will be saved automatically to your Photos library.
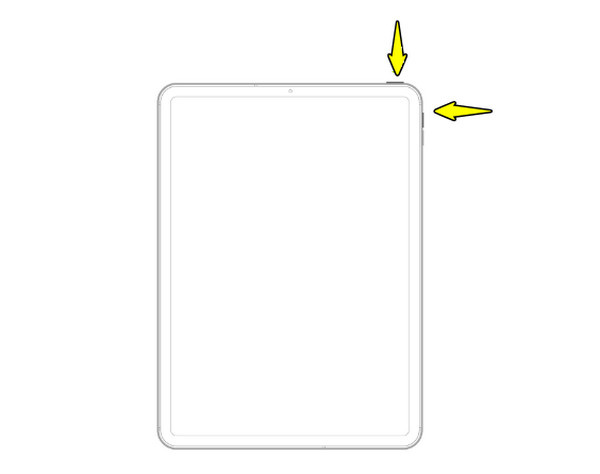
How to Take a Screenshot on iPad without Home Button
Newer, modern iPad models such as iPad Pro, iPad Air, and recent iPad Mini do not boast the physical Home button. So, how to take screenshot on iPadOS 26 (even on M5 iPad Pro, iPad 11 and earlier)? The iPad screenshot shortcut for these devices is done using the Power and Volume buttons, still keeping the same two-button simplicity approach.
Here's how to screenshot on iPad Air and other models without Home button:
Step 1.Ready the content you wish to capture. Simultaneously press and quickly release the "Power" and "Volume Up" buttons.
Step 2.Then, you can see a thumbnail of the captured image in the lower-left corner of your screen.
Step 3.Tap on it to access the editing page, or swipe left to dismiss it and view it in the Photos app.
The Reason iPad Screenshot Not Working
While it is so straightforward to screenshot on iPad, sometimes, you may encounter a situation where the function fails, whether by using the Home button or the Power button combinations. When the iPad screenshot not working issue happens, it can be frustrating, especially if critical information needs to be captured quickly.
Luckily, this issue is rarely due to hardware failure and is usually because of software glitches or incorrect settings. Knowing the reasons behind it can help you apply the proper fix.
- 1. Incorrect Button Combination/Timing. You may press the buttons in the wrong way, or at a different time.
- 2. Temporary iOS Bugs. A minor glitch can sometimes affect the screenshot function.
- 3. Physical Button Damage. If one of the screenshot buttons is physically damaged or unresponsive, the shortcut will fail.
- 4. Assitivetouch Conflict. If you have customized the single tap, double tap, or long-press action, it might conflict with the native screenshot command.
- 5. Protected Content. Some apps, like streaming services, have digital rights management that blocks screenshots and recording.
Use Alternative on PC to Screenshot on iPad
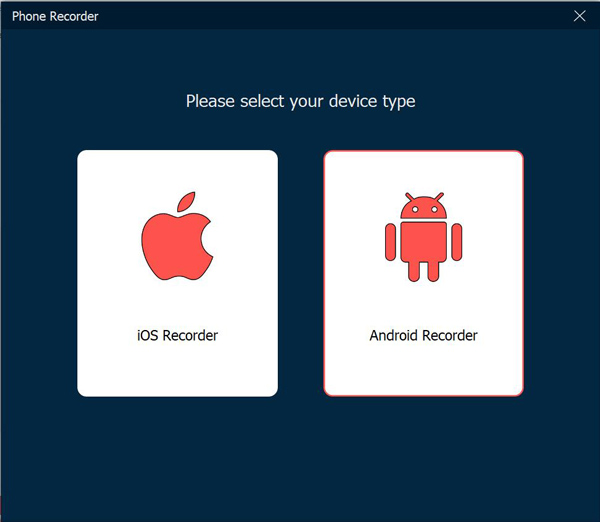
When facing the iPad screenshot not working issue just now, especially from apps that restrict direct capturing on iPad, mirroring the device to your PC is an effective workaround. For this, AnyRec Screen Recorder has the Phone Recorder tool to seamlessly project your iPad's screen onto a larger desktop monitor. This recorder not only bypasses recording restrictions but also ensures you get to take screenshots on iPad anytime without the button combinations. Also, it provides you with professional desktop tools for high-quality capture, annotation, and editing, all in one place.

Can record in full HD up to 4K, providing detailed iPad screen recordings.
Draw, insert text, and take a screenshot on the screen during the recording process.
Ensures lag-free and uninterrupted recording, mirroring the iPad smoothly.
Preview and trim your recording, removing extra parts before saving the final file.
Secure Download
Secure Download
Step 1.Open AnyRec Screen Recorder on your computer. From the main dashboard, choose the "Phone Recorder" tool. A new window will appear asking you to specify the device type. Click "iOS Recorder".
Step 2.On your iPad, open the "Control Center" and tap the "Screen Mirroring" icon. From the list of available mirroring devices on your iPad, pick the "AnyRec Screen Recorder" option to begin the connection.

Step 3.Your iPad screen is now mirrored on your desktop. Use the controls within the window to take a screenshot or record. You can select the sound source as needed.
Step 4.Once done, the captured video and screenshots will appear in the preview window. You can use the editing tools to refine the video or image before saving it.
Secure Download
Secure Download
How to Edit Screenshots with the Default Tool
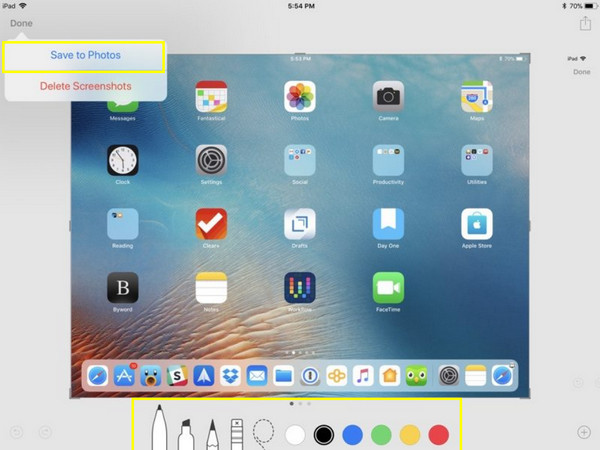
After taking iPad screenshots, the system automatically presents a powerful, built-in editing tool, Markup. This utility lets you quickly crop, annotate, sign, and highlight content on the screenshot before saving it, removing the need to open a separate app to edit the captured image.
Step 1.Right after taking a screenshot, tap the "thumbnail" shown in the lower-left corner of the screen.
Step 2.In this page, you can use tools such as Pencil, Eraser, Ruler, Crop, and the Plus button (add text, shapes, and more).
Step 3.Once you're satisfied with your edits, tap the "Done" button. Save the edited screenshot to Photos, or you can share it immediately via AirDrop, message, or email.
Conclusion
You have seen here detailed primary methods to take a screenshot on iPad, ensuring every user, regardless of the iPad model or desired approach. Furthermore, after capture, the Markup tool is there to help you enhance your images right away without using any other app. But if ever button combination troubles you, mirror and screenshot iPad screen using AnyRec Screen Recorder! By using its Phone Recorder feature, you can mirror your iPad screen to your PC, allowing you to capture content onto your desktop in high resolution while giving you access to annotation and editing tools.
Secure Download
Secure Download


