
How to Record Audio on Mac? 4 Methods to Try [with Steps]

If you know how to record audio on a Mac, it will definitely be easy for you to keep meeting recordings, record voice memos or narrations, create podcasts or voice-overs, capture system audio, and more. But what if you don't know how to do that? Or what if you do know how, but you find the method unsuitable? If so, worry no more, because this post covers four effective methods of Mac audio recording with step-by-step guides! Explore them below!
Guide List
What Kind of Audio Do You Need Why Your Mac Recording Has No Sound 2 Ways to Record Your Voice on Mac (Built-In, No Setup Needed) 2 Ways to Record System Audio on Mac (Also Voice and System Audio) Common Problems and Fixes for Mac Audio RecordingWhat Kind of Audio Do You Need
Before you try the four different methods in this post to record computer audio on a Mac, you might need to think about what type of audio you want to record. Different recording needs, subjects, or types of content may require different tools or methods.
- • Voice or microphone only - This option is for you if you are recording podcasts, voice memos, narrations, interviews, or dictation. Your Mac can do this using built-in apps like QuickTime Player. In that case, no extra setup is needed.
- • System audio only - If you want to record audio playing from your Mac, such as music, videos, or app sounds, you'll need a tool that can record internal audio because macOS doesn't support this feature by default.
- • Microphone and system audio together - In case you are planning to record tutorials, gameplay, online meetings, or presentations with your voice, you'll need a third-party tool that can capture both of those audio sources simultaneously.
Why Your Mac Recording Has No Sound
Now that you have identified the type of audio you need to record and the method you want to use, you might also need to know why your Mac recording has no sound before you totally jump to this post's methods to capture audio on a Mac, just in case you encounter this issue.
The most common reasons why your Mac recordings have no sound are that the wrong microphone is selected, the microphone doesn't have permission to be used, the input volume is too low, or the microphone is muted. So, before recording again, check your audio input, permissions first, and volume settings to make sure everything is set up correctly.
Now, if you are planning to record your Mac's internal audio, as mentioned earlier, your device doesn't support it. In that case, you'll need a third-party recorder that can capture system audio.
2 Ways to Record Your Voice on Mac (Built-In, No Setup Needed)
Now that you are done with the first two sections, you can start trying this post's featured methods to record system audio on MacBook, as well as your voice through the microphone. You can start with these two ways to record your voice on a Mac using its built-in apps.
1. Voice Memos - Best for Simple Voice Notes, Lectures, Interview Recordings
The first built-in app you can use to record your voice on a Mac is Voice Memos. This app is the best option if you are trying to record your voice for voice notes, quick ideas, interviews, lectures, meetings, and narrations. You can use Voice Memos to make a recording on iPhone as well. Here are the steps to record audio on a Mac, particularly voices, using Voice Memos:
Step 1.Open the Voice Memos app on your computer. You can try finding it in the "Applications" folder or search for it using "Spotlight". Make sure your microphone is connected before recording.
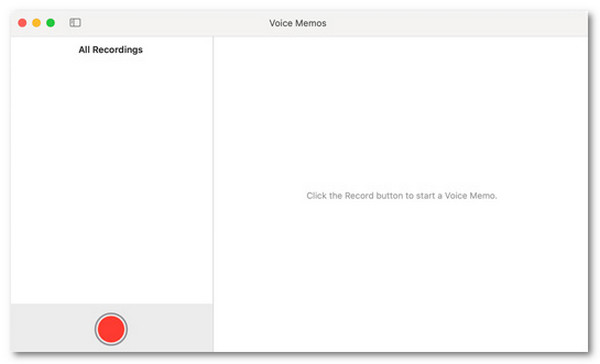
Step 2.After that, click the "Record" button with the Red Circle icon to start the recording process. You can now speak clearly, and Voice Memos will capture them.
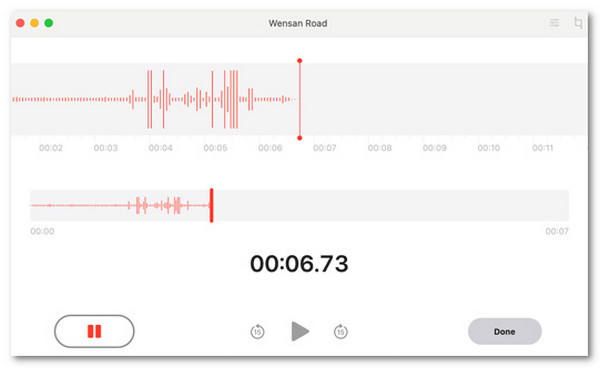
Step 3.Once you are finished recording, click "Stop". The recorded voice audio will be saved automatically in the Voice Memos, which you can then edit, rename, and share.
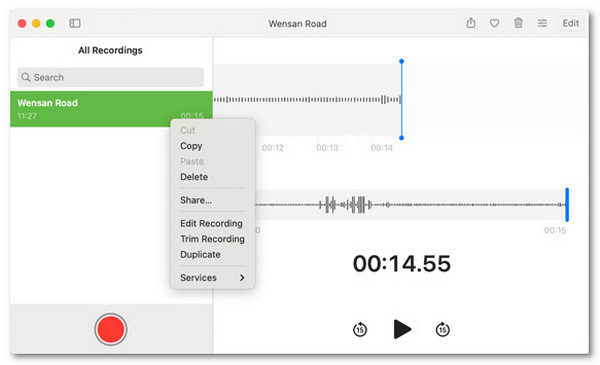
Limitation:
- • Can't record internal audio on Mac.
- • Limited editing features.
- • May have lower audio quality.
2. QuickTime Player - Best for Simple Recordings with More Flexibility
Aside from Voice Memos, you can also use QuickTime Player to record voices on a Mac through a microphone. Compared to Voice Memos, this tool lets you choose the recording quality, select a microphone, and save your recordings to your preferred location. So, if you wish to experience much more control than Voice Memos, here are the steps to record Mac audio using QuickTime:
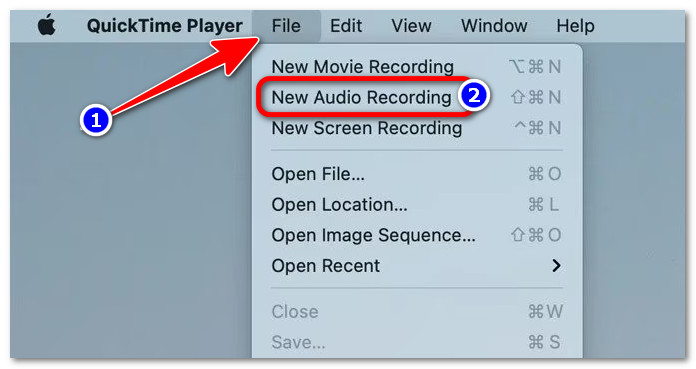
Step 1.Launch QuickTime player on your Mac. Then, click "File" and select the "New Audio Recording" option.
Step 2.Next, head to the "Options" to adjust the recording settings. Under the "Microphone", select the microphone input you wish to record. Then, choose "High" under the "Quality" section.
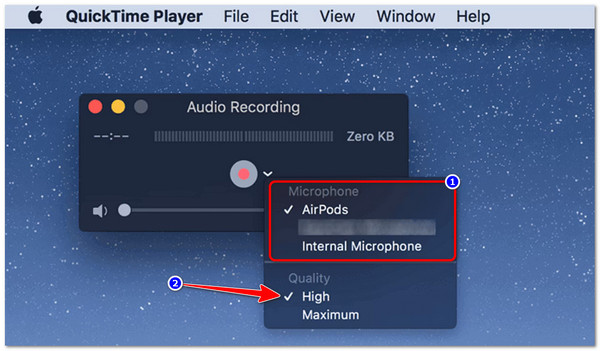
Step 3.Once done, click "Record" to start the recording process. If you're done recording, click "Stop". Lastly, click "File", select "Save", and choose where you wish to save the recorded voice.
Limitation:
- • No pause button during recording.
- • Only offers very basic editing options after recording.
What to Do If It's Still Silent While Recording
There you have it! Those are the two ways to record sound on Mac through built-in apps. Now, if your Mac recordings are still silent after trying the built-in recording apps earlier, don't worry. Incorrect settings, missing permissions, or microphone issues usually cause the problem. To fix it, try performing these solutions:
- • Check the selected microphone and make sure your Mac is using the correct microphone input.
- • Allow microphone access by checking your Mac's privacy settings, and make sure that the recording app has permission to use the microphone.
- • Try to increase the microphone input volume in your Mac's sound settings.
- • Check if your microphone is muted, covered, or blocked. These might prevent the microphone from capturing audio properly.
- • Reconnect your microphone by unplugging and plugging it back in until your Mac detects the device.
- • Test the microphone using another app to determine whether the issue comes from the microphone itself.
2 Ways to Record System Audio on Mac (Also Voice and System Audio)
Now, in case you are aiming to record system audio on your macOS, here are the two effective ways to record internal audio on Mac. Explore each of them and use the one that works on your end.
1. AnyRec Screen Recorder - Best for Recording Audio from All Sources
If you are looking for a tool that can help you record both your Mac's system audio and your voice from the microphone, one of the best options is AnyRec Screen Recorder. This tool enables you to record internal and external audio separately or at the same time. You can use it to record voiceovers, calls, podcasts, etc., with the original high quality, reduced noise, and less echo. Additionally, it is also packed with options to tweak the recorded audio from your Mac.
Record audio on Mac from any site with the original quality.
Lets you trim, merge, and convert recorded internal and external audios from your Mac.
Allows you to convert audio recordings from your Mac to ACC, AC3, WMA, and more.
Supports noise cancellation and audio enhancement for audio recording.
Secure Download
Secure Download
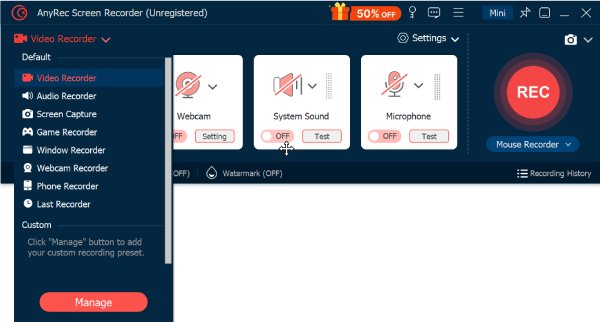
Step 1.Head to the AnyRec Screen Recorder's official website, and from there, install it on your Mac. After that, click the recorder option dropdown button and select "Audio Recorder".
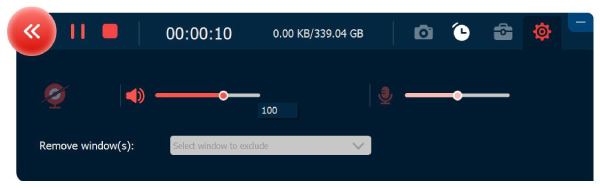
Step 2.Next, toggle the "System Sound" and "Microphone" switches on for both, or turn on only one based on your recording needs. You can also set your desired input device and volume as you like.
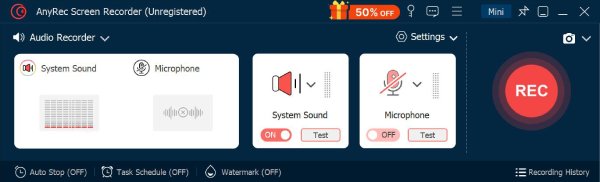
Step 3.Once everything is set, click "REC" to start recording the microphone and system sound simultaneously or separately. Once finished, click "Stop" to capture internal audio on Mac.
Limitation:
- • Requires a subscription for the full experience (although it offers a free tier).
2. BlackHole + Audio MIDI Setup - Best for Recording System Audio for Free
Aside from the first featured solution, you can also record internal audio on Mac through BlackHole, together with Audio MIDI Setup. BlackHole is a virtual audio driver that serves as an invisible cable that captures system sound. At the same time, the Audio MIDI Setup lets you create a Multi-Output Device so you can hear and record your Mac's audio simultaneously.
Step 1.Download and install BlackHole on your Mac. Once installed, open "Audio MIDI Setup" from the "Applications" folder, then open the "Utilities" folder.
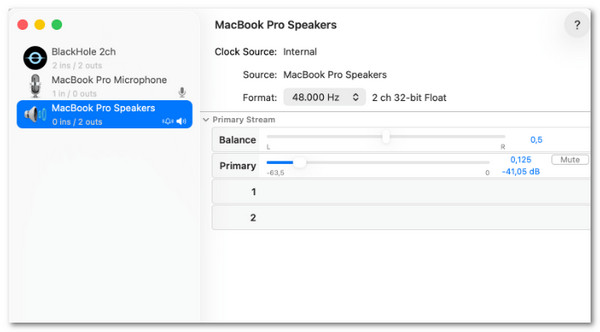
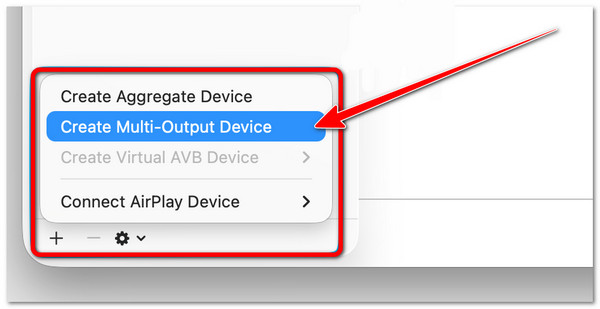
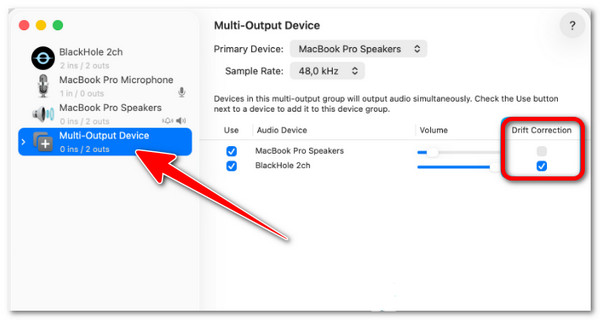
Step 2.After that, click the "+" button at the bottom left and select "Create Multi-Output Device". Then, check both your Mac's "Built-in Output" and "BlackHole 2ch", so your system audio can be recorded correctly.
Step 3.Set the newly created "Multi-Output Device" as your Mac's audio output. Then, open your recording app, choose "BlackHole 2ch" as the audio input, and start recording your Mac's system audio.
Limitation:
- • Requires a few extra steps to set up.
- • Cannot record microphone audio unless configured separately.
Common Problems and Fixes for Mac Audio Recording
There you go! Those are the tools you can use to record system audio on Mac, and of course, your voice from a microphone. Now, you may still encounter some issues during the audio recording process on your Mac. Below are some common Mac audio recording problems and their possible fixes:
- • Recording finished, but there's no sound at all - Check if the correct audio input and output devices are selected. Also, ensure that the recording app has permission to access your microphone or audio source.
- • The microphone records, but the app/system sounds don't - Make sure your system audio source is enabled and selected correctly. If you are using BlackHole, check that it is set as the audio input device.
- • BlackHole is installed, but it is still not working - Try restarting your Mac, check the Audio MIDI Setup configuration, and make sure BlackHole is selected as the correct audio device.
- • The recording app won't access the microphone at all - Go to System Settings, then head to Privacy & Security, access Microphone, and allow the app to use your microphone.
- • Audio cuts out after a macOS update - There's a possibility that updates reset the audio settings or permissions. Recheck your sound settings and reconnect or reinstall audio drivers if needed.
Conclusion
By having those tools and their steps to record system audio on Mac, it is now possible for you to record audio on your Mac. Through them, you can now keep audio recordings of your meetings, voice memos or narrations, podcasts or voice-overs, and more. However, if you wish to record with almost no limitations, have a simple and quick external and internal audio recording process, and get high-quality output. You should use the AnyRec Screen Recorder's audio recorder feature! Try this tool today, and don't forget to share it with others.
Secure Download
Secure Download
About Our Author