Hot
AnyRec Screen Recorder
Record and screenshot any video on Windows and Mac.
Secure Download
How to Crop an Image on Mac: Preview, Hotkeys, Etc. [7 Ways]
Now that you’ve seen your photos on Mac, you might be saddened when you notice an unwanted subject or photobomber. As it takes you much time to compose yourself in the camera, it becomes vital to learn how to crop an image on Mac to make it pleasing on a bigger screen. Hence, this post will take you through the 7 ways to crop on MacBook, each with a complete tutorial, all of which have been tested and proven effective.
| Ways to Crop an Image | Price | Functions | Difficulty |
| Preview | Free | View the image easily with a cropping tool. | Easy |
| Photos App | Free | Can store and sync photos and videos from other Apple devices. | Easy |
| Hotkeys | Free | Open the captured image in the preview. | Easy |
| Photoshop | Free trial Starts at $22.99 | Edit images using professional-level tools. | Moderate |
| Fotor | Free The pro version starts at $4.99 | Online editor for easy image editing with tools like cropper, rotator, flipper, etc. | Moderate |
| Pixlr | Free The pro version starts at $4.90 | Web-based editor to edit images using easy-to-use and basic editing tools. | Moderate |
| AnyRec Screen Recorder | Free version The pro version starts at $12.48 | The recorder has a snapshot tool, more recording modes, and editing tools. | Easy |
Guide List
Preview – View and Crop Any Image or Screenshots Photos App – Sync and Crop Images from Another Device Hotkeys – Capture, Open the Screenshots in Preview, and Crop Photoshop – Add and Crop/Edit Image Fotor – Open and Crop Images Online Pixlr – Upload and Crop/Edit Images with AI AnyRec Screen Recorder – Capture and Crop Screenshots FAQs About How to Crop an Image on MacPreview – View and Crop Any Image or Screenshots
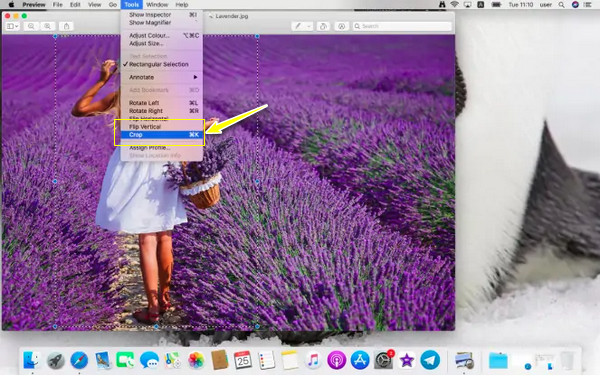
Consider the Mac’s default photo viewer if you wish to learn how to crop on a MacBook. Using it, you can crop any type of image you want, by just selecting and holding down the Command + D keys to maintain the original intact.
Step 1.Start with double-clicking the image in Finder, and you must choose to open it in Preview. Or, launch "Preview", click the "File" tab, and select "Open" to browse the local file.
Step 2.Once the image has been added, click on the point where you want to crop it and drag the frame to determine the area you intend to keep.
Step 3.Afterward, click the "Tools" tab and choose "Crop". You can also use the "Command + K" keys to crop the image. That’s how to crop in Preview!
Photos App – Sync and Crop Images from Another Device
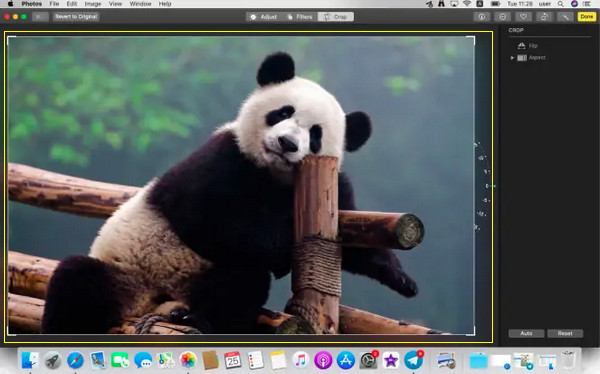
Besides the default image viewer, you have the Photos app to help you understand how to crop an image on Mac. The Photos app not only does its job effectively to sync images from another device, but it also has a built-in editing tool with a cropper. See how to crop a picture on Mac in the following steps:
Step 1.Upon launching "Photos", determine the image you want to crop and double-click on it. To start, click the "Edit" button at the upper right.
Step 2.Once inside the editing window, click the "Crop" button in the toolbar. Drag the frame border to crop the image on Mac with the desired part remained. Alternatively, utilize the "Aspect options" to select a shape.
Step 3.If satisfied, click the "Done" button. Or else, take advantage of the other adjustments, like applying filters, enhancing color, and more. It can also make picture smaller on Mac.
Hotkeys – Capture, Open the Screenshots in Preview, and Crop
After mastering the two ways how to crop a photo on Mac, do you know you can also use keyboard shortcuts to crop pictures effortlessly? If you don’t want any guide from a tool, check out the complete tutorial below.
Step 1.After selecting the images you want to crop in Finder, hold down the "Cmd + O" keys to open the image in "Preview".
Step 2.Determine the cropping area manually, then press the "Cmd + K" keys to crop Mac images. Finally, press the "Cmd + S" keys to conclude this method.
Photoshop – Add and Crop/Edit Image
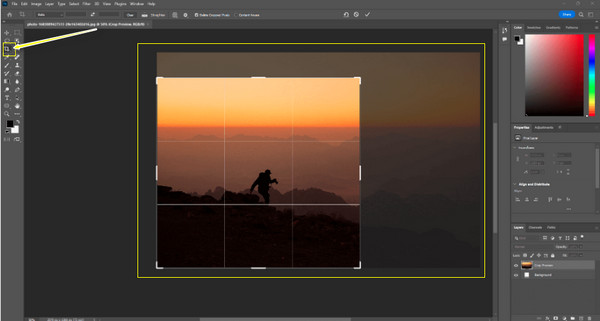
On the other hand, a considerable editing powerhouse is what Adobe Photoshop offers to you. Therefore, you’ll not just learn how to crop a picture on Mac but will also discover lots of advanced editing functionalities, like removing scratches, adding background, etc. In terms of cropping, it covers ways to adjust the size of the image, alter the aspect ratio, and more.
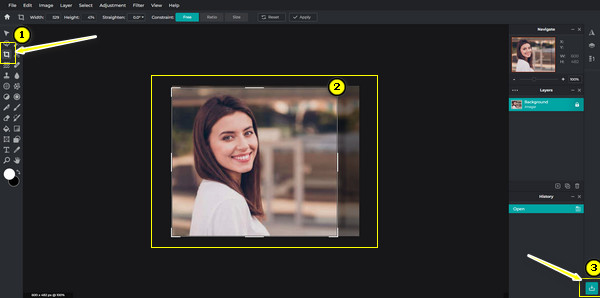
Step 1.Get Photoshop on your Mac, and then launch it. Later, add your image to it by clicking the "File" tab and selecting "Open File".
Step 2.Favor the "Crop" tool from the left's tools panel. Drag the crop box corner to resize the image. Once done, right-click on the image, then select the "Crop" option from the drop-down.
Fotor – Open and Crop Images Online
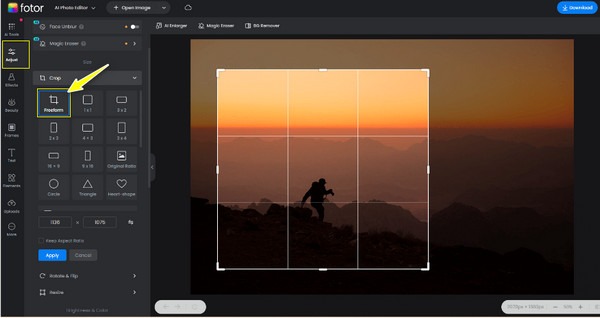
Still, nothing beats an online tool to help you learn how to crop an image on a Mac. Though the first mentioned ones are effective for cropping images, to have more of an online option, go to Fotor. Besides the image cropper it has, it permits you to set a preset size for social media sharing; it also handles bulk images, supporting cropping in batch.
Step 1.On your chosen browser, visit the Fotor website and click the "Edit a photo" button to upload the image you want to crop on Mac.
Step 2.After getting in, select the "Adjust" button on the left toolbar, and choose the "Crop" option from there.
Step 3.You can perform the cropping by selecting from the given ratios or customizing your own. Otherwise, use the borders to remove the extra parts.
Step 4.At last, click the "Apply" button to save changes and then the "Download" button to save the cropped image on Mac.
Pixlr – Upload and Crop/Edit Images with AI
Another online tool to crop an image on a Mac is the Pixlr. It features a friendly user interface, covering AI-powered tools to edit photos in formats like JPEG, BMP, PNG, PXD, and more. Aside from learning how to crop an image on Mac, you can cut and add text, background, and more here.
Step 1.Go to the Pixlr official site on any browser. Add your image to it by clicking the "Open Image" button.
Step 2.Inside the editing window, find the "Crop Tool" on the left toolbar. Drag the corner of the crop frame to select the desired area to keep and an area to cut out.
Step 3.If done, click the "Check" button at the far-right corner. Afterward, click the "Save" button on the below right.
AnyRec Screen Recorder – Capture and Crop Screenshots
Different from all the other tools that assist you in learning how to crop an image on Mac, AnyRec Screen Recorder offers a unique way to crop and edit screenshots. It is a recording software that helps you capture the image and then edit it in the program's preview window with the cropping tool, annotation tools, and more.

Capture all activities on screen with high quality using the Snapshot tool.
Can take screenshots in a window, full screen, menu, scrolling, etc., in a click.
Able to preview the captured image so you can crop and edit it before saving.
No watermark is embedded in the captured image, nor is a notification or popup.
Secure Download
Secure Download
Step 1.Start by launching AnyRec Screen Recorder. From the main screen, select the "Snapshot" widget. Otherwise, you can immediately start capturing with the set hotkeys.
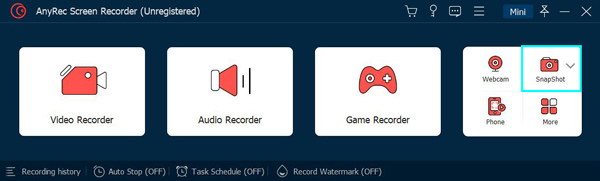
Step 2.The default set hotkeys for capturing are "Ctrl + Alt + C"; be sure that the image you want to crop is open and is included in the capture area.
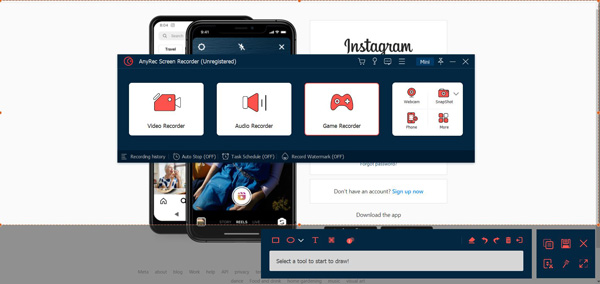
Step 3.After that, the "Preview window" will be active where you’re left with the editing tools, including the cropper. Drag the corner of the crop frame to select the part you want to keep.

Step 4.Later, click the "Save" button (Floppy Disk icon) to get the captured and cropped image saved on your Mac. In this way, you can crop out someone from the image.
Secure Download
Secure Download
FAQs About How to Crop an Image on Mac
-
How to crop an image on a Mac with the touchpad?
Open the Photos app, then click the image you wish to crop. You just activate the Screenshot on the Touch Bar, where you’ll see a Camera button; tap on it using the touchpad and choose the screenshot option you want.
-
What factors must I keep in mind when cropping pictures on Mac?
Think of what shape you want your image to be before cropping. Also, consider having a duplicate before cropping the picture so you can still save the previous version of your photo. Don’t forget when to apply other adjustments, too.
-
Why would I need to learn how to crop a photo on a Mac?
Cropping a photo improves the image and gets rid of unwanted subjects in the image, especially if you wish for it to be a solo picture of you. Furthermore, you may need to adjust the aspect ratio for specific displays or prints.
-
Is there a picture cropping software for Mac?
Yes. Besides the built-in tools on Mac, like the Photos app and Preview, you can also get Photoshop, Luminar Neo, Pixelmator, and more.
-
How to crop a JPEG on a Mac?
You can refer to the steps above, including the Photos app, Preview, Photoshop, etc., since they support various image formats, like JPEG, PNG, JPG, TIFF, BMP, and others, to get cropped.
Conclusion
Simply put, that’s all on how to crop images on Mac with native and third-party tools! With the ways discussed, be sure to pick the perfect one; it could be the way of Photos or Preview or some third-party software. However, for some unique way to crop images on Mac, don’t forget that the AnyRec Screen Recorder is always ready to serve. After capturing the picture, you can proceed to crop the image and make other edits with high quality in the preview window. Download it today and enjoy all its easy-to-use recording and editing features.
Secure Download
Secure Download
Related Articles:
About Our Author


