How to Transfer Photos from iPhone to Mac [Quick & Safe]
Want to transfer photos from iPhone to Mac quickly and safely? This post introduces some easy ways and AnyRec PhoneMover can do it excellently. It can batch transfer photos safely without iTunes restrictions.
Secure Download

Carrying out photos from an iPhone is no doubt the best solution to save space. And for iOS users, there’s no better way than to transfer photos from iPhone to Mac. In case of data missing, you can quickly backup and restore your iPhone photos on Mac. Plus, it’s much better to edit photos on a bigger screen. Whatever your case is, read this post now to learn how to transfer photos from iPhone to Mac without data loss. Here are five most straightforward ways to move photos, so come on and discover it today.
Guide List
Batch Transfer iPhone Photos to Mac with AnyRec PhoneMover Move Photos from iPhone to Mac with Photos Send iPhone Photos to Mac Wirelessly Using AirDrop Sync Photos from iPhone to Mac with iCloud Share iPhone Photos to Mac via Image Capture FAQsQuickly Transfer A Batch of Photos from iPhone to Mac
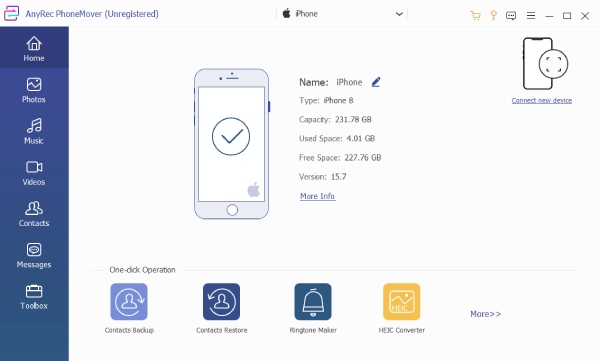
Whether you desire to move photos from iPhone to Mac, selectively or batch, you can do it effortlessly with AnyRec PhoneMover. Performing as your best photo transfer, this tool manages and backs up essential data, including photos, contacts, videos, and others. With it, you can move all photos across iOS devices and computers without much trouble. Besides that, you can remove duplicate photos, create new albums, and do more organization to your photos inside the program. You can safely transfer photos from iPhone to Mac without iTunes restrictions or other programs. See what this tool can accomplish for you. Download it now!

One-click transfer and manager for all photos, music, videos, contacts, and messages.
Transferring between iOS, Android, and computers can be done seamlessly.
Come with a HEIC Converter to convert HEIC to JPN/PNG with higher compatibility.
Fast transferring speed and flexible file management between iPhone and computer.
Secure Download
Step 1.To transfer photos saved on the "Photos" app, get a USB cable prepared to link your iPhone to your Mac. Launch AnyRec PhoneMover and tap "Trust" in the pop-up on your iPhone to allow access to Mac.
Step 2.Once trusted, navigate to the "Photos" button to view all iPhone pictures. After all are scanned, your photos will be listed by categories. It’s time to click the "checkbox" beside the desired pictures to transfer from iPhone to Mac or click the "Check All" box above.
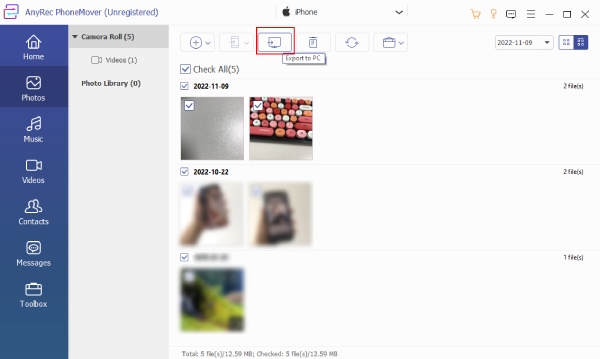
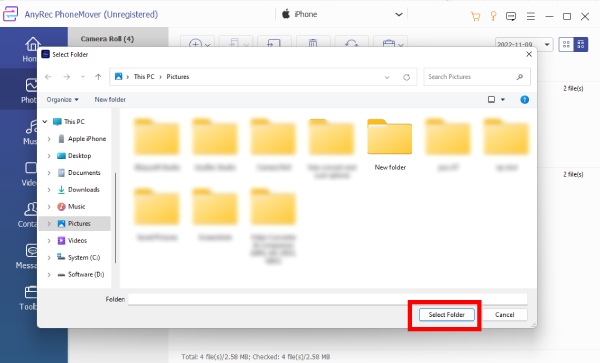
Step 3.Afterward, click the "Export to PC" button above to proceed. Set the folder where to store those iPhone pictures, then click "Select Folder" to go on. Finally, the transferring process will begin. That’s how to transfer photos from iPhone to Macbook!
Directly Transfer Photos from iPhone to Mac through Photos
While the Photos app safely stores your pictures and videos, it is also a solution to transfer photos from iPhone to Mac. As Mac is also equipped with the Photos app, your photos from iCloud, Photo Stream, and even Shared Albums can be synced and viewed on it. You just need to connect your iPhone to it and choose the items you want to import.
Here are the steps on how to import photos from iPhone to Mac:
Step 1.Go to the "Photos" app after linking your iPhone to your Mac with a USB cable. Open it from the "Launchpad".
Step 2.It will display all your iPhone photos on the "Import" screen. Or, click your "iPhone’s name" in the sidebar if it doesn't show up. Ensure your iPhone is unlocked and tap the "Trust" option in the pop-up notification.
Step 3.Returning to your Mac, click "Import Selected" to move desired pictures or "Import All New Photos" to share all the photos from iPhone to Mac.

Use AirDrop to Transfer Photos from iPhone to Mac Wirelessly
Thanks to AirDrop, transferring data, such as photos, videos, contacts, and more, isn’t challenging for iOS users. AirDrop is another convenient way to learn how to sync iPhone photos with Macbook quickly. All you must do is to ensure that both Apple devices are nearby and have Bluetooth activated.
If so, you’re ready to pursue the exact actions below on how to transfer photos from iPhone to Mac:
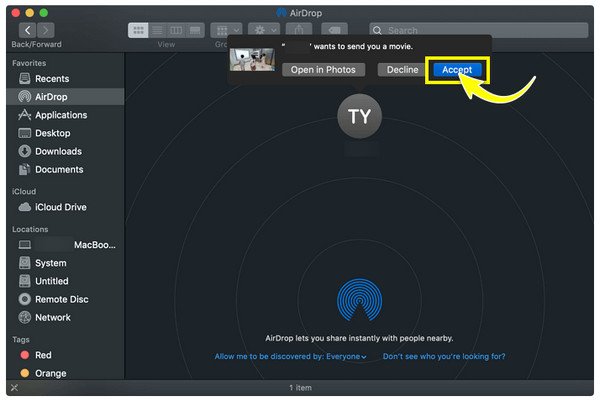
Step 1.Open AirDrop on Mac and iPhone first. Swipe up or down for iPhones to open the "Control Center", long-press on "Bluetooth", and choose "AirDrop". For Mac, head to "Finder", click "Go", and pick "AirDrop".
Don’t forget to set the device visibility to "Everyone". Otherwise, set it to "Contacts Only" if both have contact with each other.
Step 2.On your iPhone, determine the pictures you wish to transfer. Tap on the "Share" button and tap "AirDrop" as the sharing approach. Please wait until your iPhone detects your Mac.
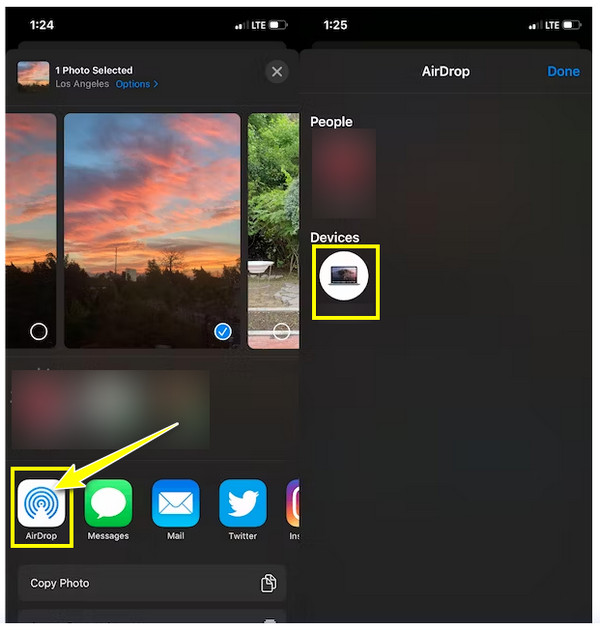
Step 3.Choose your "Mac’s name" among any other nearby iDevice, and click "Accept" to successfully transfer photos from iPhone to Mac.
How to Sync Photos from iPhone to Mac with iCloud
Another wire-free method to transfer photos from iPhone to Mac is with iCloud. With this cloud-based service, you can transfer files like photos, documents, and videos across Apple devices. If you have enabled iCloud Photos on your iPhone, it automatically syncs all items across all Apple devices. Although that’s how easy it is, if you have 5GB of photos and above, you must upgrade and pay for a storage plan, as iCloud stops syncing your pictures when that happens.
Anyway, here’s how to load pictures from iPhone to Macbook with iCloud’s assistance:
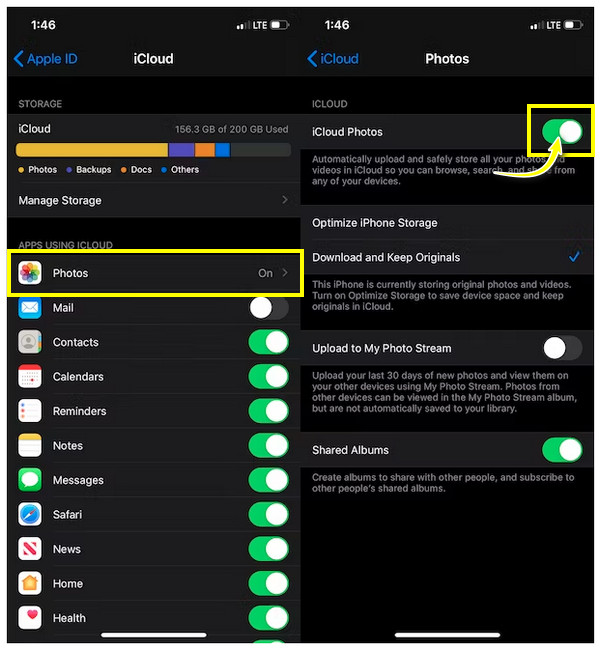
Step 1.If you haven't yet enabled the iCloud Photos, run the "Settings" app and tap your "Apple ID" or your "Name" above.
Step 2.Tap "iCloud" to see the list of "Apps Using iCloud". Find your way to "Photos and then switch its button to turn it on.
Step 3.Now, on your Mac, go to the "Photos" app, enter the menu bar, and click "Preferences". Then, go to "iCloud" and check the "box next to it to sync iCloud Photos from iPhone to Mac.
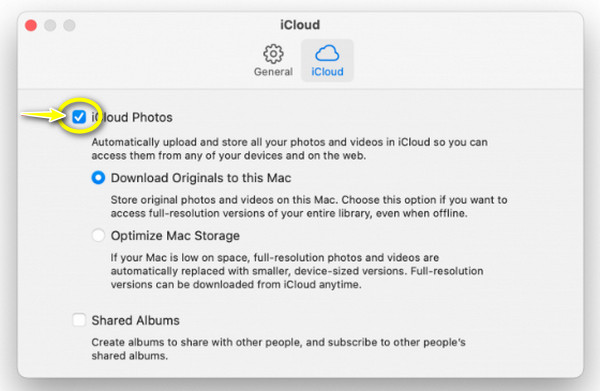
Please ensure that your iPhone and your Mac are using the same "Apple ID" to sync your photos and videos automatically with no problem. It will also sync your iPhone messages to Mac.
Transfer Photos from iPhone 17 to Mac via Image Capture
Image Capture is another direct way to transfer photos from iPhone to Mac. It is a default Apple app that lets you sync your photos between iPhone and Mac. It may be like how the Photos app works, but Image Capture primarily allows users to import pictures from digital cameras to Mac.
If you prefer this method, here’s how to copy photos from iPhone to Mac:
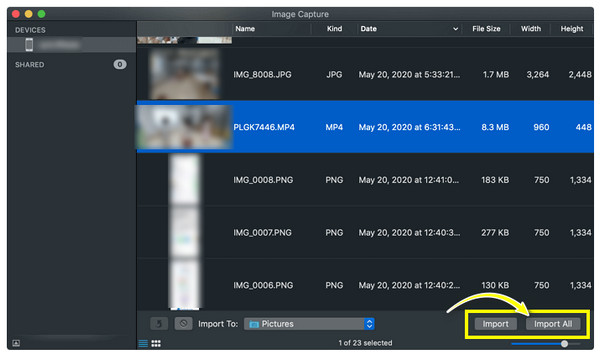
Step 1.Once the iPhone is linked to your Mac with a USB cable, tap the "Allow" in the "Trust this Computer?" and then run the "Image Capture" in the "Launchpad".
Step 2.Wait for it to load iPhone pictures on the screen. Next, you can click "Import" or "Import All" to transfer photos from iPhone to Mac in an instant.
FAQs about How to Move Photos from iPhone to Mac
-
Can I AirDrop all my photos from my iPhone to my Mac simultaneously?
Yes. Although AirDrop offers no limit in sharing photos across iDevices, you may be experiencing some issues when transferring lots of pictures simultaneously. It will need a longer time and a strong network.
-
How near should the devices be when AirDropping pictures?
When you cannot transfer photos from iPhone to Mac using AirDrop, make sure first that both devices are nearby and within 30 feet or 9 meters to get that Bluetooth connection.
-
How to import photos from iPhone to Mac with Preview?
Preview is a built-in app on a Mac that can also be used to move out photos. To do so, plug in your iDevice to your Mac, then open Preview. Head to the File menu and click Import from iPhone. All your photos will be displayed on a screen; click Import or Import All.
-
Is it possible to transfer photos from iPhone to Mac without a cable?
Yes. You can share photos wirelessly with iCloud or AirDrop. This post discusses these methods that require both Apple devices to connect to the same network. Refer to the above information to get more detailed instructions.
-
How long will the transfer process between iPhone and Mac take?
The time depends on the photos' number and sizes. It is usually quick when you only have a few numbers of photos to share, but it will take more than that if you have a bunch of pictures along with videos to move.
Conclusion
As you see, Apple provides more features to make transferring photos between Apple devices easier. With AirDrop, iCloud, Image Capture, and others, you can quickly transfer photos from iPhone to Mac without any trouble. However, these methods come with limitations, like iCloud being able to store 5GB of storage for free or AirDrop taking longer to process many pictures. That said, don’t hesitate to learn more about AnyRec PhoneMover. This tool can selectively or batch-transfer your iPhone data, like photos, to any other device. Give it a try and see what other things it can do for you.
Secure Download
Related Articles:
About Our Author