6 Ways to Remove the Background with/without Photoshop
In any sense of photo editing in Photoshop, you want to make your pictures more appealing to share with your friends over social media. Then you can remove the background in Photoshop to achieve your aim. This guide will show you the detailed steps with five various methods to use Photoshop. And in case you think Photoshop is too trouble for you, there is also an easy-to-use online tool recommended for you in this post. Let’s proceed to the instructions.
Guide List
Part 1: 5 Ways to Remove Background in Photoshop Part 2: Get a Free PS Alternative to Remove Image Background Online Part 3: FAQs about Removing Background in PhotoshopPart 1: 5 Ways to Remove Background in Photoshop
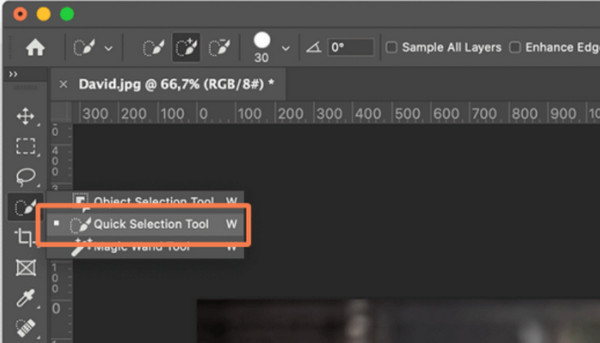
1. Quick Selection Tool
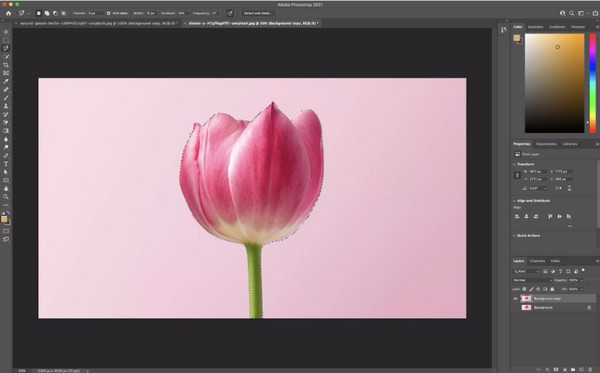
One of the best ways to remove image background is using Photoshop, which uses artificial intelligence to create the edges of the photo’s subject in real-time. It is suitable when the background and foreground have differences, allowing the tool to distinguish them easily. You can also use the Quick Selection Tool to pick the subject by detecting the colors and refining it without trouble.
Step 1.Launch Photoshop on your device. Upload the picture you want to edit. Choose the "Quick Selection Tool" from the "Photoshop Toolbox" on the left panel (it could be under the Object Selection Tool). Go to the "Options" bar and tick the checkbox for "Enhance Edge". This option will give you smoother and high-quality edge selections.
Step 2.Move the cursor around the photo and select your desired subject. The "Quick Selection Tool" will choose the tones until it finds the right edges. If you wish to lessen the edges of the selected area, use the "Deselect" tool at the top menu bar and move your mouse to the desired parts.
Step 3.To remove the background, go to the "Select" menu and choose the "Inverse" option. Click the "Delete" button. If you see spots that need refinements, you can undo the steps and refine them manually. Save the image without background to your computer.
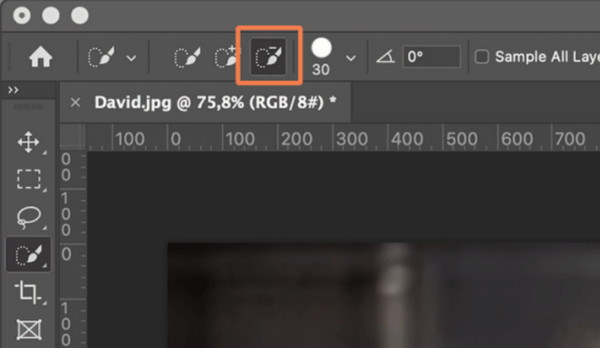
2. Remove Background Tool
This Photoshop background removing tool is also a good choice, especially if you are not really into refining the subject’s edges of your pictures. It is best to use photos with high contrast and no too complex lines between the background and the subject. But since this tool can be used effortlessly, it is best to remember that the cuts may not be perfect.
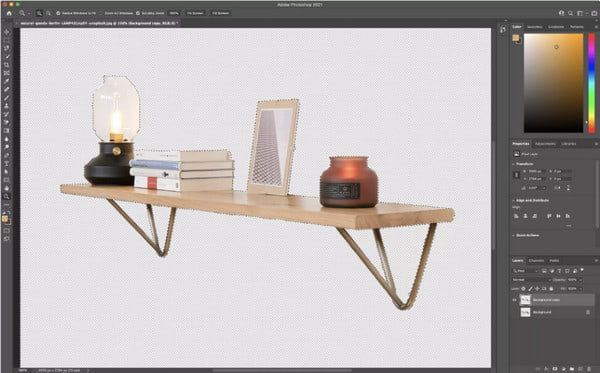
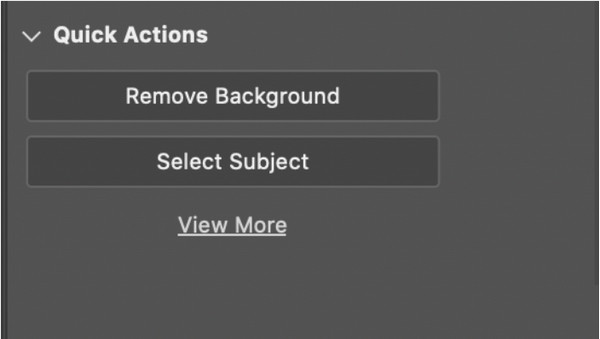
Step 1.After opening Photoshop and importing the image into the software, head to the Layer panel on the right part. Simultaneously press the "Ctrl + J" to duplicate the current layer.
Step 2.Go to the "Quick Actions" panel and select the "Remove Background" option to finalize the procedure. Once the background is removed, you can refine the edges as needed. Save the picture or share it on social media.
3. Background Eraser Tool
The third tool to remove the background in Photoshop allows you to erase the background manually. It works well if you want complete control over removing the background but need Photoshop to do the heavy lifting. The Background Eraser Tool depends on the picture you will edit as it can be a time-saver and high-efficient in image editing. Even more, with a bit of sacrifice, you can get closer to the desired outcome.
Step 1.Once you open the image in Photoshop, point your cursor on the "Background Layer" menu and right-click on it. Select the "Duplicate Layer" option to reveal the dialog box. Rename the file to the desired title and confirm the name by clicking the "OK" button. From the left part of the original layer, click the "Eye" button to deactivate that layer. Then, find the "Background Eraser" tool from the left-side toolbox. You can find the option by clicking and holding the "Eraser" menu; other options can be seen here.
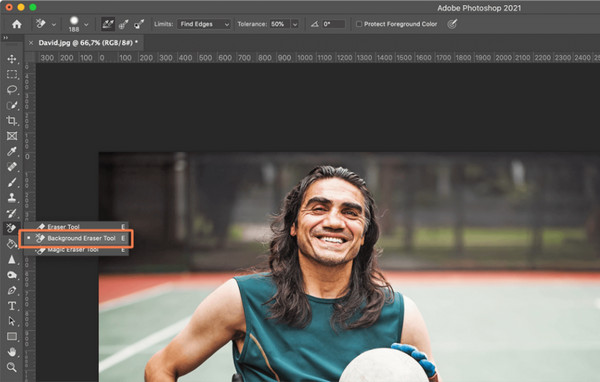
Step 2.Select the "Brush" icon from the tool options to reveal the brush panel. Adjust the hardness near or at 100 percent. The suggested brush size can be around 50px, but you can still change it anytime in the brackets. Place the center of the brush over the color you want to erase; change the tolerance to remove other colors in the background. Always remember that the "Background Eraser Tool" will delete the matching colors even with the subject. Hence, the "Tolerance" option needs to be set depending on the color around the area.

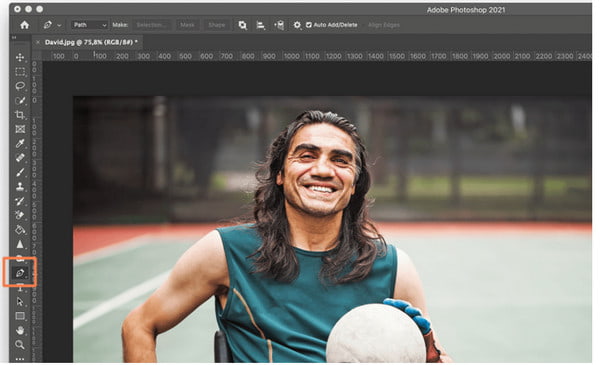
4. Pen Tool
The Pen Tool can be used to remove the background in Photoshop with complete control. It is highly recommended if the background and subject are not contrasted enough for other tools like Quick Action or Background Eraser Tool. And you can use Pen Tool to make the background white or black. However, using this function consumes too much time to get the best result.
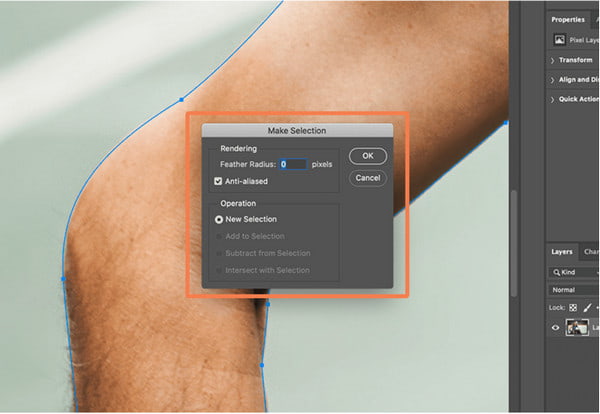
Step 1.With the image opened in Photoshop, choose the "Pen Tool" from the toolbar on the left panel. Zoom in to the edge you want to start erasing and click it to pin the anchor. Work your way around the desired subject to outline.
Step 2.If you need curves or straight lines, press the "Ctrl" key to switch between the two options. Once the path is completed, go to the "Windows" menu and select the Path option; a menu will appear. Click the "Three bar" menu and choose the "New Path" option. You can rename the outline to your preference.

Step 3.Right-click the saved path and select the "Make Selection" option. When the dialog box appears, click the "OK" button and leave all settings to default. The outline will appear on the edges, and the next thing you need to do is to delete the outside areas. Go to the "Select" menu and choose the Inverse option; press the "Delete" button to erase the background. Save or edit the output.
5. Magnetic Lasso Tool
The last Photoshop remove background tool is the Magnetic Lasso, which has a similar method to the Pen tool. You can also use this tool to remove watermark in Photoshop. However, this one makes it easier to outline your subject.
Step 1.Open an image in Photoshop. Then grab the "Magic Lasso tool" from the left panel box. Draw around the subject, and the tool will start drawing the path as you move the cursor. Ensure that you connect the ending to the starting point.
Step 2.Go to the "Selection" menu and click the "Save Selection" button. Once you enter the outline's name, you must delete the background. Head to the "Select" menu and select the Inverse option. Click the "Delete" button to erase the background; you will see it as white and gray checkered.
Part 2: Get a Free PS Alternative to Remove Image Background Online
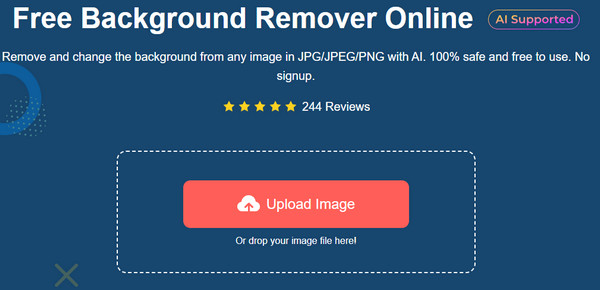
Is it challenging to remove the background in Photoshop from images? Or not affordable to purchase? AnyRec Free Background Remover Online can help you with that! It is a web-based tool that provides an automatic and efficient way to change your picture’s background. It has an intuitive interface for more straightforward navigation, such as zooming in/out, moving the subject, and others. The best part of the background remover is the advanced color palette to pick the solid background to your preference. Try AnyRec Free Background Remover Online and experience the most accessible tool for image editing!
Features:
◆ Default AI technology to remove image background smartly.
◆ Support various image formats like PNG, JPEG, GIF, TIFF, etc.
◆ Highlight the picture’s object to keep or erase the certain part manually.
◆ Suitable tool to remove different watermarks like logo, date, icons, and others.
Step 1.Open the online image background remover on your browser. Click the "Upload Image" button. Browse for the desired picture you want to edit. Click the "Open" button to confirm the import.
Step 2.From the "Edge Refine" menu, you can see the highlighted object from the original photo. The side-by-side preview gives you a glimpse of the output. You can use the "Keep and Erase" tools from the top of the window to adjust to the highlight.

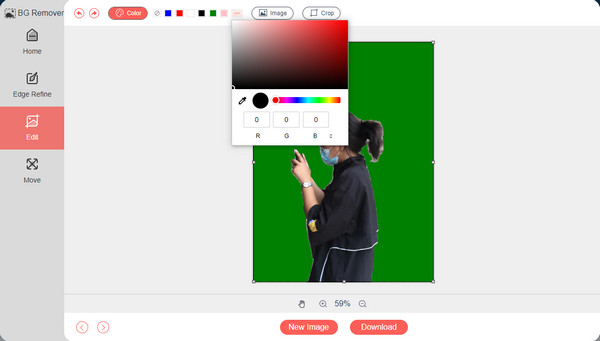
Step 3.If you wish to change and apply a new background for the picture, go to the "Edit" menu and select the "Color" menu to reveal the palette. You can control the primary colors like red, green, and blue. Or move the color drop to the desired color pigmentation. In this section, you can also crop the photo freely.
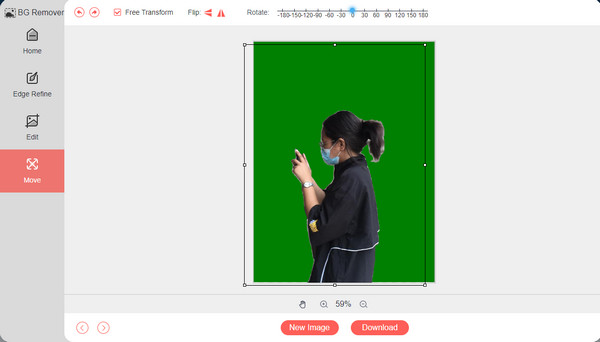
Step 4.For the final step, head to the "Move" menu, where you can move the subject around the background. Other tools also include rotating, flipping, and zooming. Click the "Download" button once editing is done. Click the "New Image" button to import another photo from your folder.
Part 3: FAQs about Removing Background in Photoshop
-
How to apply a new background in Photoshop?
You can start by uploading the photo and the background picture. From the Layers Panel menu, drag the background photo below the subject. Use the Remove Background tool to cut out the desired subject and apply a layer mask. Refining the layer mask can be done using the Brush Tool from the toolbox.
-
Is it possible to match the light source of the subject and the new background?
Yes. To match the light from the subject to the new background, ensure you flit the background image horizontally. You can do this by pressing the Ctrl + T to transform the layer. Right-click the image and select5 the Flip Horizontal option from the list.
-
What is the best alternative for Photoshop to remove the background on a smartphone?
You can always find alternative apps to remove backgrounds. You can try Background Eraser Photo Editor, Background Eraser, Remove BG, and PhotoRoom Studio Photo Editor.
Conclusion
Now that you have learned how to remove the background using Photoshop with its various methods, you can try them by following the instructions. Although most of the given methods are challenging, it takes a lot of effort and practices to see the perfect outcome. If you are looking for a simple yet professional-looking result, AnyRec Free Background Remover Online is accessible to any browser and is free to use! Visit the website and effortlessly edit your favorite pictures!
Related Articles
About Our Author


