How to Record and Screenshot on Steam Deck with High Quality
Gamers love to record their gameplay to share their gaming skills or save thrilling experience. Luckily, you can directly take screenshots when playing Steam Deck games. But there is no built-in recorder for you to record the whole gaming process. Don’t worry, this article will provide 3 ways to record and screenshot on Steam Deck, you can even snapshot during the recording. Learn the detailed steps below.
Guide List
Can You Record and Screenshot on Steam Deck? – Steps What You Should Prepare for Recording on Steam Deck The Easiest Way to Record and Screenshot on Steam Deck FAQs about Steam Deck Recording and ScreenshotsCan You Record and Screenshot on Steam Deck? – Steps
Can you screen record Steam Deck directly? Unfortunately, Steam Deck does offer to take screenshots but does not record the screen. Although that’s the case, you can still have alternatives to capture gameplay with screen recording software or a capture card, which will be covered later. But now, look at how to take Steam Deck screenshots in two ways.
How to Take Screenshots on Steam Deck:
1. In-game
If you desire to capture your most loved in-game moments on Steam Deck, it’s good to know that it can be done effortlessly. Come after the steps to take screenshots while playing a Steam Deck game.
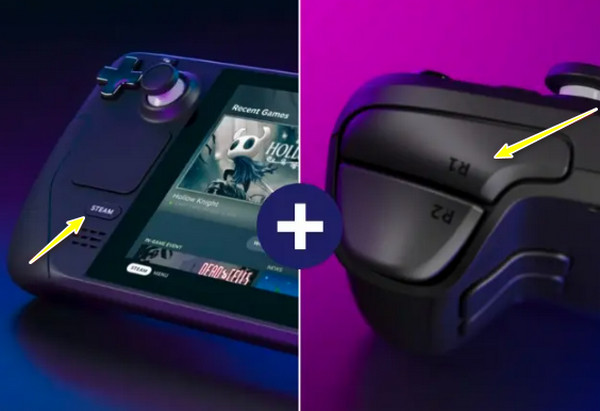
Step 1.On the left side, press the "Steam" button. Then, locate the "R1" button and press. Pressing these buttons at the same time will take high-resolution screenshots of the game.
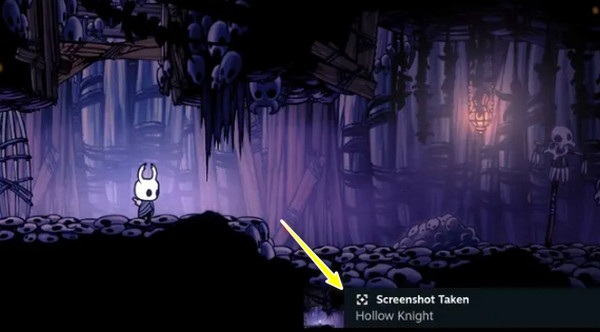
Step 2.The Steam Deck will present a "Screenshot Taken" notification at the right corner below, saying you’ve successfully taken a screenshot.
2. Desktop mode
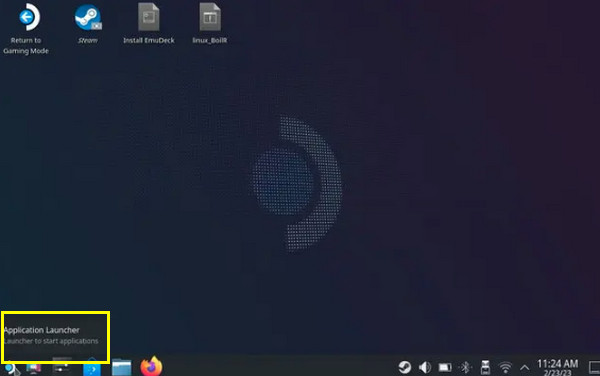
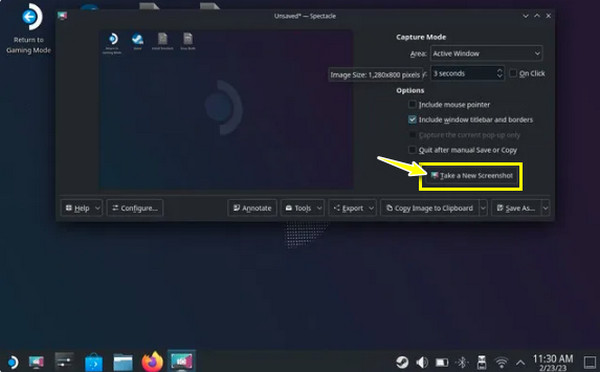
On the other hand, the desktop mode has a much more complex process for taking screenshots on Steam Deck. You are required to get a third-party application, Spectacle, which comes pre-installed on Steam Deck. To learn to use it, follow the steps below:
Step 1.Firstly, use the desktop mode on Steam Deck. Achieve this by pressing the "Steam" button and choosing "Power". Then, go inside the "Application Launcher" on the taskbar to access the menu.
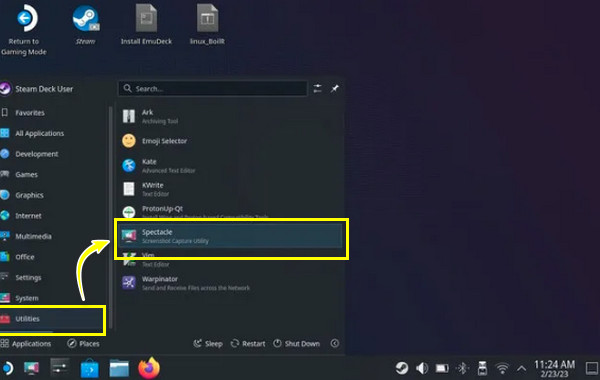
Step 2.Direct into the "Utilities" section on the right-side pad. Then, locate "Spectacle", a free screenshot app preinstalled on Steam Deck.
Step 3.After that, click the "Take a New Screenshot". That’s how to take Steam Deck screenshots in desktop mode!
How to Find and Transfer the Screenshots Taken by Steam Deck:
After learning the answer about the record and screenshot on Steam Deck, you may be curious about where to locate those screenshots for easy transfer. Are they located on Steam Deck directly? There are two ways to uncover them, and both are explored in the following.
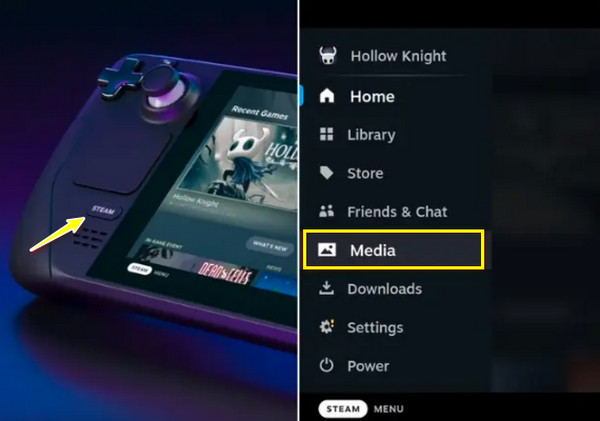
1. Find the Screenshots on SteamOS:
Step 1.Press "Steam" to open the menu, then proceed to the "Media" library, where you’ll catch all screenshots taken. You can view them publicly or privately, or all captured pictures here.
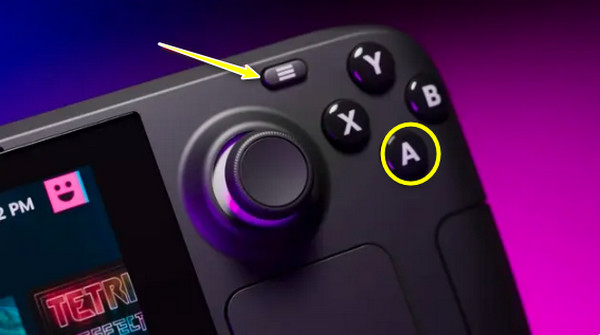
Step 2.By default, screenshots captured are private. But you can modify the settings and share the image. Choose an image with the "A" button, then push down the "option" button on Steam Deck.
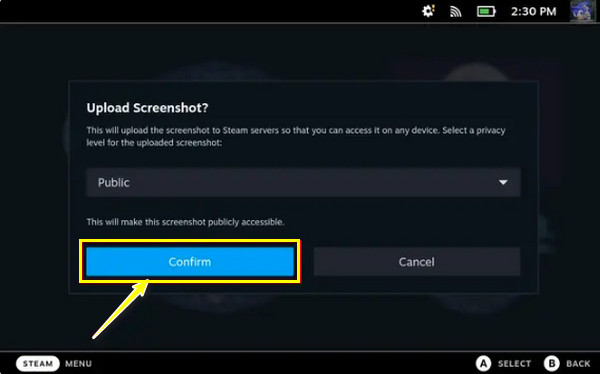
Step 3.In the "Upload Screenshot" pop-up, set the correct privacy settings, and click "Confirm" to upload the image and see the image on your desktop.
2. Find the Screenshots on Desktop mode:
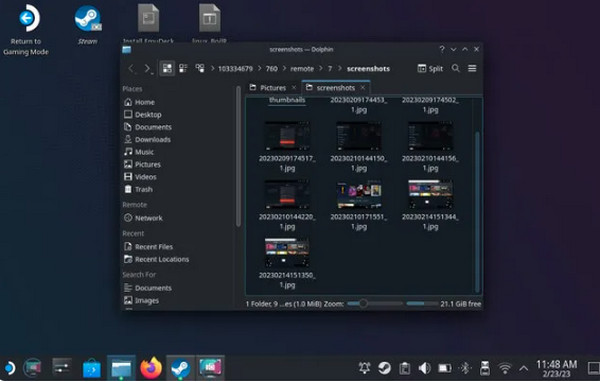
Step 1.Once you open the "Steam", click "View", and pick the "Screenshots" option. The window lets you view all captured screenshots on Steam Deck.
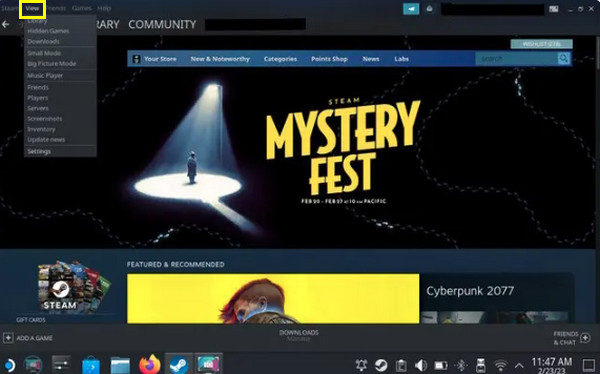
Step 2.To know their location, choose the game in the drop-down menu and click "Show on Disk". Doing so will open the "File Explorer", which presents the location of your Steam screenshots.
What You Should Prepare for Recording on Steam Deck
Now that you understand the answer about the record and screenshots on Steam Deck and have learned how to take Steam Deck screenshots, the doors aren’t yet closed for recording. As mentioned earlier, there are many alternatives you can use to do Steam Deck record gameplay. Prepare things that are jotted down; then you record on Steam Deck with ease.
1. HDMI Capture Card
For the capture card, you can make use of the Elgato Cam Link 4K HDMI Capture Card. It records audio-visual content from the game console without interrupting your gameplay and transfers it to the computer, where you can upload it.
2. USB C to HDMI Adapter
Next, you must have a USB C to HDMI Adapter. This cable will let you mirror the screen of the game console on a larger display. Doing so will allow you to share the recorded gameplay on your chosen platform.
3. Screen Recorder Tool
Finally, you must have the best screen recorder tool on your computer to help you record and screenshot on Steam Deck. There is a lot of recording software today, so make sure you select the best fit for your requirements.
The Easiest Way to Record and Screenshot on Steam Deck
Now that you have the means above to do Steam Deck record gameplay, as said, looking for a reliable screen recorder is a must! Thanks to AnyRec Screen Recorder, you won’t have to go further, as this software will help you confidently record on Steam Deck. It efficiently records high-quality games with the built-in Game Recorder. No watermark will be seen after exporting your recorded video, in contrast with other recorder software. As for saving the recorded Steam Deck games, no need to find where do screenshots go on Windows, you can pick your desired folder path and not stick with the default location of Steam Deck.

Record and screenshot your Steam Desk with full screen or desired area.
Customize the recording settings to keep 60 fps and 1080p high quality.
During recording, you can add annotation easily, as well as capture exact moments.
Save recordings in your preferred format, location, and video and audio settings.
Secure Download
Secure Download
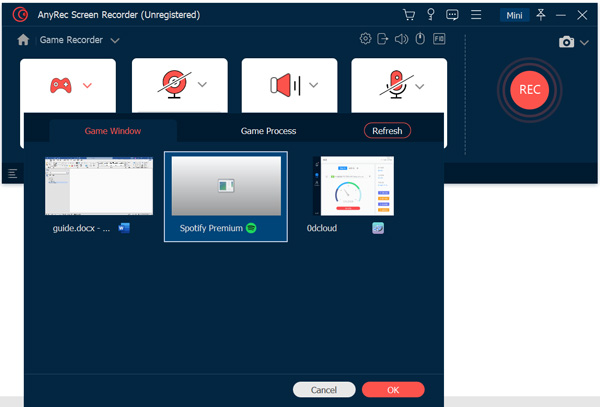
Step 1.Upon launching the AnyRec Screen Recorder, start the game on Steam Deck. Then, go immediately to the "Game Recorder" to record and screenshot on Steam Deck.

Step 2.Next, click the "Select the Game" button to choose the source from the drop-down window. Ensure that you select the right window for your game.
Step 3.Then, you can enable the "Webcam" option to overlay your webcam video while recording the game. Turn on the "System Sound", too, to capture the game effects, dialogue, and music.
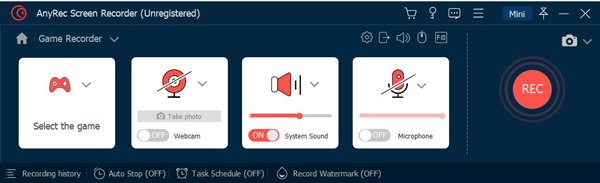
Step 4.If you’re done doing a great job on the settings, you’re ready to click the "REC" button to initiate the recording; you can also take screenshots on Steam Deck with the floating toolbox.
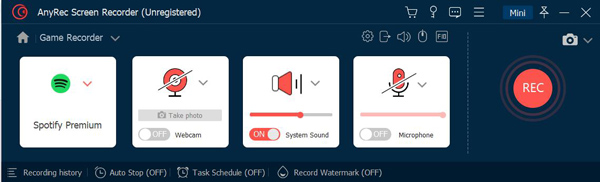
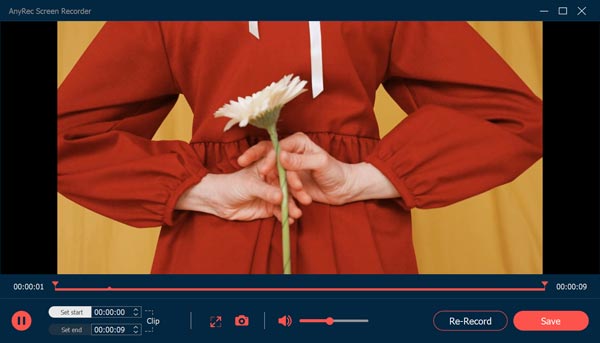
Step 5.Once done capturing the gameplay, click "Stop" to save the recording to enter the "Preview" window, where you can edit the video prior to clicking the "Save" button.
Secure Download
Secure Download
FAQs about Steam Deck Recording and Screenshots
-
Is it possible to share my screenshots on Steam Deck with others?
Yes, you can share your screenshots on Steam Deck with others. After uploading it to the Steam server, you can share the link with others.
-
How can I transfer my Steam Deck screenshots?
Currently, Steam Deck doesn't have a built-in transfer option from console to PC. Sharing screenshots will require some work on the user’s end.
-
How to record videos on Steam Deck?
Sadly, regarding the recording of videos, Steam Deck doesn't have the power to do so. But, it will be possible with the help of certain equipment mentioned in the above post, such as having reliable screen recorder software.
-
Is changing the screenshot button on Steam Deck possible?
Yes. The default ones will be the Steam and R1 buttons, but you can set them to any button you want on Steam Deck, as well as the rear buttons, touchpads, and analog sticks.
-
Can I send my Steam Deck screenshots to my friends?
No. The only thing that can be sent to your friends is text and not pictures. But you can do it anyway by uploading it to Steam and sharing it with friends.
Conclusion
That ends the record and screenshot on Steam Deck! Hopefully, you can efficiently take screenshots on Steam Deck in the ways provided. This post also shows that recording on Steam Deck is not impossible with the capture card, USB C to HDMI adapter, and, of course, screen recorder software. If you wish for quality recorded gameplay, then use AnyRec Screen Recorder! This tool can record all-onscreen moments smoothly, with no lag and a watermark at the end! It’s time for you to get this tool and start recording with ease.
Secure Download
Secure Download


