Capture everything. Miss nothing. Crystal Clear.
Hot

AnyRec Screen Recorder
Record and screenshot any video on Windows and Mac.
Secure Download
Audacity Record Computer Audio: Ways and Troubleshooting Tips

Recording your computer audio with Audacity may sound very simple until you hit a silent recording or confusing settings. You can use Audacity to record computer audio on Windows and Mac, but there are a few things to keep in mind. Come and jump right into the following parts, covering 3 easy ways to record desktop audio with Audacity, plus fixes for the most common Audacity not recording issues.
Guide List
How to Record Computer Audio with Audacity on Windows How to Record Computer Audio with Audacity on Mac How to Record Computer Audio and Microphone at the Same Time Audacity Not Recording Computer Audio? Try These FixesHow to Record Computer Audio with Audacity on Windows
Start with how to record internal computer audio in Audacity on your Windows computer, including movies, music, or system audio. With Audacity, you can achieve it even without routing your audio through a mic. The way is through picking WASAPI as the host, and choosing the right playback device as your recording source.Here's the step-by-step to set it up:
Step 1.Start Audacity on your Windows PC, and locate the "Audio Setup" where you can choose the audio host, playback, and recording device. Choose "Windows WASAPI" from the "Audio Host" dropdown.
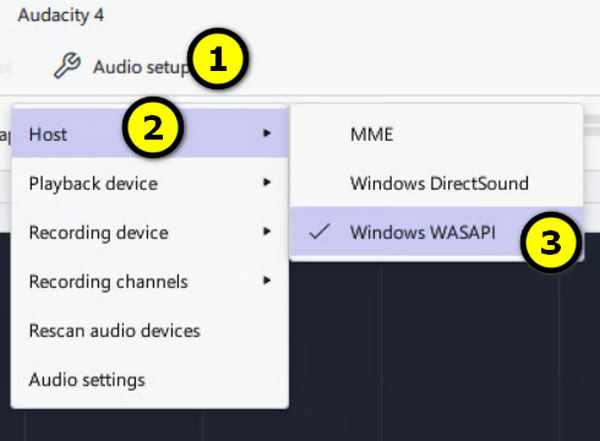
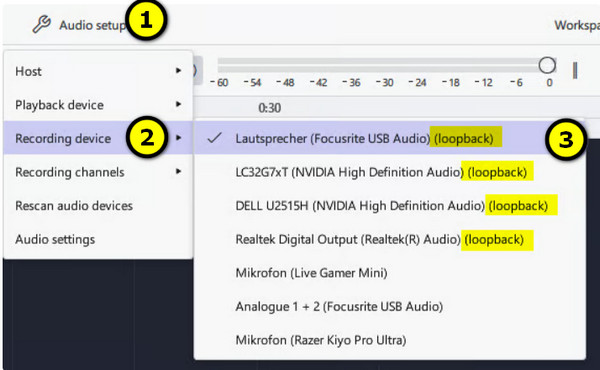
Step 2.In the "Recording Device" dropdown, choose your device with the loopback option to record audio from your computer. Then, in the "Playback Device", select the correct speakers or headphones.
Step 3.Now, open the website or app with the audio you want to capture. Click the "Record" button and start playing audio on your computer, and you can see the waveform from Audacity as it records.
Step 4.When you're finished, click the "Stop" button. Trim extra sections or edit your audio recording. Later, go to "File," then "Export Audio," and choose your desired format.
How to Record Computer Audio with Audacity on Mac
Unlike Windows, macOS does not offer Audacity with a built-in way to record computer audio. Audacity can record from your mic or other input device, but macOS doesn't usually expose system audio as your direct source. To be able to record computer audio with Audacity, you need a virtual driver like BlackHole to route your Mac's system audio into it. Once set up, you can record audio from your app, browsers, sites, and other sources. Here's how:
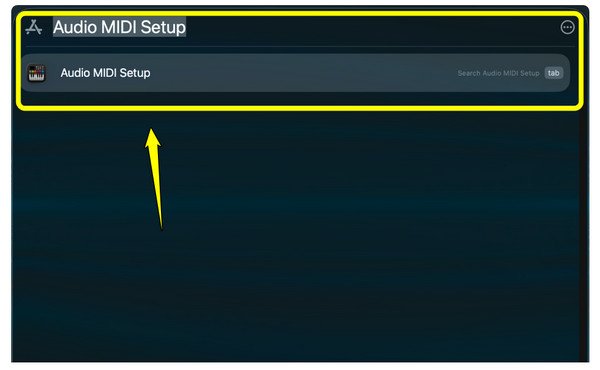
Step 1.Get BlackHole installed on your Mac to create a virtual audio device to receive your Mac's system sound. Then, press "Command + Space" and search for "Audio MIDI Setup", and launch it.
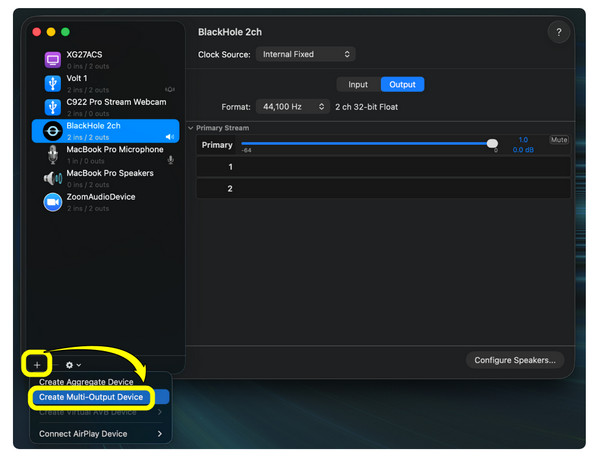
Step 2.From the Audio MIDI Setup, click the "Add" button in the corner and select "Create Multi-Output Device". Choose your normal speakers/headphones and "BlackHole" so you can continue playing your audio while sending it to the virtual device.
Step 3.Open "System Settings", then head to "Sound", then "Output", and choose the device you just created. Launch Audacity and open "Audio Setup". Set your Audio Host to "Core Audio" and choose "BlackHole" as your Recording Device.
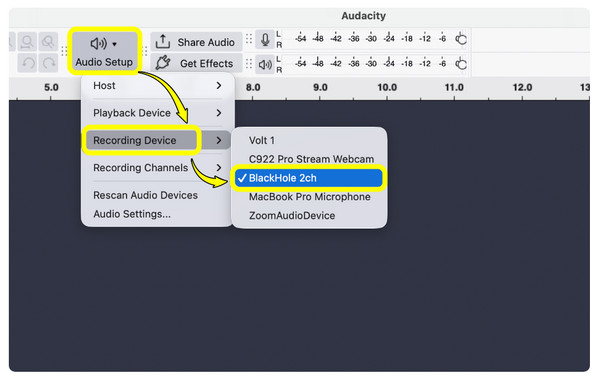
Step 4.It's time to open your video or app with the sound you want to capture. Click the "Record" button, and when you're done, click the "Stop" button. Listen to it and edit it out. Select "File" then "Export Audio" and choose your format.
How to Record Computer Audio and Microphone at the Same Time
Once you know how to use Audacity to record audio from your computer, you may also want to record your microphone simultaneously. When you need to create tutorials or narrate a video, this is where recording gets a bit tricky. In some setups, recording system audio and a mic at once, Audacity may see only one input source. On Windows, WASAPI capture system, while your mic is a different input device. On macOS, the internal audio needs a virtual audio drive. As a result, selecting your mic while also trying to record computer audio with Audacity may not work. You may end up with only one audio recording.
Common Workarounds to Record Computer Audio and Microphone
- Record both audio sources separately. Capture each source on a separate track and merge them afterward. Doing so allows you to have more control over the volume, system audio, and timing.
- Use a virtual audio mixer. On your PC, a virtual audio cable or mixer can combine your mic and system audio into a single virtual input.
- Create a multi-input device on your Mac. Mac users can use Audio MIDI Setup and a virtual driver to combine audio devices. This will route your system audio and mic into a configuration that Audacity can record.
- Use a dedicated recording software. A screen recorder is often much easier if you want to record your screen, computer audio, and mic at the same time.
Easier Alternative: AnyRec Screen Recorder
If using Audacity to record computer audio feels unnecessarily complicated, here's AnyRec Screen Recorder to offer you a more straightforward way to capture both sources together. Here, you can enable your system sound and mic before recording, adjust their volumes separately, and even record your screen at the same time. It can be useful for your tutorials, meetings, presentations, gameplay, and voice-over recordings, where you can record your mic and system audio together without a complicated virtual audio setup.
Capture your computer audio and mic voice at once with ease.
Flexible audio control, can adjust system sound and mic before or during recording.
Improve recordings with noise reduction and microphone enhancement.
Preview everything before finalizing to MP3, AAC, WAV, etc.
Secure Download
Secure Download
Audacity Not Recording Computer Audio? Try These Fixes
Even after learning the right way to record computer audio with Audacity, the program may sometimes record the wrong source or produce low-quality audio. But before giving up on it, check the following common issues and try their quick fixes:
Loopback Device is Missing. Ensure your computer is playing audio through your playback device, then restart Audacity and check the recording device list. Try to update your drivers, too, and make sure the correct playback device is enabled.
Stereo Mix Does Not Appear. Go to "Windows Sound Settings", then select "More sound settings", then "Recording". Right-click on any area, and turn on Show Disabled Devices. If Stereo Mix is unavailable, use Windows WASAPI instead.
No Sound is Being Recorded. Check whether the program is using the correct recording device and that your computer is playing audio. Make sure your volume is not muted and confirm that the input has permission to access audio devices.
Audacity Records the Wrong Audio Source. Recheck "Audio Setup" and pick the correct input source. On your Windows PC, choose the correct WASAPI loopback device. If you're using a Mac, ensure that the virtual audio driver is selected as the recording input.
Audio Quality Is Poor. Inspect Audacity's sample rate and recording settings, and do not put the input level at too high a level. If possible, record using the original audio source rather than a microphone.
Conclusion
Using Audacity to record computer audio is easier once you know the right settings. Windows users rely on the WSAPI loopback, while Mac users need a virtual audio driver; a few quick checks can help you fix common Audacity not recording problems. However, if you're looking for a simpler way to capture both audio sources and even your screen, try AnyRec Screen Recorder. Download it today from its official website and record your computer audio with no setup hassles.
Secure Download
Secure Download
Related Articles
About Our Author