7 Ways to Transfer iPhone Photos to PC Safely and Effectively
There are many tools available to transfer photos from iPhone to computer, but AnyRec PhoneMover is your best choice due to its super-fast transfer speed and unlimited file size. Use it to help you transfer iPhone data safely now.
Secure Download

Transferring photos from iPhone to PC is a good backup method, there are many convenient ways, and it can free up iPhone space to a great extent. However, is the photo format of the iPhone compatible with Windows? How to transfer photos from iPhone to PC quickly and without size limitations? This article introduces seven methods for different photo and storage situations - read on to learn more.
Guide List
Transfer iPhone Photos to PC Using Official Apple iTunes Quick and High-Quality Transfer iPhone 17/16/15 Photos to PC Transfer iPhone Photos to PC with iCloud Cloud Service Use Google Photos Online to Transfer iPhone 17/16/15 Photos to PC Transfer iPhone Photos with Dropbox to PC Online Browse and Copy iPhone Photos Using Windows 11/10 Photo Easily Emailing iPhone 17/16/15 Photos to PC to Transfer| Method | Transfer Speed | Wired | File Size Limit | Local Use | Notes |
| iTunes | Moderate | √ | No clear limit | √ | Primarily for syncing media; not ideal for photo transfer |
| AnyRec PhoneMover | Very Fast | √ | No clear limit | √ | |
| iCloud | Fast (network-dependent) | × | Up to 50GB per file | × | Cloud-based; requires internet and iCloud storage |
| Google Photos | Moderate | × | Up to 10GB per file (compressed) | × | May compress images; requires a Google account |
| Dropbox | Moderate | × | Up to 2GB per file (free users) | × | Cloud transfer; manual upload/download needed |
| File Explorer | Fast | √ | No clear limit (depends on storage) | √ | Access the DCIM folder directly via USB cable |
| Very Slow | × | Usually > 20–25MB per email | × | Only suitable for small photo sets |
Transfer iPhone Photos to PC Using Official Apple iTunes
iTunes is one of a commonly used methods for transferring photos from an iPhone to a PC. It is more secure and effective, but the steps can be slightly complicated. Moreover, Windows may not support specific devices and file types, such as HEIC format, and may also consume more resources.
Pros
The official tool is more compatible.
Windows correctly recognizes the iPhone and displays the DCIM folder.
Cons
It is not possible to browse albums, filter, or export specific photos, unlike other programs.
Cannot access photos stored in the cloud, only recognizes local iPhone photos.
Step 1.Connect your iPhone to your computer using the USB cable, and then launch iTunes, click on the "iPhone" button. It is a good idea to enable the "Automatic" sync option when connecting this iPhone so that photos are automatically transferred to the PC.
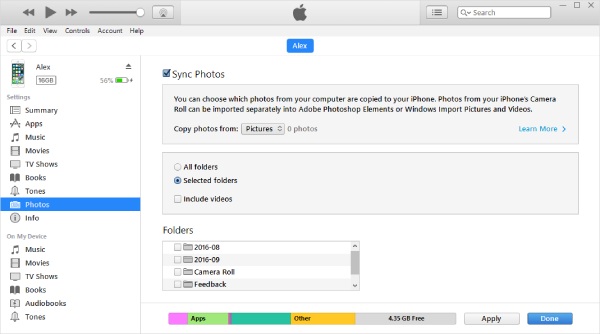
Step 2.Click "Photos" in the left menu, select "Select Folder" from the drop-down menu, and choose the photos you need to transfer.

Step 3.After selecting the desired photos, click "Done" at the bottom right corner to transfer the photos from your iPhone to PC.
Quick and High-Quality Transfer iPhone 17/16/15 Photos to PC
If your PC doesn't have iTunes and you're looking for a simple method, is a suitable choice. It supports transferring files from iPhones to PC and various other devices. It can help you categorize and organize files during the transfer process, such as identifying duplicate items in different categories. In addition to transferring pictures from iPhone to PC, it also supports various file types and transfers from other devices like Android to PC. The supported file types include contacts, messages, videos, and more.

One-click transfer, with simple operation and no waiting.
Support secure transferring, no need to reset the device.
The built-in search automatically categorizes files for easy searching.
Convert HEIC photos to JPG, etc., and retain EXIF data.
Secure Download
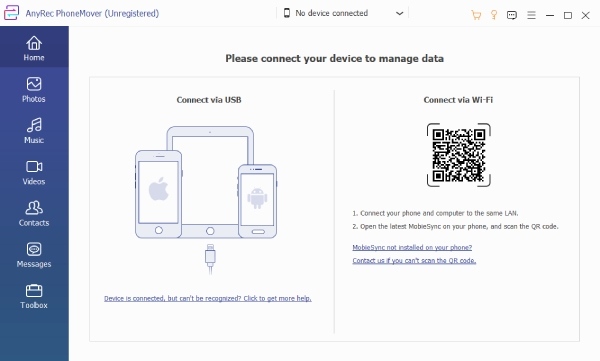
Step 1.Launch the AnyRec PhoneMover program on your computer, and connect the iPhone to the PC using the USB cable. Click "Pictures" and select the photos you want to move to your computer.
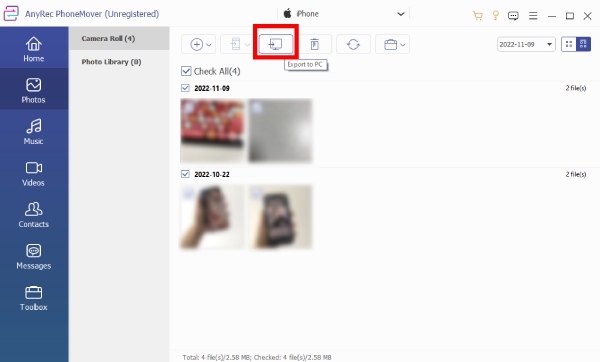
Step 2.Click "Pictures" and select the photos you want to move to your computer or select all of them.
Step 3.Next, click "Transfer to PC" above to select or create a folder to save these photos. Confirm the folder, and your photos will be transferred from your iPhone to your PC.
Transfer iPhone Photos to PC with iCloud Cloud Service
If you have iCloud enabled, this is a convenient way to transfer iPhone photos to a computer wirelessly. It can automatically synchronize photos within 30 days, and the order, shooting date, etc., remain the same as on iPhone on the computer. On iPhone, you can choose Optimized Storage to keep the original pictures in iCloud, which also saves space on iPhone. With just one click, the photos will be transferred to your computer.
Pros
There is 5GB of free capacity.
Any iOS device can access the download at any time.
Cons
Larger storage requires a paid upgrade.
Uploads and downloads rely on Wi-Fi.
Synchronize the entire gallery by default and cannot synchronize only some albums.
Step 1.Launch the AnyRec PhoneMover program on your computer, and connect the iPhone to the PC using the USB cable. Click "Pictures" and select the photos you want to move to your computer.
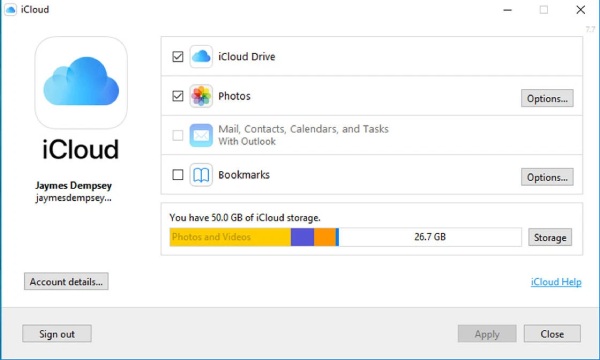
Step 2.An iCloud folder will appear on your Windows Explorer, where the synced photos will be transferred to your PC.
Use Google Photos Online to Transfer iPhone 17/16/15 Photos to PC
Google Photos is also a convenient tool for transferring photos from an iPhone to a PC. By using the same Google account, you can transfer photos via cloud storage. It works across multiple devices and automatically organizes and categorizes pictures by the date they were taken. Additionally, it can recognize and find specific images through keyword searches. However, it only supports up to 15GB of storage, and since it’s cloud-based, the transfer speed from iPhone to PC heavily depends on your internet connection.
Pros
Automatically synchronize your iPhone's photos to Google Cloud to avoid losing them.
Automatically organize albums by date taken.
Cons
The free space is only 15 GB.
Must be synced to the cloud before you can download from the web version or desktop client again.
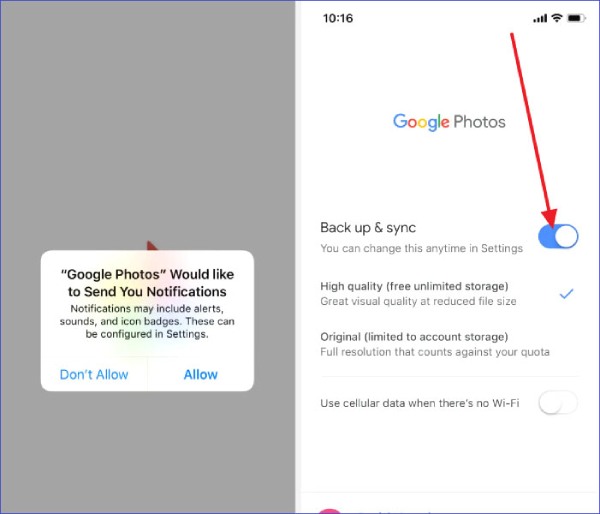
Step 1.Open Google Photos from your iPhone. Click "Turn on Backup & Sync" and then select "Upload Quality" to wait for your photos to be automatically uploaded to the cloud.
Step 2.Open the Google Photos website on your computer browser and sign in with the same Google account you use on your iPhone.
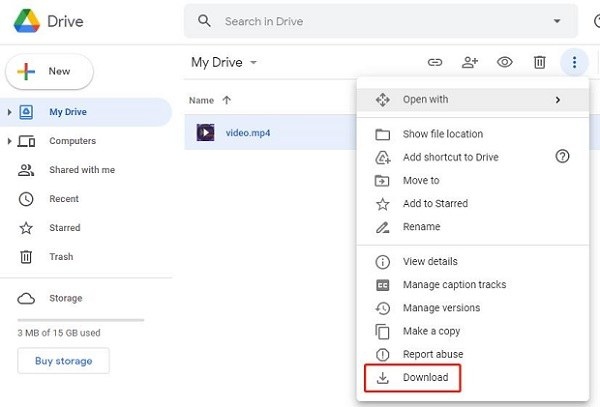
Step 3.Browse the synchronized photos, click "More" in the upper-right corner, and select "Download" to save transferred photos to your computer.
Transfer iPhone Photos with Dropbox to PC Online
Dropbox can be used to transfer photos from an iPhone to a computer. By enabling the "Camera Upload" feature, photos taken on the iPhone are automatically synced to the cloud, allowing large batches of photos to be quickly synchronized to the computer. For teams or families, you can set access permissions on shared file links to make sharing easier. Dropbox also saves version history to restore previous versions if photos are accidentally overwritten.
Pros
Uploaded photos from iPhone to PC are not compressed.
Support multi-platform management of photo transfers.
Automatically save the history version to prevent overwriting.
Cons
Free accounts provide only 2GB of space.
Photos are organized into folders after being uploaded.
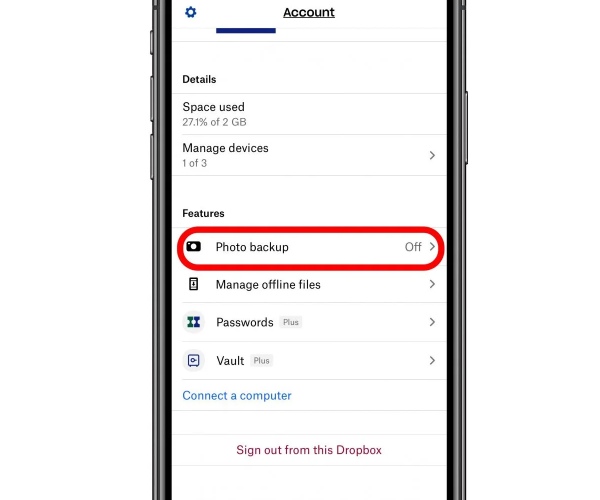
Step 1.Open Google Photos from your iPhone. Click "Turn on Backup & Sync" and then select "Upload Quality" to wait forOpen the Dropbox app on your iPhone and enable "Automatic Uploading" in your iPhone's Photo Settings.
Step 2.It will automatically synchronize to the Dropbox cloud. Open the official Dropbox website on your computer.
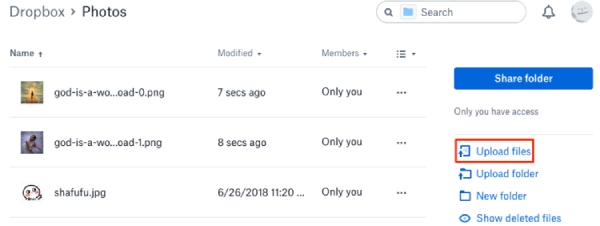
Step 3.Click the "folder of iPhone photos" synchronized in the cloud, check the box, and then download and save the iPhone photo to your computer.
Browse and Copy iPhone Photos Using Windows 11/10 Photo
Windows 11/10 supports the Microsoft Photos app that you can download, making it easy to transfer photos from an iPhone to a computer. Connect your iPhone to the computer using a data cable—no network connection is required. The app supports duplicate item detection, and downloads photos are automatically categorized for easy access. However, it does not support the direct transfer of photos stored in iCloud; those photos must be downloaded to the iPhone before they can be transferred to the computer.
Pros
USB cable connection, stable transfer speed.
Recognize imported photos to avoid repeated import.
Cons
Photos in iCloud need to be downloaded locally to iPhone before they can be transferred to a PC.
A first-time connection requires iTunes or Apple Mobile Device Support to be already installed.
Step 1.Install and run the Photos app, connect your iPhone and computer with a USB cable. Click "Import" in the top right corner.
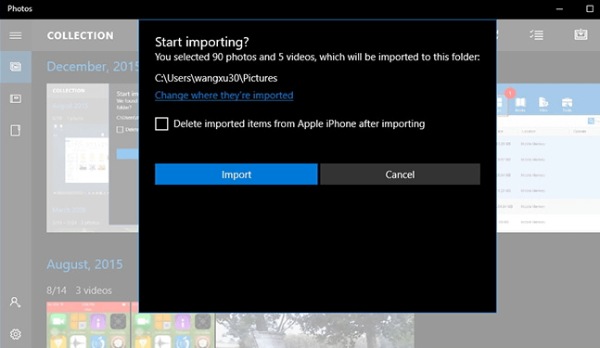
Step 2.By default, it will select all photos, allowing you to manually remove any unwanted ones. When you are satisfied with the transferred photos, click "Continue" to start transferring photos from iPhone to PC.
Easily Emailing iPhone 17/16/15 Photos to PC to Transfer
The last method is to email the iPhone photos to your computer. This method is suitable for situations where you don't have a USB cable and prefer not to use the cloud. It is used for the vast majority of photo types and is relatively simple to do. However, it uses an email attachment to transfer iPhone photos to a computer, so the size of the attachment limits it. If there are more photos, you may have to send them in multiple emails.
Pros
No USB cable connection is required.
No compression of photo quality.
The operation steps are simple and do not require additional knowledge.
Cons
A limited number and size of photos are to be transferred from iPhone to PC.
Manual selection and downloading of photos are required.
Step 1.Choose an Email address you usually use and prepare the photos you need to transfer from your iPhone to PC. Then, as a common practice, send an Email and add these photos to it.
Step 2.Open the email on your computer and download the photos inside to confirm a successful transfer of photos from iPhone to PC.
Conclusion
Above, you'll find several methods for transferring iPhone photos to a computer, ranging from highly secure options to the easiest solutions. For the fastest, highest-quality transfers, choose AnyRec PhoneMover. It guarantees photo fidelity, lets you move large batches with a single click, and requires no Wi-Fi. Download it today and give it a try!
Secure Download
Related Article
About Our Author