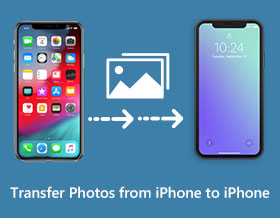
How to Transfer Photos from iPhone to New iPhone 17
This article provides 7 ways to transfer photos from iPhone to iPhone:
- AnyRec – Quickly and safely transfer all photos in one click.
- iCloud – Directly sync with the same account or share the link.
- AirDrop – Face-to-face easy transfer for only a few photos.
- Email – Transfer limited photos within 25MB.
- Shared Album – Upload and download photos when you need.
- Dropbox – Sync photos to cloud and download the desired ones.
- iTunes – Sync folders to computer and then to your new iPhone.
Secure Download
How to transfer photos from iPhone to iPhone when you have changed to the latest iPhone 17? Apple is known for its high-quality images, so you may not want to lose the good memories on your old phone. Luckily, iPhone provides the easiest AirDrop way to move data, and you can also rely on iCloud. But you may find some limitations. Read more to learn the following 8 efficient and quick methods to transfer photos from iPhone to new iPhone.
Guide List
Transfer Batch Photos Between iPhone Devices with AnyRec Directly Sync or Share Photos from iPhone to iPhone with iCloud 2 Ways to Send Photos Wirelessly with Original Quality How to Sync Photos with Cloud Service [2 Ways] Use iTunes to Transfer Photos from iPhone to iPhone FAQs about Transferring Photos from iPhone to iPhoneTransfer Batch Photos Between iPhone Devices with AnyRec
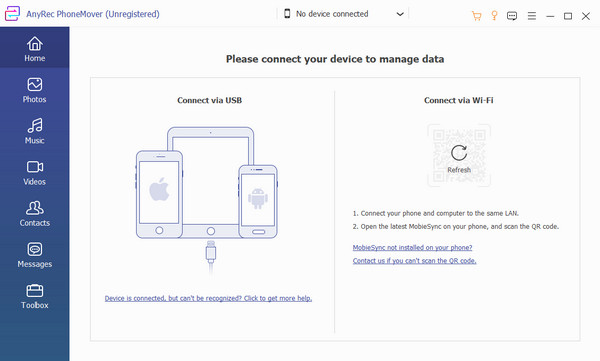
The easiest way to transfer photos from iPhone to new iPhone 17 is with AnyRec PhoneMover. It is a Windows desktop tool that supports the latest iOS 26 and Android 16/15. One of the best features of AnyRec is that you can connect devices by a compatible USB cable, scanning a QR code, or using a strong Wi-Fi network. Moreover, it supports all files such as documents, messages, and contact lists with backup and restore options. Try this powerful tool and transfer photos from iPhone to iPhone in one-click.

Offer a one-click transfer for bulk file transferring to the new iPhone without delay.
Support all data files and you can also preview the detailed content before transferring.
Able to manage, restore, or delete duplicated photos from your iPhone to free up storage space.
Smooth and quick transfer process to promise no stuck or data loss.
Secure Download
Step 1.Launch PhoneMover on Windows. Plug a USB cable into the computer with the phone connected to the other end. Or just install the "MobieSync" app on your mobile device and connect.
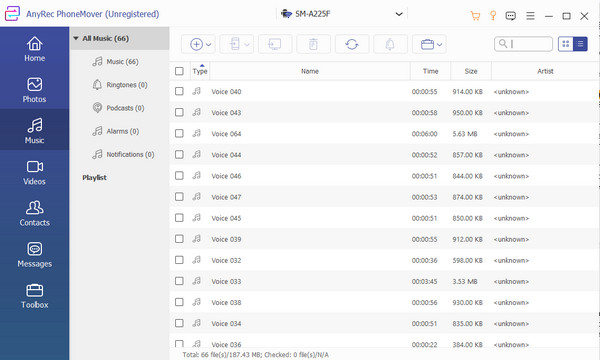
Step 2.Afterward, the mobile’s information will reveal on the software’s interface, where you can access all the files from the phone. Go to the "Photos" or other menu and tick the checkboxes to select the desired photos to transfer from iPhone to iPhone.
Step 3.Click the "Connect New Device" button from the top of the window. Then scan the QR code using the receiving iPhone 17. Wait for the photo transferring process to finish. You can also manage, convert, or delete the files.
Directly Sync or Share Photos from iPhone to iPhone with iCloud
iCloud allows you to back up and restore data anytime you want, so it is an effective way to transfer photos from iPhone to iPhone 17. Apple’s default cloud service supports migrating files. So here you can either sync the photos directly or share the links to transfer with iCloud.
Method 1: Sync Photos with the Same iCloud Account
When you sync iPhone pictures with iCloud, you can access the files on any device. It replaced the late "Camera Roll" and "Photo Stream" options with the "All Photos" feature, which can store thousands of captured images.
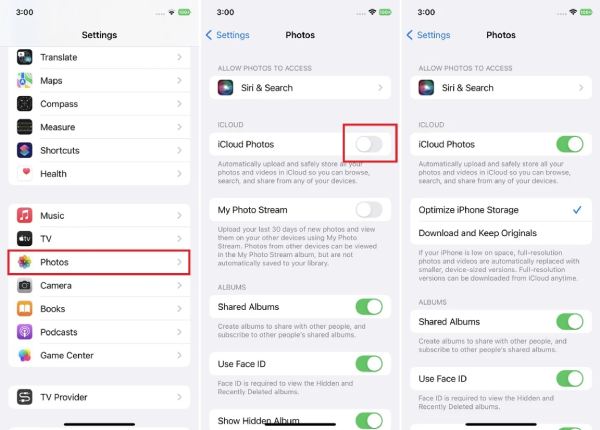
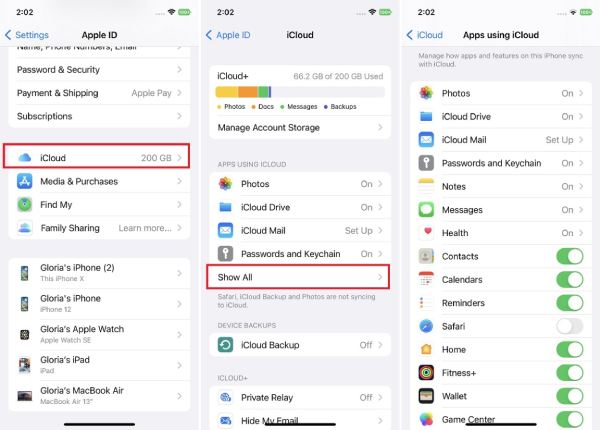
Step 1.Go to the source iPhone’s "Settings". Locate the "iCloud" menu. Toggle on the "Photos" button to enable the sync of iCloud Photos.
Step 2.Launch the receiving device and follow the prompts. Once you reach the "Apps & Data" menu, tap the "Restore from the iCloud Backup" button. Log in to the Apple ID and select the backup you want to restore.
Method 2: Send iCloud Link of Photos to Other iPhone
If you have an iOS 14 or later version, you can use the iCloud link to transfer photos from iPhone to iPhone with different Apple ID. In this way, you can open images on any device without trouble. Follow the steps below:
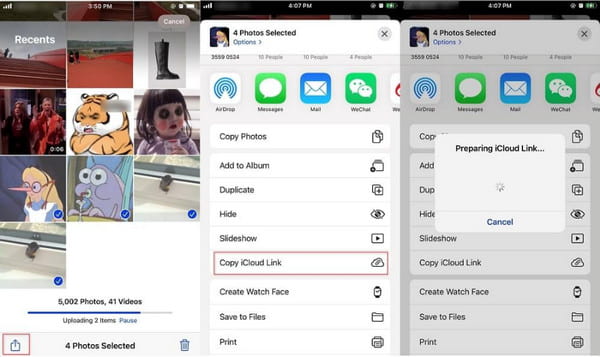
Step 1.Open the "Photos" app on your iPhone. Select the pictures you want to transfer to new iPhone.
Step 2.Tap the "Share" button and locate the "Copy iCloud Link" option. It will prepare a link you can send to messages, emails, and other social media apps.
2 Ways to Send Photos Wirelessly with Original Quality
Alternatively, you can use AirDrop and email to transfer photos from your old iPhone to the new iPhone 17. This is also a great solution if there are files you need to remember to back up on iCloud. Here are the two methods to send images of high quality.
Method 1: AirDrop Photos to Other iPhone
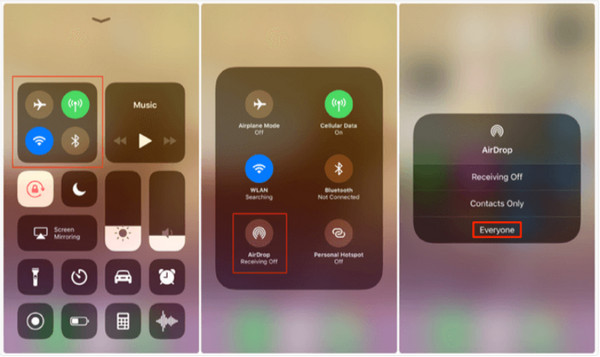
Step 1.Launch the Control "Center panel". Turn on the "AirDrop" feature. Ensure Wi-Fi and Bluetooth are also activated. Choose between "Contacts Only" and "Everyone" according to your need.
Step 2.Go to the "Photos" app and select the pictures you want to send. Tap the "Share" button from the bottom of your screen and tap "AirDrop". Select the new iPhone to transfer the photos. You can also AirDrop from iPhone to Mac.
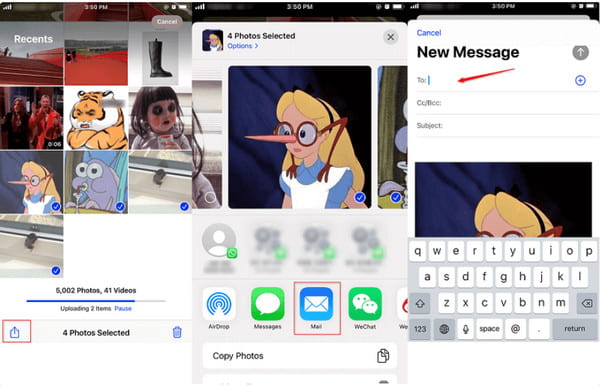
Method 2: Send Photos with Email
Step 1.Open "Photos" on your device. Select the pictures and tap the "Upload" button. Select the "Mail" option to open the email app.
Step 2.Enter the email address to send the pictures as an attached file. Open the email on the other iPhone.
How to Sync Photos with Cloud Service [2 Ways]
iCloud is not the only cloud service to transfer photos from iPhone to iPhone, and thankfully, you can use Dropbox on iOS. Preferably, this part reveals two ways to export files through cloud services. And one of them is a new feature on the iOS 18 version. You can use these two methods to transfer photos wirelessly when AirDrop is not working.
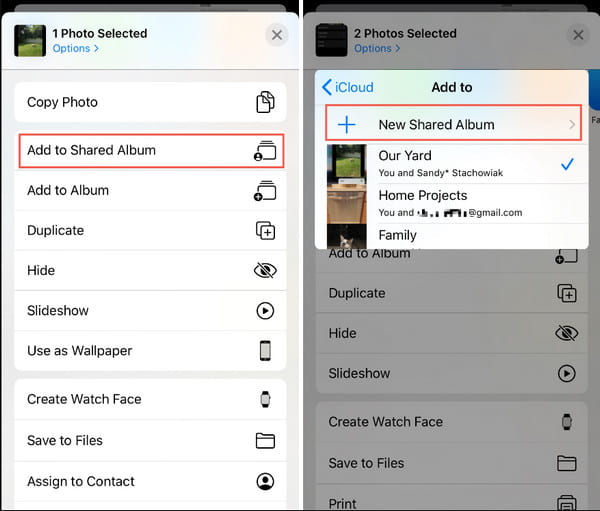
Method 1: Create Shared Album to Sync Photo
Step 1.Go to "Photos" on the source device. Tap the "Albums" button. Tap "Plus" from the top left of your screen and create the album.
Step 2.Select all the pictures to include on the new album. Then, tap "New Share Album" and name it. Include all the contacts to share the album and tap the "Create" button to confirm the selections.
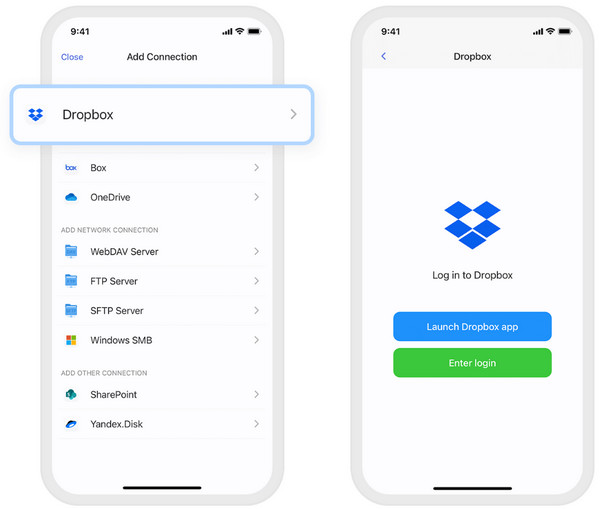
Method 2: Using Dropbox Cloud to Sync Photo
Steps: Install the Dropbox app on your phone and launch it. Sign into the account. Then upload the images from the source device. The app will sync the photos to your new iPhone via Wi-Fi.
Use iTunes to Transfer Photos from iPhone to iPhone
iTunes is a standard method to transfer photos from iPhone to iPhone on macOS Catalina earlier versions. However, this service will likely erase the existing pictures in the Photo library when you send them to another device. And it may take a long because of the large size if you do not turn off the HEIC image feature.
Step 1.Plug a USB cable into a computer to connect the smartphone. Launch the default photo app on both devices.
Step 2.Later, choose the pictures you need to send. Click the "Import/ Export Selected" button from your phone to transfer files to the computer. Then, connect the receiving device to your Mac.
Step 3.Open iTunes and click the "Device" button from the top right part of the window. Select the "Photos" option from the left panel.
Step 4.Later, click the Sync Photos button from the "Application" folder. Confirm the action by clicking the "Apply" button to transfer photos to the new iPhone 17.
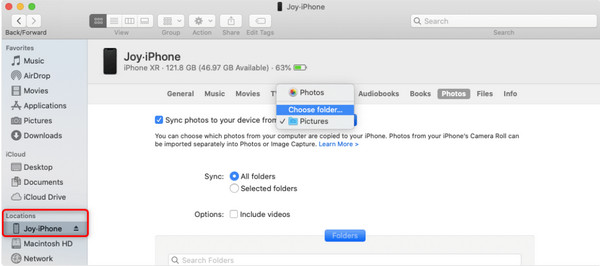
Note: As for macOS Catalina, Big Sur, Monterey, and Ventura versions, you can transfer and manage iPhone photos on Mac with Finder directly. Because iTunes is not available on those new Mac operating systems.
FAQs about Transferring Photos from iPhone to iPhone
-
1. Do my pictures reduce quality once transferred to another device?
Yes. When you transfer photos from iPhone to iPhone, there are small changes in the quality. However, you can avoid reducing the image quality by converting the pictures to HEIC format. If you have the latest iOS, you can convert photos for better quality and free up some space.
-
2. How long is the time to transfer photos from iPhone to iPhone?
Different factors can cause the waiting time when you migrate pictures to the new iPhone 17. And the estimated time ranges from 45 to an hour or so. Ensure you have a good WiFi connection, updated software, and enough storage space.
-
3. Do files are automatically saved in iCloud?
No. You need to set up iCloud from the setting of your iPhone to save files. In this case, you can access it on Apple ID on any Apple device.
Conclusion
With the solutions presented, transferring photos from iPhone to iPhone 17 is not to be worried. But if some files are left from the previous device, you can use AnyRec PhoneMover to share and manage your files. This software could help you transfer data to your iPhone from any device; you can even use it to transfer data from Android to your iPhone 17. Download the best desktop tool for a fast-transferring process.
Secure Download
Related Articles:
About Our Author