Transfer iPhone Photos to External Drive Quickly and Safely
You may need to transfer photos to free up some iPhone memory, and this post introduces five methods to help you do so. The first one on the recommendation list is AnyRec PhoneMover, which can fast and safely transfer photos and organize them. Download and start moving your iPhone photos.
Secure Download
Over time, your phone consumes lots of space due to the number of photos and videos you have. No one wants to delete those precious, treasured photos, so you should transfer photos from iPhone to external hard drive. One external hard drive's capacity is much larger than your iPhone's storage. Thus, here are 5 efficient ways to transfer photos from iPhone to external hard drive. Start now to move your important files from iPhone and save more storage space!
| iPhone Transfer Software | Platform | Batch or Selective Transfer | Other data supported to transfer |
| AnyRec PhoneMover | Windows 11/10/8/7 | Both support batch and selective transferring and offer the most effective solutions to back up and restore data across iPhones and computers. | Videos, Music, Contacts, and Messages |
| Windows Photos app | Windows 11/10/8 | It is a built-in app that supports only selective transfer of your photos and videos. | Photos and Videos |
| Mac Photos app | macOS X 10.10.3 and later | Another built-in app that lets you selectively transfer photos or batch transfer them all to your computer. | Photos and Videos |
| iCloud | Windows/Mac | It only supports selective transferring of files and can quickly backup and restore iPhone data. | Photos, Contacts, Calendar, Notes, Mail, etc. |
| Image Capture | Mac | Offers batch and selective transferring and works similarly to iCloud. | Photos and Videos |
Easy Way to Transfer Photos from iPhone to External Hard Drive [Recommended]
Suppose you’re digging for a manageable way to transfer photos from iPhone to external hard drive. In that case, you must be looking for AnyRec PhoneMover. It is an excellent tool for transferring data from your iOS device, including photos, videos, contacts, and more. This program offers nothing but convenience in transferring photos from iPhone to external hard drive in one click, as you can select your desired image to share or do a batch transfer effortlessly. Furthermore, it permits you to eliminate unwanted or duplicated photos directly within the program with great ease.

Transfer all or selected photos from iPhone and other devices.
Get built-in preview function to check all details before transferring.
Create new albums, organize photos, remove duplicated ones, and more.
Convert HEIC photos to JPEG or PNG before transferring.
Secure Download
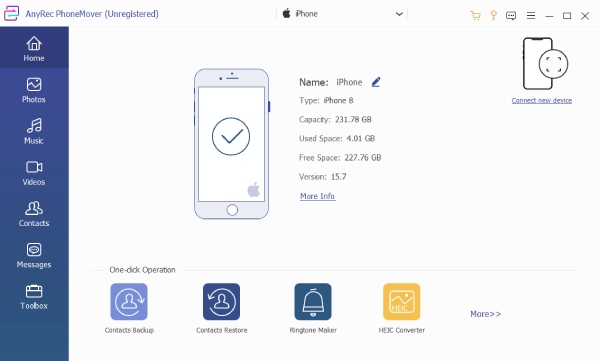
Step 1.Before starting to transfer photos from iPhone to external hard drive, confirm you have the latest iTunes on your computer and a workable USB cable to connect your iPhone. If done, launch AnyRec PhoneMover and link your iPhone to begin scanning.
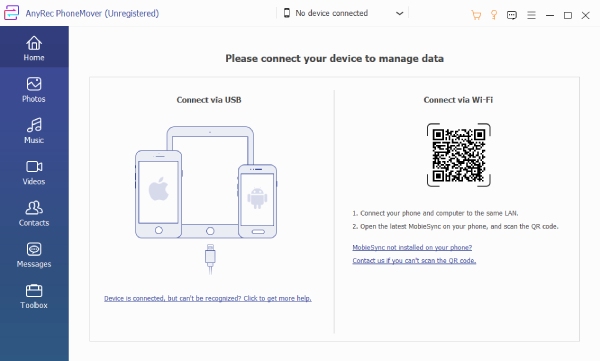
Step 2.Tap the "Allow" option on your iPhone to let your computer access your iPhone data. Then, click the "Photos" section from the left side tab.
Upon getting all your iPhone photos to appear on the screen, click the ones you wish to transfer to external drive, or click the box of "Check All" above if you desire to transfer all photos from iPhone to external hard drive.
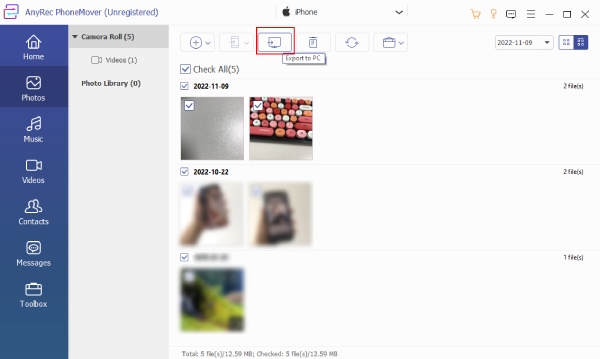
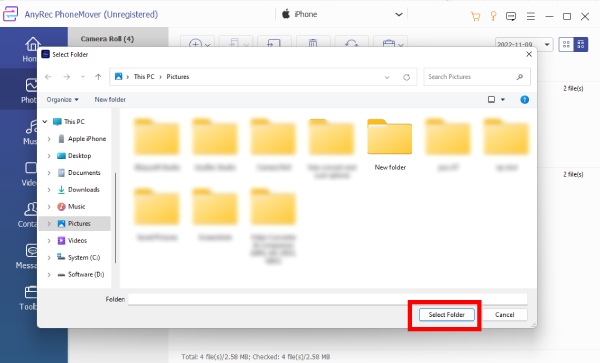
Step 3.Later, you can click the "Export to PC" button to move your iPhone photos to the computer. Then, determine your external hard drive folder to store those photos, but remember to have your external hard drive plugged into your computer.
Directly Transfer Photos from iPhone to External Hard Drive on Windows
For some who don't prefer installing software to transfer photos from iPhone to external hard drive, the good thing is that you can directly do it on the Windows Photos app. It is a built-in app that gives a straightforward process to share all those photos to free up space. Besides that, you can edit and organize videos and photos inside the application.
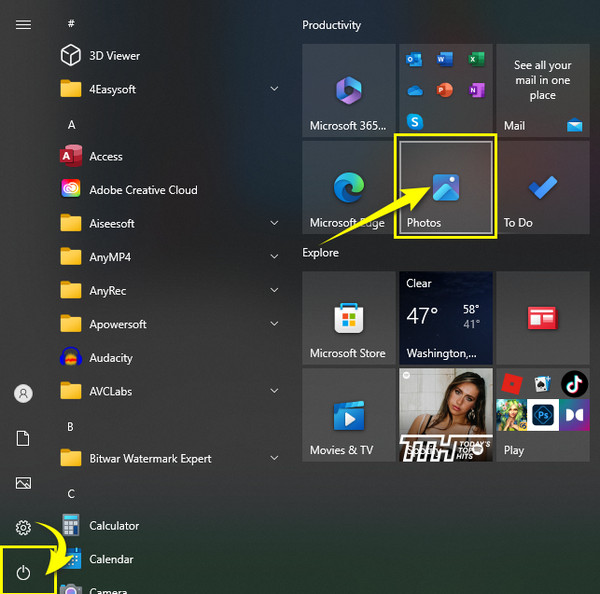
Step 1.Link your iPhone to your Windows PC and navigate to the "Photos" app by clicking the "Start" menu and locating it there. Don’t forget to plug in your external hard drive, too.
Step 2.In the "Photos" app, click "Import" and select "From a USB device". Then, choose the desired photos you want to move. You can now transfer photos from iPhone to Windows PC or external hard drive.

Step 3.Proceed to select a folder on your external hard drive by clicking "Import settings" and going to "Change the Import Destination" and "Done". Finally, click "Import Selected" to begin.
How to Transfer Photos from iPhone to External Hard Drive on Mac
Like Windows, Mac lets you back up iPhone photos to an external hard drive using the Photos app, an alternative to the iPhone in late versions. With it, you can quickly get your photos safe and sound while freeing up more space in your iPhone. Without installing anything, you can transfer photos from iPhone to external hard drive; however, this can be done if you run macOS X 10.10.3 or later.
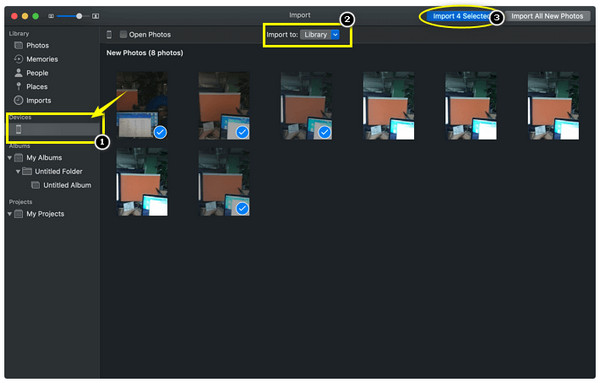
Step 1.Start by linking your iPhone as well as your external hard drive to your Mac. Then, open the "Photos" app, head to the "Devices" section in the left menu, and choose your iOS device.
Step 2.Click on the "Import to" option and decide to save the imported photos to your external hard drive, among other options, from the drop-down.
Step 3.Once done settling those up, click on "Import All New Photos" or selectively choose photos to transfer. Lastly, click the "Import [number] Selected". You can then quickly move them to the folder of your external hard drive. You can also use iCloud to transfer photos from iPhone to iPad.
Use iCloud to Transfer Photos from iPhone to External Hard Drive
Done with separate methods for Windows and Mac, here’s the suitable method for both platforms. The iCloud, a cloud storage for iOS/macOS users, lets you transfer photos from iPhone to external hard drive. Once the iCloud Photos is enabled on your iPhone, photos are automatically stored in the cloud for backup. Then, download it on your computer by signing into the iCloud app or main page.
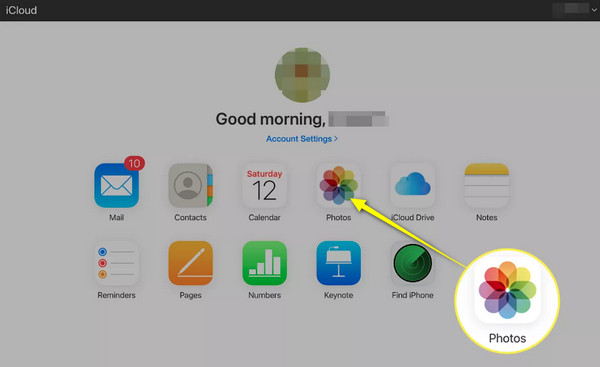
Step 1.Once you verify that "iCloud Photos" is enabled on your iPhone. Visit the "iCloud" website on your web browser, or open the "iCloud app" on your Mac and sign in using your iPhone’s Apple ID.
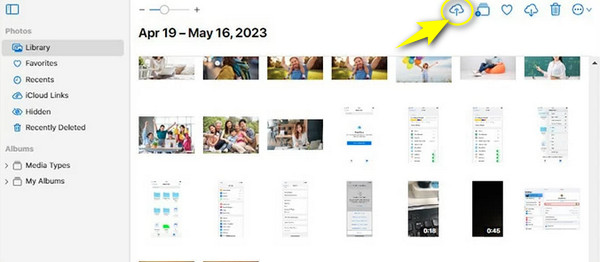
Step 2.Head to the "Photos" app, among other options, to access your iPhone pictures stored in the cloud. Click the "Library" tab and pick the images you wish to transfer. Press the "Ctrl" key to select multiple pictures you want to import from iPhone to external hard drive.
Step 3.If finished, click the "Download" button to save your selected photos to your computer. Establish a bond between your external hard drive and computer. Then, "copy and paste" the folder that stores your iPhone photos to your hard drive.
Import iPhone Photos to External Hard Drive with Image Capture
Luckily for Mac users, you have another option to transfer photos from iPhone to external hard drive using Mac exceptional programs, one of which is Image Capture. This native macOS program is primarily for externally attached devices and handles and processes photos and videos.
The following is for how to get pictures off iPhone to external hard drive with Mac’s Image Capture:
Step 1.Get a lightning USB cable to connect your iPhone to your Mac. Later, connect the hard drive to your Mac right after.
Step 2.Using "Finder" or the "Launchpad", find your way to "Image Capture". Once it is opened, select your iOS device under "DEVICES" in the left tab.
Step 3.Proceed to select the photos you want to transfer to your external hard drive. Push down the "Command" key to select numerous items. After selecting, click "Import to" and choose your external hard drive as the location.
Step 4.For the last procedure, click the "Import" button to begin transferring or the "Import All" to move over all your iPhone photos and videos.
FAQs about Transferring iPhone Photos to External Hard Drive
-
How to transfer photos from iPhone to external hard drive?
Firstly, connect your iPhone and the external hard drive to your computer. Then, use one of the abovementioned solutions to transfer photos, like the built-in Photos app, iCloud, Image Capture, or third-party software.
-
Can I transfer photos from iPhone to external hard drive without computer?
Yes. With a USB-C cable, you can connect your external hard drive to your iPhone without a computer to transfer photos. Otherwise, you can connect these devices with the lightning-to-USB cable.
-
How to move photos from iPhone to external hard drive using File Explorer?
After connecting your iPhone and your hard drive to your Windows computer, tap the Allow button to allow a computer to access your iPhone’s data. On your computer, go to This PC, then Apple iPhone to Internal Storage, and select DCIM to 100Apple to view your Camera Roll. Copy the selected iPhone photos and paste them into your drive.
-
Aside from iCloud, can I use other cloud-based- services to transfer photos from iPhone to external hard drive?
Yes. After knowing the transferring method of iCloud, likewise, you can rely on One Drive, Google Drive, Dropbox, and others to assist you in sharing photos to a hard drive. The steps are likely similar to each other.
-
Can I organize my iPhone photos on an external hard drive?
Yes. To do so, you will have to connect it to your computer and then organize it by backing up or removing unwanted or duplicated items.
Conclusion
Those cited are proven ways to transfer photos from iPhone to external hard drive. Whether you wish to transfer using Windows66 or Mac, you can rely on the solutions in this post, such as the Photos App, Image Capture, iCloud, etc. Among them, the recommended way is using AnyRec PhoneMover. Transferring data, such as photos, videos, music, contacts, and messages, has never been challenging with this program. Whether you want to share data between iPhone, Android, or computer, you can do it flawlessly! Try it today!
Secure Download
Related Articles:
About Our Author