8 Ways to Transfer Videos (in GB/MB) from iPhone to Computer
Do you love to edit your iPhone videos on the computer with professional tools like Premiere Pro? Or do you prefer watching iPhone movies on a larger screen? In circumstances like these, knowing how to transfer videos from iPhone to computer is vital. You can also save the storage space on your 16. Indeed, iPhone has a high-quality camera that gives you the best video display. And beyond the cases raised, there are many reasons people want to transfer videos to a PC. Thus, this post is here to share with you the 8 ways on how to get videos from iPhone to computer.
Guide List
Best Way to Transfer Large Videos from iPhone to Windows/Mac 3 Ways to Transfer Videos from iPhone to Windows PC 4 Ways to Transfer Videos from iPhone to Mac FAQsThe Best Way to Transfer Large Videos from iPhone to Windows/Mac
Starting with the best way to transfer videos from iPhone to computers is with the AnyRec PhoneMover.This program covers a one-click transfer of data solution, including videos, music, images, messages, and contacts. Furthermore, this tool can detect all your videos and organize them into categories, like Home Videos, Movies, TV shows, iTunes U, and others. Also, viewing any of your videos is possible with the built-in player, letting you check if you have selected the right one to be transferred to the computer. Check out below how to transfer videos from iPhone to computer with this excellent program.

Support transferring data between iOS devices, Android, and computers.
Preview all videos with the built-in player before transferring.
Quickly locate all duplicated videos and remove them to free up storage space.
The iPhone videos are categorized into Home Videos, Movies, Podcasts, etc.
Secure Download
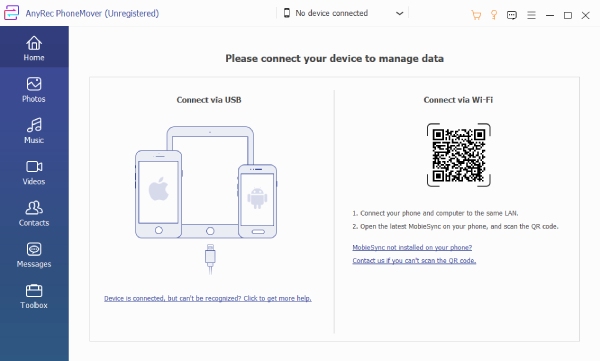
Step 1.Open AnyRec PhoneMover software. Prepare a USB cable to join your iPhone to your computer. Then, wait until the program detects your device, and click "Videos" from the left side menu.
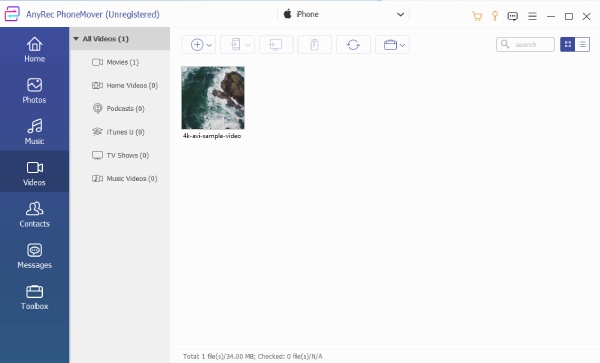
Step 2.Now that all videos can be seen on screen, organized into categories like "Movies", "TV Shows", "iTunes U", and more. Choose the video you love to transfer from iPhone to the computer by ticking each of their "boxes."
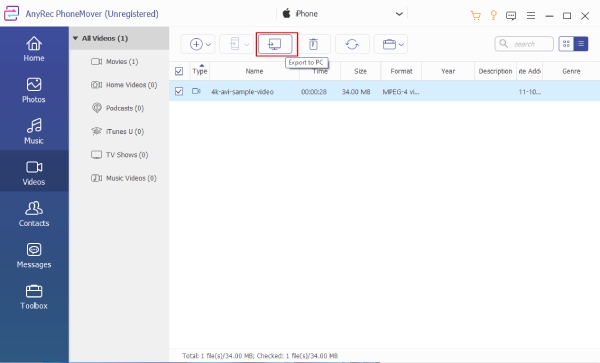
Step 3.Later, you can click on the "Export to PC" button. From the second window appears, select where to store your videos, then confirm it to start transferring videos from iPhone to Windows/Mac. Optionally, you can remove all videos transferred for further editing to save storage space.
3 Ways to Transfer Videos from iPhone to Windows PC
Succeeding from the best way to transfer video from iPhone to PC, you can also get it done quickly with many methods available for Windows. But, it is worth noting that only if you have some videos to import to a computer, you can use the following services.
Way 1. Move Videos from iPhone to Computer via iTunes
iTunes is a file manager introduced by Apple that lets you organize your music files and other media, as well as share between devices. You can use it to sync data and back up your iPhone. But, if you do have lots of videos to transfer, expect a longer time to get it completed. See how to move videos from iPhone to PC with iTunes:
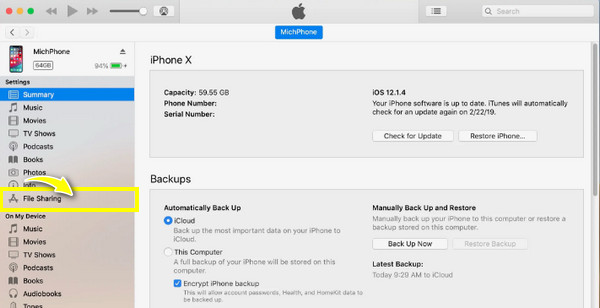
Step 1.Link your iPhone to your PC via a USB cable, then run the latest version of "iTunes" on your Windows computer. Please wait for it to recognize your device.
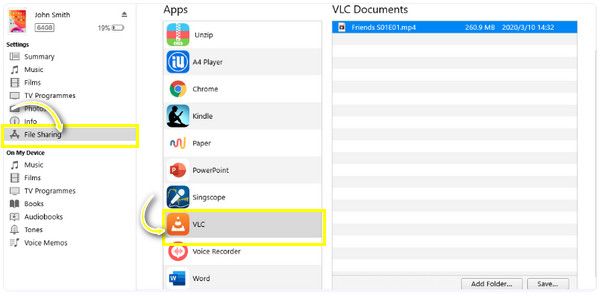
Step 2.On iTunes, click the "Device" button above, then select the "File Sharing" option from the left sidebar. Then, choose the app from where you store all your videos, then drag and drop it into a folder on your PC.
Step 3.Finally, click "Save" to begin the transferring process from iPhone to computer. Please wait until it gets done.
Way 2. Import Videos from iPhone to Computer via Photos
Another way to transfer videos from iPhone to PC is through the Photos app on Windows 8 or 10. The Photos app is specifically created to assist you in managing photos and videos on your Windows PC. You can also use it to carry your videos from your iPhone to your PC, and here’s how you will do it:
Step 1.Don’t forget to prepare a USB cable that you’ll use to connect your iPhone to your PC. Tap the "Trust" button in the "Trust this Computer" notification, and wait for the PC to recognize it.
Step 2.Click "Start" on your computer, then choose the "Photos" app. If you cannot find it, try searching in the search box beside the "Start" menu.
Step 3.Next, click "Import", then select the "From a USB device" option. You can now see all your iPhone photos on the screen. Pick which video you want to transfer from iPhone to computer and set the destination folder. Click the "Import Select" button to start.

Way 3. Get Videos from iPhone to Computer via File Explorer
The last possible method to transfer videos from iPhone to PC is with File Explorer, a built-in app in Windows PC. It is also referred to as Windows Explorer for Windows earlier versions. With it, you can copy and paste your videos from your iPhone after Windows detects it. The following steps will direct you to perform the process with the File Explorer:
Step 1.Ensure to plug your iPhone into your Windows PC forest, then tap "Trust" to allow the computer to scan your device.
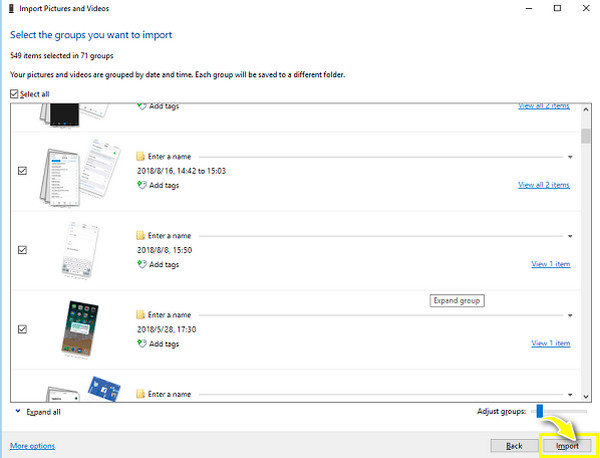
Step 2.On your PC, open "This PC" and locate your iPhone. Upon locating it, "right-click" your device, then select "Import pictures and videos" from the drop-down.
Step 3.After that, click "Import all new items now", or "Review, organize, and group items to import", depending on whether you’re using it for the first time. Now, choose the video you want to transfer, then click "Import".
4 Efficient Ways on How to Transfer Videos from iPhone to Mac
After knowing the best three methods to transfer video from iPhone to PC, it’s time to solve your problem on Mac! Fortunately, Apple provides features such as iCloud and AirDrop for easy sharing of files between iOS devices, which applies to iPhone and Mac. Get to know them below.
Way 1. Transfer iPhone Videos to Computer via iCloud
Apple introduced the iCloud feature to automatically save your phone data, such as videos, contacts, reminders, emails, etc. Make sure to save your video in iCloud, so the transferring operation to any device, including Mac, will be easy. Here’s how to transfer videos from iPhone to computer using iCloud:
Step 1.Run any browser on your Mac, then enter "iCloud.com". Log in with your Apple ID with the proper name and password.
Step 2.Tap "Allow" on the pop-up on your iPhone. A two-factor authentication code will appear on your iPhone; enter it in the fields.
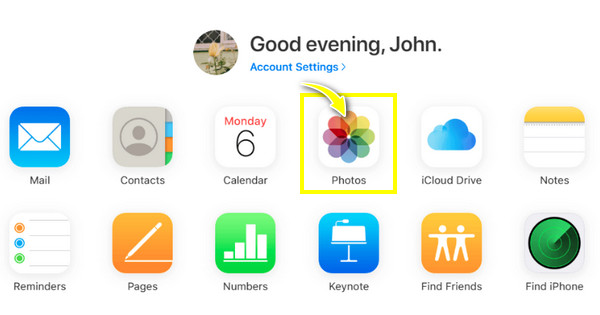
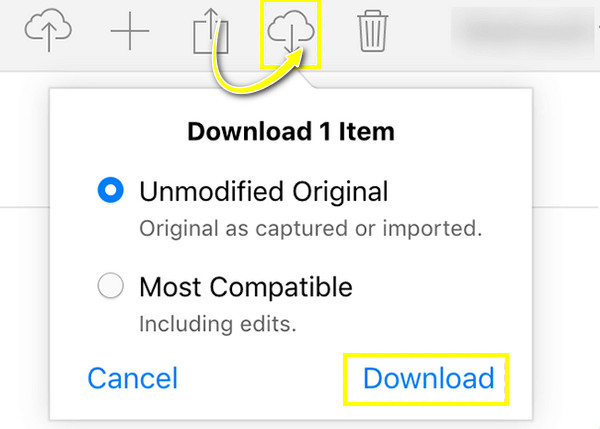
Step 3.Many iCloud icons will appear on your Mac screen; choose "Photos". All your photos and videos will be viewable on Mac. Select which video to transfer from iPhone to Mac, then click the "Download" button.
Way 2. Move Videos from iPhone to Computer via AirDrop
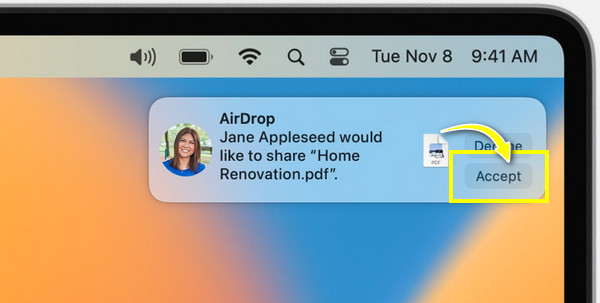
Another quick and easy way on how to get videos from iPhone to computer is through AirDrop. Using this Apple feature, you can wirelessly share any data, including videos, photos, contacts, and more, to another iOS device. See below how to send videos from iPhone to Mac via AirDrop:
Step 1.Please ensure that "AirDrop" on your iPhone and Mac are enabled and choose "Everyone" as their device visibility.
Step 2.Enter the "Photos" app on your iPhone, then pick out the videos you wish to AirDrop on Mac. Tap the "Share" button, then select the "AirDrop" button.
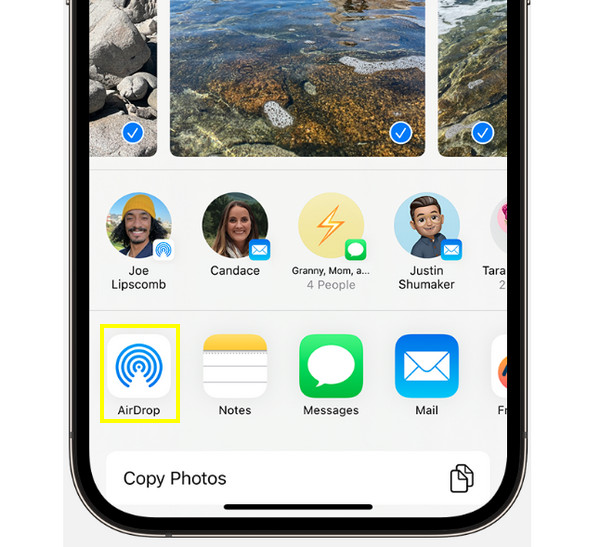
Please wait until your Mac’s name appears, then tap on it. On Mac, you must see an alert regarding the transfer; tap "Accept."
Way 3. Send Videos from iPhone to Computer via iTunes
As mentioned earlier, Apple introduced iTunes mainly to provide a music streaming experience. It is also capable of organizing and sending large video files from iPhone. The following steps on how to transfer videos from iPhone to computer are similar to Windows, and please remember that you cannot find iTunes in some of Mac's latest versions.
Step 1.Run iTunes, then have your iPhone connected to your Mac through a USB cable. Then, navigate to the "Device" icon and click the "File Sharing" option.
Step 2.Choose the app where you have saved your videos, then drag and drop it to your Mac’s folder. To apply changes, click the "Save" button.
Way 4. Export Videos from iPhone to Computer via Photos
Like Windows, you can also rely on the Photos app to learn how to transfer videos from iPhone to a computer. Take the steps below to see how easy it is to share iPhone videos to your Mac.
Step 1.Prepare a USB cable to connect your iPhone to your Mac. Then, click on the "Photos" app on your Mac computer.
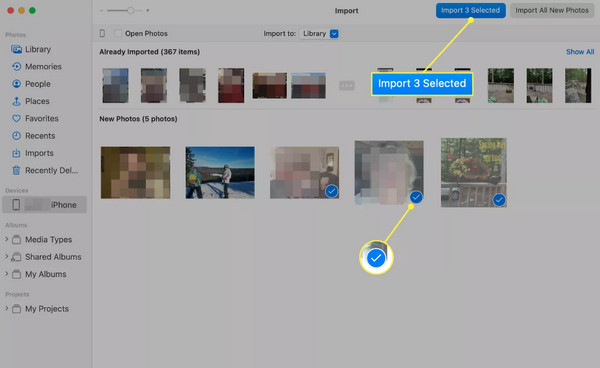
Step 2.Navigate to "iPhone" from the "Devices" section in the sidebar. Then select "Import All New Items" to transfer all new videos from your iPhone.

However, if you prefer to share only desired items, click each video you want to transfer and then click "Import Selected".
FAQs about How to Transfer Videos from iPhone to Computers
-
Why is it essential to transfer videos from iPhone to PC?
Usually, people must transfer videos to their computers to manage their storage space or back up data. Or, they want to edit their iPhone videos with one of their video editors on PC.
-
Why can’t I find iTunes on my Mac to transfer videos?
It is worth noting that iTunes is not available for Mac’s latest versions and is now distributed to separate apps such as Apple Music, Apple TV, Apple Books, and Apple Podcasts apps. You can use the Finder app to manage your iPhone data.
-
How much storage space does iCloud offer?
iCloud lets you keep your data safe and backs them up for up to 5GB of storage. If you wish to exceed, iCloud offers you a plan where you can get 50GB of up to 2TB storage.
-
How do you enable AirDrop on iPhone and Mac?
To activate AirDrop on your iPhone, access the Control Center and tap Bluetooth to turn it on. Next, long press on it to see the AirDrop feature; please enable it and select Everyone. On Mac, click on Finder, then select AirDrop, turn it on, and choose Everyone.
-
Are the Photos app available to all Mac versions to transfer videos?
You can use the Photos app to answer how to transfer videos from iPhone to computer for macOS Catalina and later. In contrast, you can use iPhoto for Mac's earlier versions.
Conclusion
That’s it for how to transfer videos from iPhone to computer! With the given methods for Windows PCs, the first one is risky since you can experience data loss with iTunes, while Photos and File Explorer aren't suitable for managing large videos. However, all three are effective in sharing videos to PC. Furthermore, you see all four methods for Mac computers, each providing the necessary sharing process. But if you wish for a safe, secure, and quick process of transferring videos from iPhone to Windows/Mac, go for AnyRec PhoneMover. See its managing and transferring capabilities by downloading it today!
Secure Download
Related Articles:
About Our Author