5 Ways Stretch a Photo without Distortion Online/Offline
Sometimes, you get to stretch images to match a standard aspect ratio on social media. And it’s dreadful to learn that the photo will get distorted once stretched out. Thankfully, there are five tools to help you for Windows, Mac, Android, and iPhone. With this article, you can try various alternatives to stretch pictures with built-in functions on your device. Moreover, learn which professional tool to resize images online.
Guide List
Part 1: Use AnyRec to Stretch Images for Free by 800% [Online] Part 2: 2 Built-in Software to Expand Pictures on PC [Windows] Part 3: How to Use Preview in Finder to Extend Images [Mac] Part 4: How to Broaden Images on Mobile [iPhone/Android] Part 5: FAQs about Stretching Images1: Use AnyRec to Stretch Images for Free by 800% [Online]
Rather than worrying about the quality of the picture once you use an image stretcher, AnyRec AI Image Upscaler will help upscale photos up to 800%. The free web-based tool increases resolution without distorting the quality. It is powered by the latest AI technology, which automatically detects blurry parts and fixes them. By using this, you can easily stretch images for various occasions, such as a presentation, printing, and sharing. AnyRec AI Image Upscaler is the ideal tool for professional photo editing.
Features:
- Stretch pictures with recovered colors, details, textures, and pixels.
- Have Magnification features enlargement options from 2x to 8x upscale.
- No file limitations for various supported formats like JPG, PNG, and TIFF.
- Require no registration or subscription for you to stretch images.
Step 1.From AnyRec AI Image Upscaler’s interface, click the "Upload Photo" button to open your folder. Browse for the image you want to edit and click the "Open" button to confirm your selection.
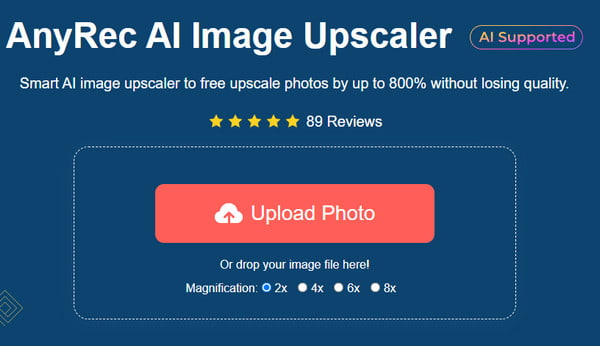
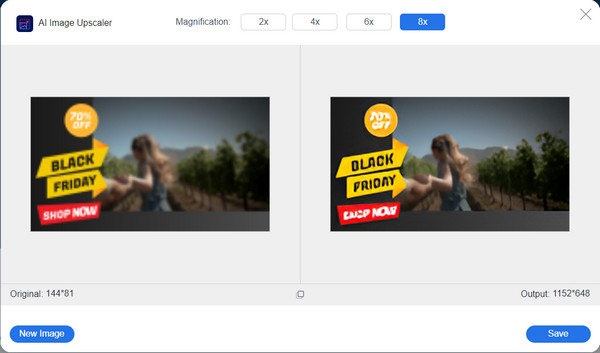
Step 2.Select the "Magnification" level from the top part and see the difference from the side-by-side preview. Hover your mouse over the parts of the picture to see the repaired details. You can change the magnification for an adjustment.
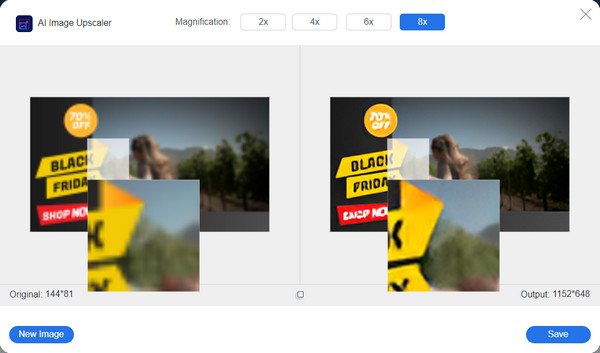
Step 3.Once satisfied with the result, click the "Save" button to download the output. The download process will be finished in a few seconds. Click the "New Image" button to upscale another photo.
Part 2: 2 Built-in Software to Expand Pictures on PC [Windows]
Windows are updating its features for every version; this time, it provides image stretchers to its default photo viewer and editor. By learning the built-in functions, you don’t need to install any third-party software to do the task. Without further ado, let’s look at Window’s image stretchers.
Method 1: Photo App
The photo app is the default photo viewer for Windows, and as expected for Windows 10, you can also use it as a stretcher. Here is a demonstration of how to resize your pictures with the Photos app
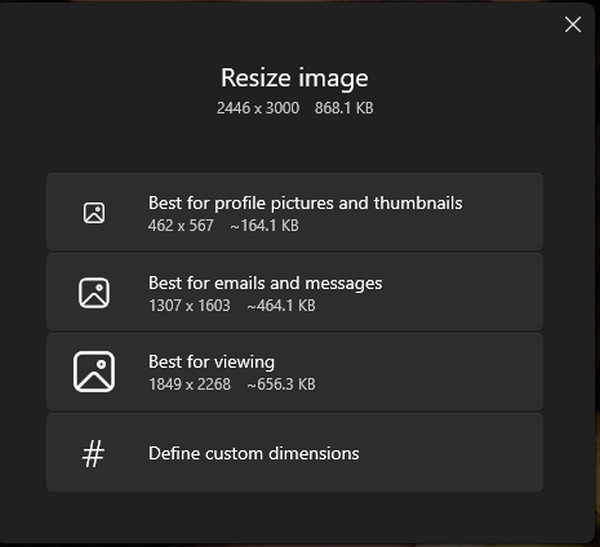
Step 1.Open the picture on the "Photos" app. Select the "See More" button or right-click your mouse to open the drop-down menu. Choose the Resize Image option.
Step 2.You can choose from recommended resizing options. You can also customize the picture by clicking the "Define Custom Dimensions" button. Click the "Save Resized Copy" button to wrap it up.
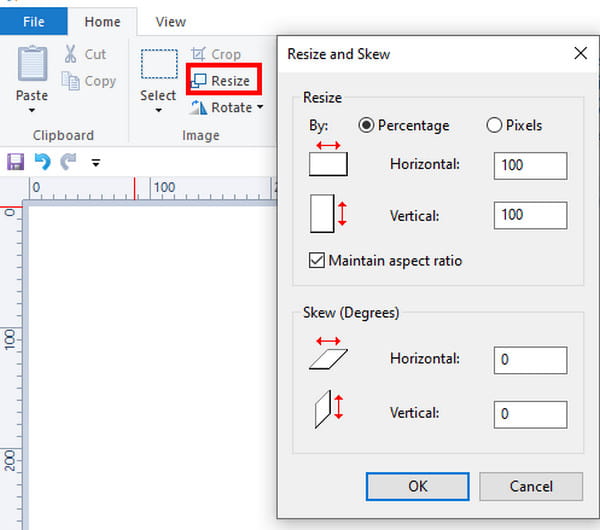
Method 2: Paint App
Alternatively, the Paint app can be your photo stretcher. It is easy to use and allows you to undo the changes if you don’t like it. Also, it lets you save the edited photo to another supported format.
Step 1.Open your local folder and locate the image file. Right-click on it and choose the "Open With" option from the drop-down menu. Click the "Paint" button to open the app.
Step 2.Click the "Resize" button from the top toolbar. A dialog box will show the settings for resizing, including percentage, pixels, and aspect ratio. After making changes, click the "OK" button.
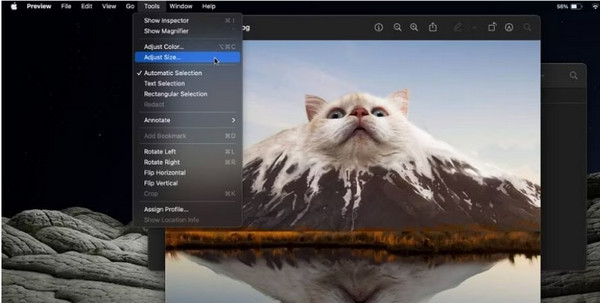
Part 3: How to Use Preview in Finder to Extend Images [Mac]
If you are a Mac user, then there is also a default way to stretch images without distortion. Apple does not lack powerful features, and Preview is one of the best solutions for resizing pictures. Utilizing the default viewer to edit pictures does not require additional apps, so this is a perfect and quick way to stretch an image.
Step 1.Browse and open the image on Preview. You can also go to Finder and right-click the file. Select "Preview" from the drop-down menu.
Step 2.Go to the "Tools" menu and pick the "Adjust Resize" option. Once the dialog menu opens, change the image dimensions like resolution, height, width, etc. Click the "OK" button to save the changes.
Part 4: How to Broaden Images on Mobile [iPhone/Android]
More default ways to stretch images can be found on your mobile device. Whether you are using an Android or iOS, here’s how to find a resizing feature on your phone.
1. Resize Images on iPhone
The possible way to stretch images on iPhone is by using the "Photos" app. You can also set the desired dimensions without limitations. Furthermore, you can edit the picture for enhancement.
Step 1.Launch the Photos app and tap "Edit" from the upper right corner. Tap "Crop" from the bottom toolbar to open more options. From the top right corner, select the "gray rectangle" icon.
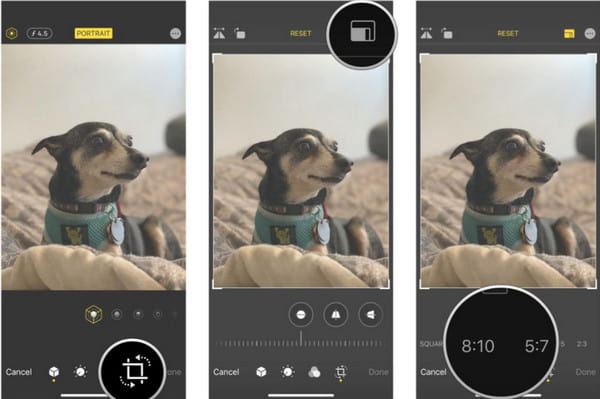
Step 2.Select the desired dimension or use "Freeform" to set a customized dimension. Tap the Done button to save the resized picture.
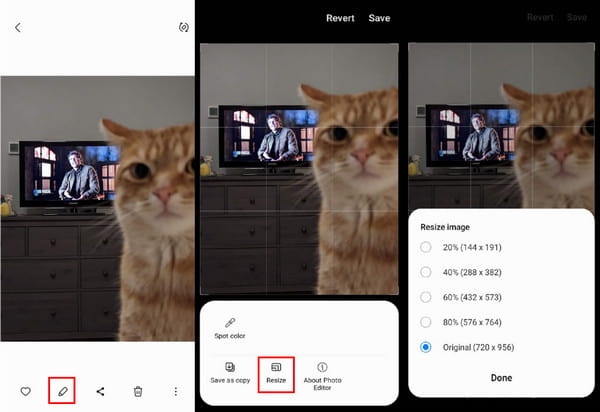
2. Resize Images on Android
Many latest versions of Android have the resize feature for captured photos. The only drawback is that there is no custom option to enlarge the picture and set the dimensions freely. Still, it is fairly easy to do on your smartphone.
Step 1.Launch the Gallery app and pick the picture you want to edit. Tap the "Edit" button with the pen icon.
Step 2.Tap the "Ellipsis" button and select the "Resize" option. Choose the desired dimension for the image. Tap the "Done" button to apply the new size.
Part 5: FAQs about Stretching Images
-
1. What is the aspect ratio for a resized image?
The aspect ratio of a resized picture depends on the usage. For example, if you use a picture as wallpaper on your phone, use the 9:16 aspect ratio. Laptops or computers use mostly need 16:9 and 21:9 for ultrawide monitors. It also depends on social media, such as Instagram requires a 1:1 ratio.
-
2. What happens to the quality after resizing a photo?
Resizing the image can impact the quality, which is inevitable when you scale it beyond the original size. So it’s best to copy the photo before resizing it or use AnyRec AI Image Upscaler to upscale the resolution.
-
3. Does stretching an image affect the file size?
Yes. The file size of an image changes when you increase or decrease the resolution. This is because an image resizer changes the number of pixels and the pixels per inch. So, the file size will change either way.
Conclusion
To conclude, stretching images with the mentioned tool is more accessible, especially now that you’ve learned the default ways on various devices. Don’t forget to convert low-resolution images to high resolution with AnyRec, as it will help the pictures not to lose quality.
Related Articles
About Our Author


