
How to Crop Video in VLC? (and A Much Easier Alternative!)

No doubt, those annoying black bars ruin the view when watching a video in VLC. It is known as the Swiss Army Knife of media players, so can you crop a video in VLC? Well, it is not exactly as simple as you think it is, but to save you time and headaches, this guide breaks down the exact steps on how to crop the length of a video in VLC. It also shares some quick troubleshooting fixes for when the cropping acts up, and a much better alternative for a no-hassle process.
Guide List
Step 1: Find the Crop Values You Want (Live Preview) Step 2: Set the Same Crop Values in Preferences Step 3: Convert/Save the Cropped Video in VLC Cropping a Second Video in VLC, Don't Skip This Not Satisfied with VLC? Crop Videos Flexibly with This Alternative Quick Troubleshooting of VLC Video Cropping ProblemsStep 1: Find the Crop Values You Want (Live Preview)
Starting with figuring out exactly how many pixels you want to cut from the top/bottom and left/right to crop part of a video in VLC. The video player has a handy real-time preview that allows you to get different values, ensuring you do not chop off any important details or leave extra black bars in the frame.
1. Open your video in VLC Media Player, then go to the top menu and choose "Tools" then "Effects and Filters".
2. Switch to the "Video Effects" tab, and then click the "Crop" sub-tab. Use the counter boxes to enter pixel values, and you'll see the video frame change.
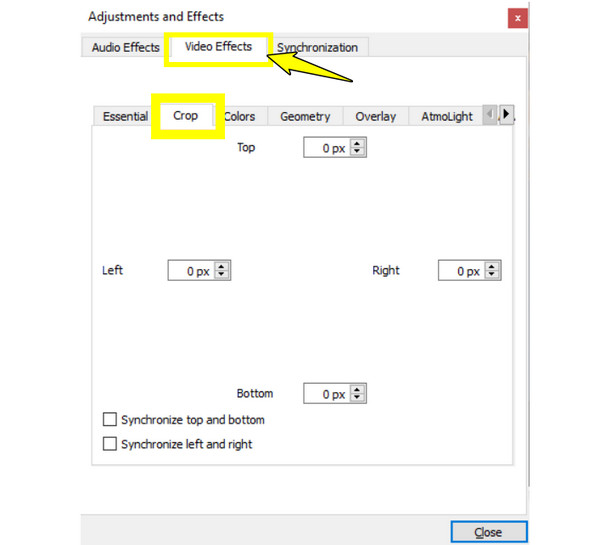
3. Once your video looks exactly how you want it, write down these exact values, then close the window.
Step 2: Set the Same Crop Values in Preferences
While the live preview adjusts how your video looks right now, it does not tell the player's engine to apply those changes during the export. So, to make sure your VLC video cropping is sticking for saving, you need to input those same numbers into VLC's advanced preferences and activate the Crop filter.
1. In the top menu, click "Tools" then select "Preferences". Then, at the very bottom, from "Show settings", select the "All" radio button to open the Advanced Preferences.
2. Now, in the left-hand sidebar, scroll down to the "Video" section, expand it, and select "Filters". Look for "Cropadd" in the list and click on it. Enter the same values you've set in Step 1.
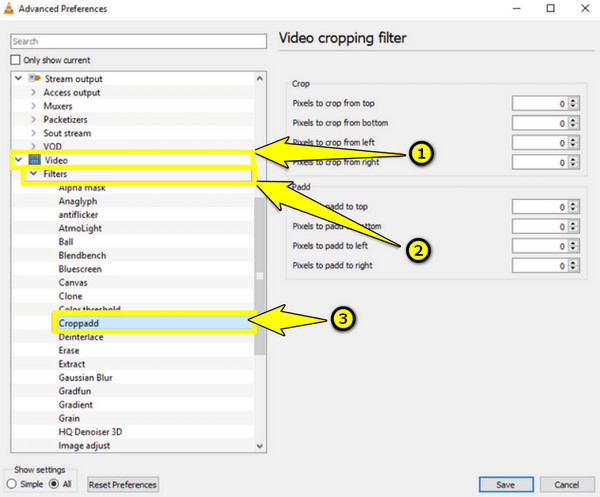
3. Next, go back to the "Filters" category. On the right side, check the "Video scaling filter" (Cropping filter) box. Click the "Save" button to apply everything.
Step 3: Convert/Save the Cropped Video in VLC
With all those preferences locked in, you're finally ready to crop video using VLC and save it! By doing so, VLC can re-encode your video through the crop filter you've set up, permanently burning the new size into the output file.
1. From the top menu, select "Media" then "Convert/Save".
2. Click the "Add" button to choose the file you wish to crop, then click the "Convert/Save" button.
3. In the Convert window, select your desired format in "Profile".
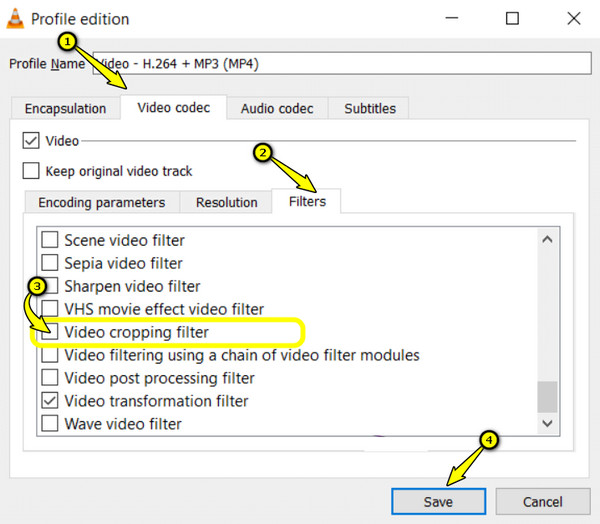
4. Click the "Settings" button next to it to check the "Video cropping filter" from the "Filters" sub-tab inside the "Video codec" tab.
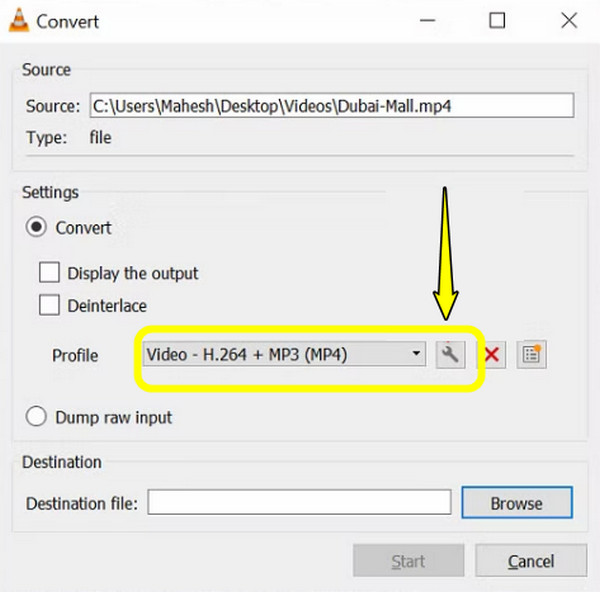
5. Once saved, click the "Browse" to choose your path folder and name for your new file. Click the "Start" button and wait for it to finish encoding.
Cropping a Second Video in VLC, Don't Skip This
Have another video that needs a quick crop? Since VLC's advanced settings don't automatically reset, your second video might result in awkwardly cropped frames or stretched footage. Thus, you should not skip clearing out the old data. Here's how to crop a portion of a video in VLC for the second time!
Step 1.In VLC, head to "Tools" then "Preferences". Select "All" at the bottom left. Now, in the left sidebar, expand "Video" and click on "Filters".
Step 2.Click "Cropadd" in the list and change all values to 0. Click back on the "Filters" category, uncheck the "Video cropping filter", and save it.
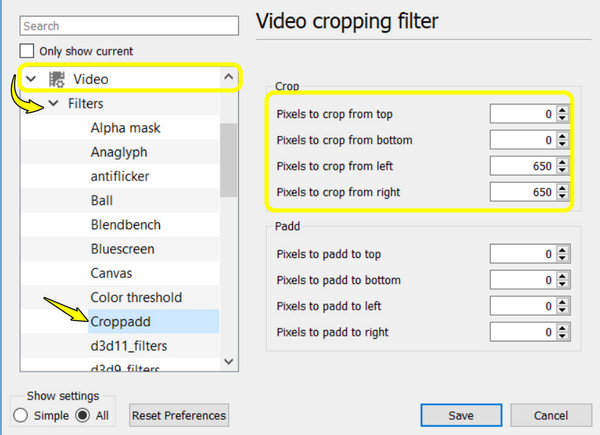
Step 3.After that, go to "Media" then "Convert/Save". Click the "Settings" button beside your selected profile, then head to the "Video codec" tab and then "Filters". Uncheck the "Video cropping filter", and save.
Step 4.Restart VLC. Locate your new crop values using the "Live Preview" tool. Enable the filters in your preferences and export your video.
Not Satisfied with VLC? Crop Videos Flexibly with This Alternative
If completing all the steps for the VLC video cropping feels like too much, you are not alone. Enjoy a fast, flexible way to crop video with AnyRec Video Converter. Instead of memorizing the pixel values, this software has a dedicated aspect ratio presets that do the magic cropping for you within its Video Cropper tool. Best of all, it keeps your video crisp and clear without sacrificing any detail during the export, letting you have a polished, cropped video to share with the world.
Quick aspect ratios perfectly tailored to standard platform requirements.
A real-time preview to show you what your final video looks like.
Enhance your footage by adding filters, watermarks, adjusting effects, and more.
Can strip away black bars, extra edges, or trim your video all in one place.
Secure Download
Secure Download
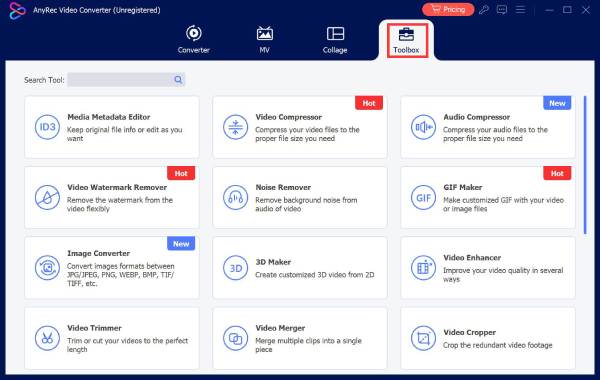
Step 1.Fire up AnyRec Video Converter on your computer. Look at the top bar, then click on the "Toolbox" tab. There, select the "Video Cropper" tool from the list of handy features.
Step 2.Next, click the "Add" button. Once your video loads, open the "Aspect Ratio" dropdown menu to select your desired crop shape.
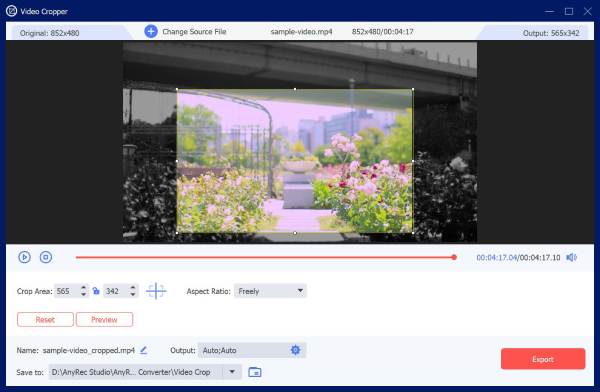
Step 3.Fine-tune the size by dragging the edges of the frame. If you have specific dimensions in mind, type them into the "Crop Area" boxes. Check the preview to ensure everything looks right before clicking the "Export" button to save your cropped video.
Quick Troubleshooting of VLC Video Cropping Problems
Even when you follow all the steps perfectly for using VLC to crop video on Windows 10/11 and Mac, the player sometimes acts a bit stubborn. Most of these issues are easy to fix. So, to help you get back on cropping videos quickly, see the table below, outlining the most common culprits and exactly how to fix them.
| Problem | Likely Cause | Quick Fix |
| Crop preview works, but the saved file is not cropped | The Video Cropping Filter checkbox was not enabled | Head to Media, then Convert/Save. In the Profile settings, head to Video codec, to Filters, and make sure the Video cropping filter is checked. |
| Crop values reset to zero when reopening Effects | Known bug: values are not persisted between sessions in some versions | Just proceed with the conversion or update the VLC to the latest version. |
| The save button stays grayed out after inputting crop values | Documented the VLC 3.0x bug specific to the crop filter | Close the dialog, restart VLC, and try entering the crop values again. |
| The output file has no picture, audio only | The Start/Stop Time is set in the same Convert/Save window | Clear the timestamps in the Convert/Save menu. If you need to trim as well, do it in separate passes. |
| VLC crashes during conversion | Large file size, high resolution, or incompatibility | Lower the bitrate or switch the codec. Or disable hardware acceleration in Tools > Preferences, and then Input/Codecs. If not, you can try online video croppers. |
| Crop applied to the wrong video | Forgot to uncheck the filter before starting a new crop | Go back to Tools > Preferences > All > then Video, then Filters. Uncheck the crop filter, and click on Save. |
Conclusion
VLC Media Player plays almost any file, and while it can edit videos, its clunky design makes it complicated to figure out hidden filter menus. Fortunately, today, you know how to crop and save a video in VLC and fix those annoying VLC cropping bugs. But you might step away from the player completely and crop videos with AnyRec Video Converter! Its dedicated cropper tool gives you instant presets and a real-time preview, all while maintaining the high video quality. Get your files looking exactly the way you want in seconds.
Secure Download
Secure Download
Related Article
About Our Author