
Content
Instructions
AnyRec PhoneMover is an efficient data-transferring tool for both your iPhone and Android. No matter if it is the latest iPhone 17/17 Pro, iPhone 16, iPhone 15, or the old iPhone 4, you can all safely transfer the data from your iPhone to Android or vice versa. Besides, you can also move the data from your phone to the computer and create a backup for your important files. And next time, you can then restore these files through AnyRec PhoneMover easily.
Purchase and Register
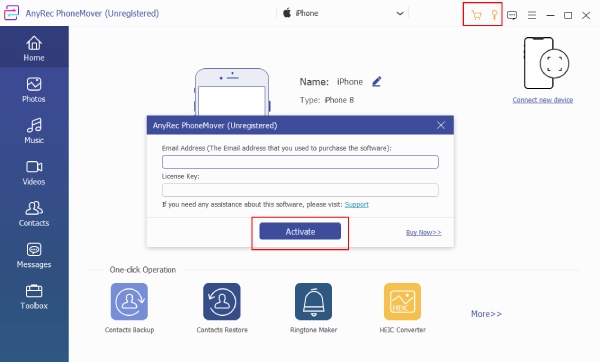
To move your data safely and completely across iPhone to Android, you can purchase AnyRec PhoneMover to unlock and enjoy all features. To do so, simply click the shopping cart icon after launching the program and fill in the required information on the ordering page. Then, complete the payment. Back to PhoneMover, click the key icon. Enter your email address and the registration code you just received after purchasing. Click the Activate button to end.
Update
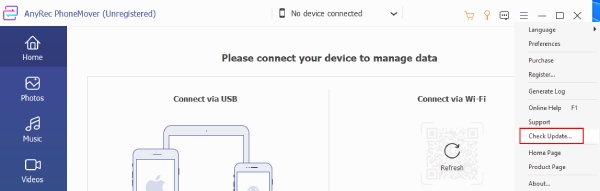
Keeping AnyRec PhoneMover in the latest version allows you to know the new features or fixes in time. You can either manually update or enable auto-update. Click the three-line icon on the main interface and click the Preferences button. See if the box beside the Check for Updates Automatically option is ticked there. Or you can manually check updates by clicking the Check Update button after clicking the three-line icon.
Preferences
In the Preferences window, you can adjust many settings to make AnyRec PhoneMover in line with your habits. The customizable settings include file storage path, transfer quality for different files, and so on. Below are more details.
General
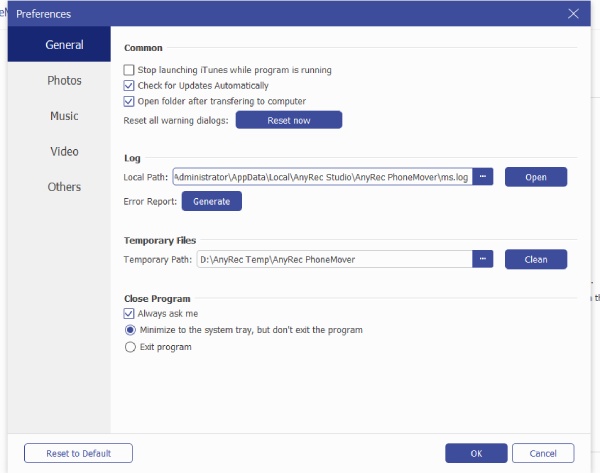
After launching the AnyRec PhoneMover on your computer, click the Menu button with a three-line icon. Then, click the Preferences button to go on. There, the first tab is General, in which you can stop launching iTunes while the program is running, enable Check for Updates Automatically, or the Open folder after transferring to computer functions. Meanwhile, you can go to the Local Path of the log file or generate an error report. You can also set up the actions you want after closing the program. There are three options for you: Always ask me, Minimize the system tray, but don’t exit the program, and Exit the program.
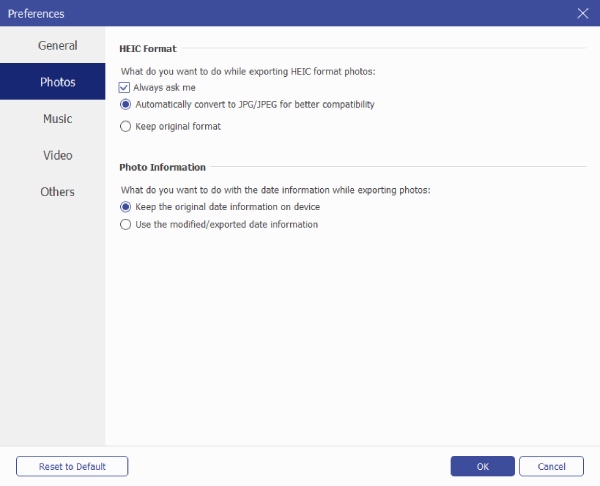
Photos
Move on and you are now in the Photos tab. Then you can change settings about your HEIC photos’ format after exporting them from your latest iPhone 17/16/15/14. You can convert them directly to JPG/JPEG or keep the original format after transferring. Moreover, you can decide whether to keep the original data information on the device of the photos transferred or use the modified/exported data information.
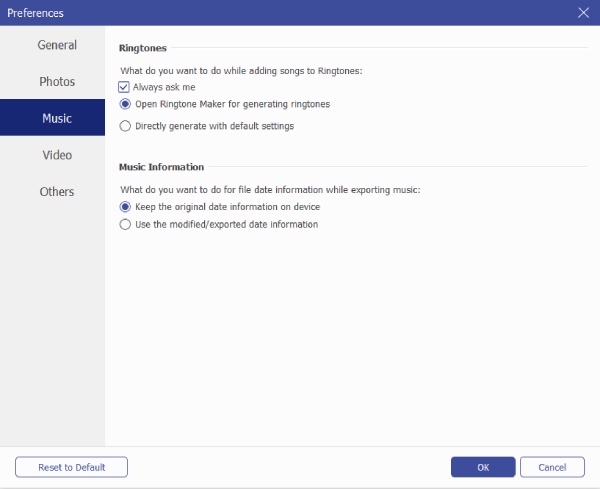
Music
In the Music tab of the Preferences window, you can change settings about the Ringtone Maker in AnyRec PhoneMover. Like whether you want to open it to generate a ringtone after you add songs, or directly generate a ringtone for you without asking. For example, you can turn TikTok sound into ringtone here. Furthermore, the original music information can also be kept or abandoned.
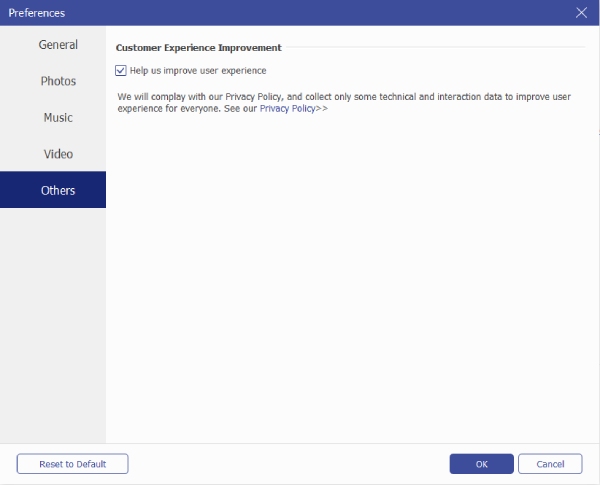
Others
There is only one option in the Others tab, which is to decide whether to allow AnyRec to collect technical and other data for it to improve your experience when using AnyRec PhoneMover. You can tick the box beside the Help us improve user experience option to stop the data collection anytime you want. Additionally, if you make any changes, you can back to the original setting by clicking the Reset to Default button.
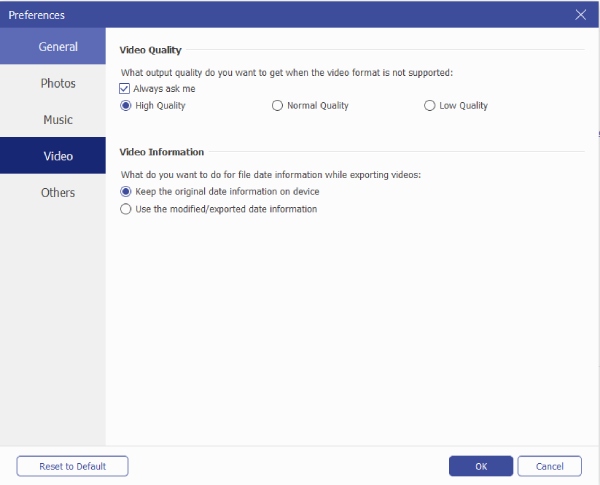
Video
When your video format is not supported by the AnyRec PhoneMover, you can come to the Video tab to adjust the output video quality for them, which has High Quality, Normal Quality, and Low Quality. Also, the video information can be adjusted here.
Transfer Media Files
All the media files like photos, music, and videos from your iPhone 17/16/15 or Samsung Android phone are transferrable in AnyRec PhoneMover. You can either transfer them from iPhone to Android, or from phone to computer. Before transferring, you can preview all these media files and their sequence, metadata, and categories. Meanwhile, you also need the latest iTunes installed on your computer. Here are the detailed steps.
Transfer Photos across Devices
You can transfer all the photos and videos stored on the Photos or Gallery app from your old Android phone to a new iPhone 17/16/15/14, or you can even move the photos from your latest iPhone 17/16/15 to your computer as a backup. Move on to see the guide below for different device transfers.
Transfer Photos across iPhone and Android
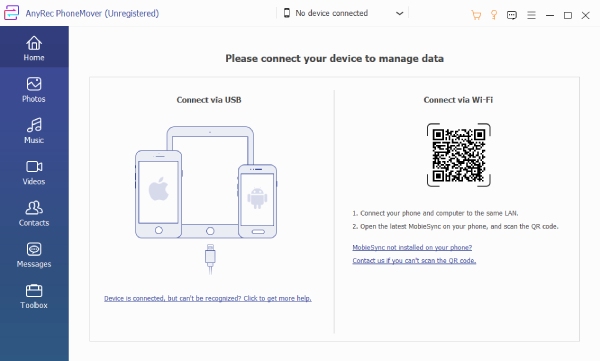
Step 1: Connect Phones to Computer
You need two USB cables to connect your iPhone and Android phone to the computer before launching. Or you can use the USB cable to connect your iPhone while scanning the QR code on the main interface to connect your Android phone to the computer.
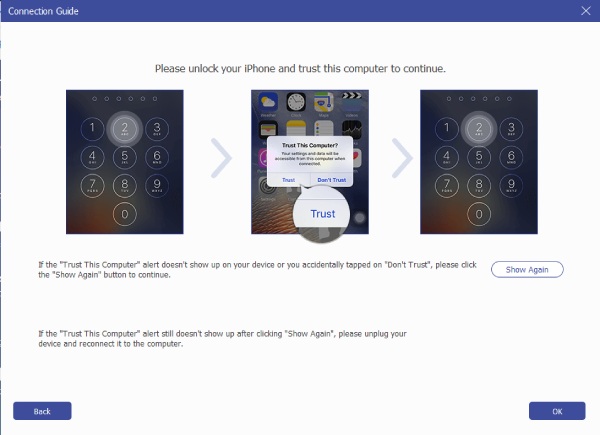
Step 2: Scan and Select Photos
After connecting, you will see a popup on both your iPhone. Follow the instructions on the PhoneMover to let your iPhone trust the computer. Now, click the Photos button on the left side to view all the photos on your iPhone.
Step 3: Export to Device
On the left side, you can also see the categories of these photos. Tick the boxes beside the photos to select. Then, click the Export to Device button above to transfer your iPhone photos to Android or vice versa. You may also delete your photos directly through the Trash Bin icon above.
Transfer Photos from iPhone/Android to PC
Step 1: Connect Device and Check Info
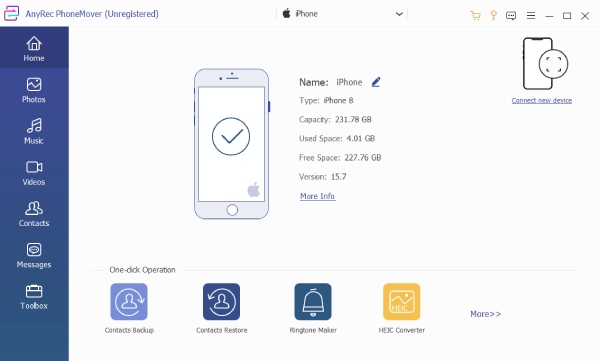
Launch the AnyRec PhoneMover program on your computer and connect either your new iPhone 17/16/15 or Samsung Android phone to the computer via a USB cable. If you connect the iPhone, make sure it has trusted the computer. Then, you will see the storage capacity, device name, and system version on the main interface.
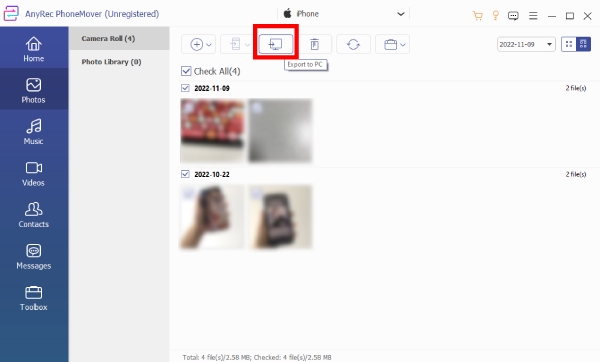
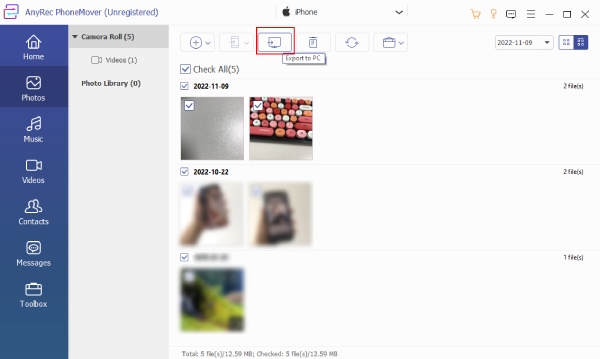
Step 2: Check All Photos
Again, click the Photos button and select the photos you want to move to the computer. Or tick the box beside Check All to select all the pictures and photos. After that, click the Transfer to PC button above to go on.
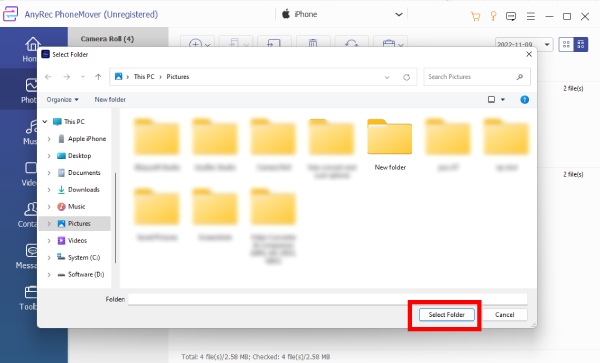
Step 3: Choose Folder to Save
Choose or create a new folder on your computer to store these photos. Click the Select Folder button to confirm. Then, the photo transferring process will start. Your photos from the iPhone or Android will be exported to your computer.
Transfer Music across Devices
All the music files from your iPhone or Android will be displayed under classified categories. Therefore, when you are transferring this music across iPhone, Android, and computer in AnyRec PhoneMover, the data and sequence will not be messed up.
1. Transfer Music across iPhone and Android
Step 1: Select the Desire Audio
Take the latest iPhone model as an example. Connect your iPhone 17/16/15 to the computer with a USB cable and use the Android phone you want to transfer to scan the QR code on the main interface after launching AnyRec PhoneMover. Then, both devices are connected. Click the Music button.

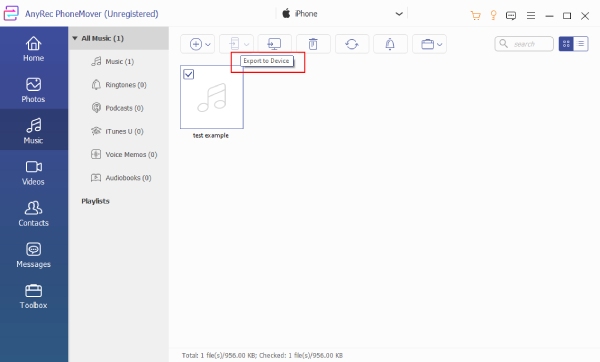
Step 2: Export to Device
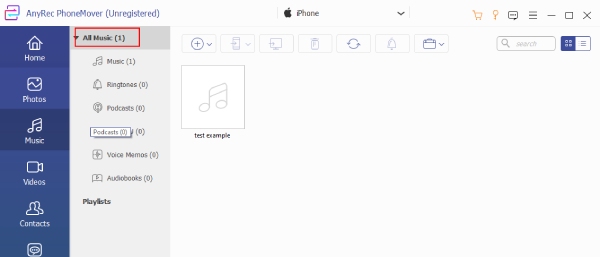
You can see all your music files from Ringtone, Podcasts, iTunes U, Voice Memos, and so on. Before transferring them from Android to your iPhone 17/16, you may also click the Plus icon to import extra music files from your computer. Select the music you want to transfer and click the Export to Device button above.
Step 3: Delete Former MusicScan All the Music
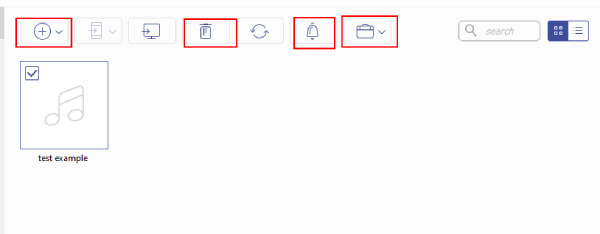
After exporting, you can delete the songs from your Android by clicking the Delete Files button. Or you can also choose one song and click the ring bell icon to generate a ringtone for your new iPhone. Meanwhile, if you click the Other Tools button, you can create a playlist out of the music. If you want to transfer music from iPhone to Android, the steps are the same.
2. Transfer Music across Phone and Computer.
You can move the music out of your iPhone or Android to the computer, here are the specific steps on how to do it with AnyRec PhoneMover.
Step 1: Scan All the Music
Connect your phone to the computer via a USB cable. Launch the AnyRec PhoneMover program on your computer. Then, click the Music button on the left side. The phone transferring software will start scanning your phone’s music. After that, all your music will be presented on the right side.
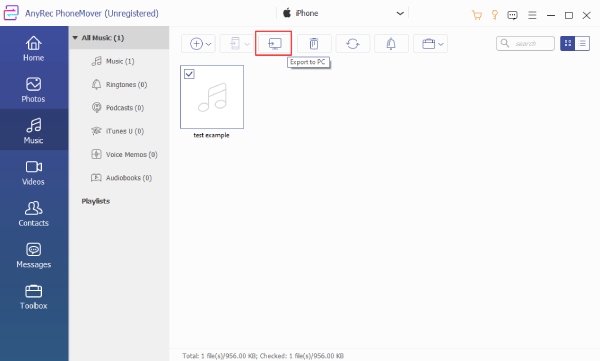
Step 2: Export Music to PC
Select pieces of music for transferring. You may also click the Refresh button if there is not all the music. Afterward, click the Export to PC button. A window pops up and you need to choose a destination folder to place the music. Confirm your choice and the transfer will start.
Transfer Videos across Devices
AnyRec PhoneMover can also take care of all your downloaded movies or videos containing cheerful memories. All sorts of videos can be moved from your Android to the iPhone and vice versa. For instance, iPhone 17/16/15 to Android 6.0 or lower is workable, and Android to iPhone 17/17 Pro, 16, 15, or even earlier is also feasible.
1. Transfer Video across iPhone and Android
Step 1: Select the Desired Videos
Launch AnyRec PhoneMover on your computer and connect your iPhone 17/16/15 or one of any models you have to the computer with a USB cable. After that, connect your Android phone via Wi-Fi and the QR code to the computer. Then, click the Videos button on the left side.
Step 2: Export to Device
Select the videos you need to transfer and click the Export to Device button at the top of the window to start the transferring process. Meanwhile, if you happen to have videos stored on the computer and want to transfer them to your new iPhone as well, click the plus icon to add them.
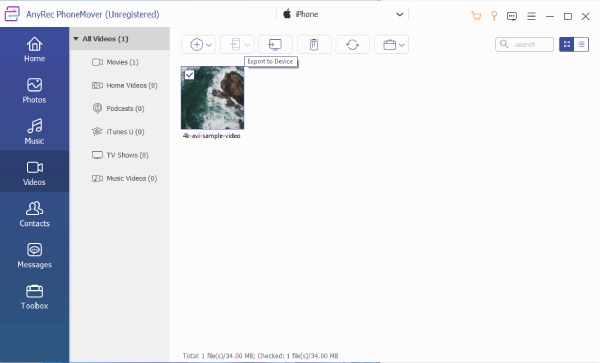
For transfer from iPhone to Android, the steps are the same. If there is a video that is not supported by AnyRec PhoneMover during export or import, then the program will convert it for you and ask which quality standard you want the converted video to be.
2. Transfer Videos across Phone and Computer
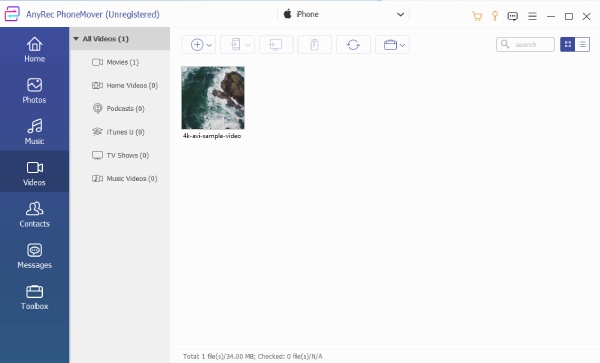
Step 1: Scan the Device and Choose Videos
To transfer the videos from one of your iPhone or Android phones to your computer, you also need to connect it to your computer via the USB cable. And launch AnyRec PhoneMover. After the program identifies your device. Click the Videos button as well.
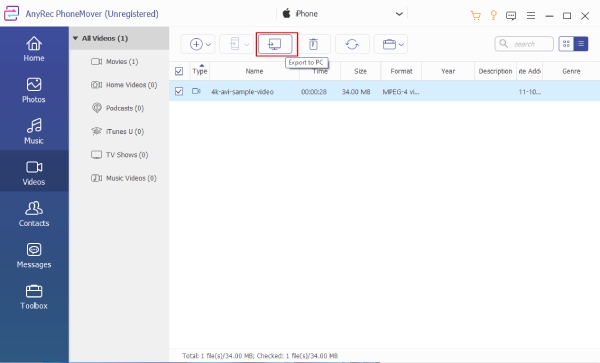
Step 2: Export Video to PC
Tick the box beside the videos you want to choose for transfer. Then, click the Export to PC button above. A new window will appear, where you can pick up a new folder or create one to store these videos. Confirm it and the video transferring process will start. Additionally, you can delete the videos already transferred to save some space on your iPhone or Android.
Transfer Contacts and Messages
If you can’t stand typing each number and name into your new iPhone 17/16/15, then the steps below are necessary for you, and you can effortlessly transfer all your contacts from your old Android to your new iPhone 17/16 and messages from phone to the computer by clicking a few buttons in AnyRec PhoneMover.
Transfer from iPhone to Android
Step 1: Connect Phones to Computer
Prepare yourself with a workable USB cable and make sure the MobieSync is installed on your Android phone. Connect your iPhone to the computer via the USB cable while connecting the Android phone to the computer via the app. Later, you can scan the QR code on the main interface of AnyRec PhoneMover after you launch it.
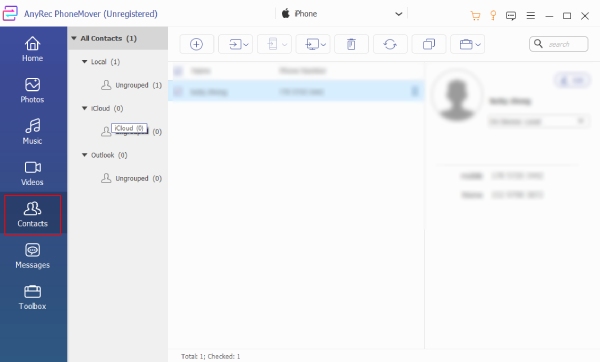
Step 2: Choose Contacts
Click the Contacts button on the main interface and AnyRec PhoneMover will start to scan the contacts on your iPhone. And the contacts will show up based on their groups like Local, iCloud, Outlook, or other sources. Choose the contacts and click the Export to Device button to transfer.

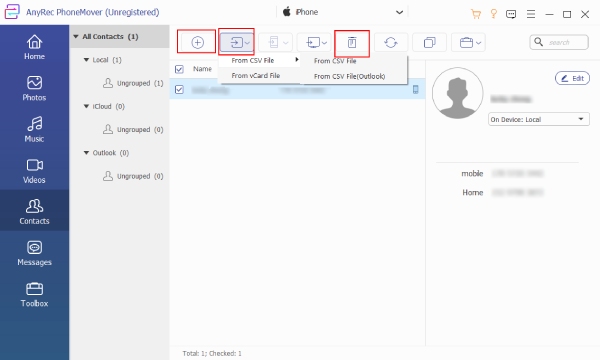
Step 3: Export Contacts to CSV/HTML
You can also copy, create, and import contacts and numbers in this program. For instance, you can import contacts from CSV files or vCard files stored on your computer. Once you have imported and transferred these contacts, you may also delete the original ones from your iPhone via the Trash Bin icon.
Transfer from iPhone/Android to Computer
Transfer from iPhone to Android
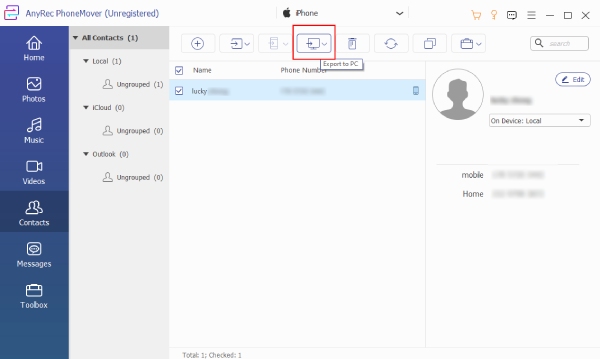
Step 1: Connect and Select
For the transfer between phone and computer, you can transfer both contacts and messages. After connecting your phone to the computer. Launch the PhoneMover and click the Contacts button. Select the contacts you want to move and click the Export to PC button to choose a destination. Click the Select Folder button to confirm the destination and start transferring.
Step 2: Export Contacts to PC
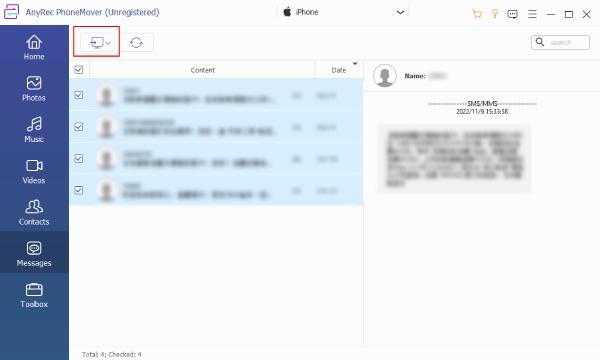
Then, you can transfer the messages. First, click the Messages button and choose the messages that showed up. After that, click the Export to PC button above to also choose a folder for these messages and confirm it. Then, the messages will start moving.
Toolbox
AnyRec PhoneMover’s toolbox gives you more practical tools to make transfer smoother and easier. Your incompatible HEIC photos from iPhone 17/16/15 or contacts piled up on your phone can both be resolved with the tools here. You can convert HEIC photos, transfer contacts in one click, and create ringtones for your new iPhone 17/16/15/14.
One-Click Backup and Restore of Contacts
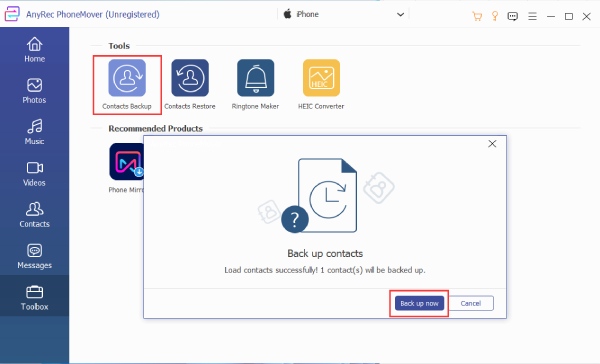
Step 1 Contacts Backup Tool
After launching the PhoneMover and connecting your iPhone or Android to the computer, click the Toolbox button on the main interface. To create a backup for all contacts in one click, click the Contacts Backup tool, and a window will tell you how many contacts you need to back up. Click the Backup now button to back up all.
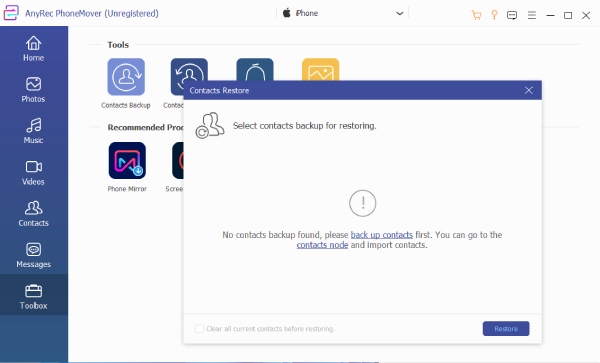
Step 2 Contact Restore
After you choose a folder for the contacts backup. You can restore these backups any time you want. Simply click the Contacts Restore tool and find the backup you created. Tick the box beside it to select it and click the Restore button to retrieve it.
Ringtone Maker
In this toolbox of AnyRec PhoneMover, you can also use the existing music pieces either from your Android or the computer to make a ringtone for the new iPhone 17/16. Then, your new iPhone will be more individualized.
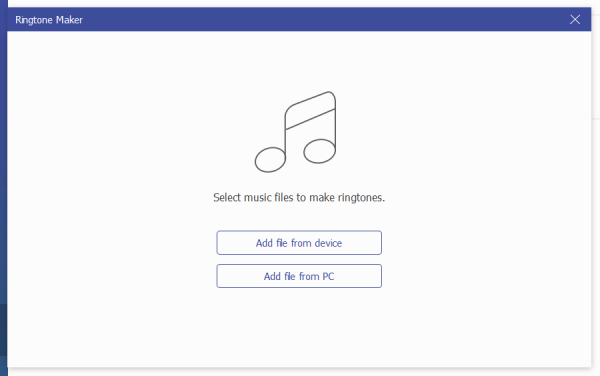
Step 1 Add Music File
Connect your Android to the computer via a USB cable. Launch the program and click the Toolbox button. Then, click the Ringtone Maker tool. On the new window, click the Add files from device button, you can also click the second button. It depends on where you store the music.
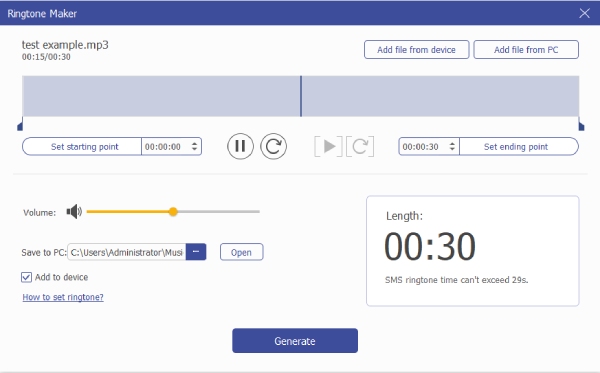
Step 2 Trim and Generate Ringtone
A simple editing window for the music will appear, you can now trim the music piece and adjust its volume. On the right side, you can see the music duration. If you tick the box beside Add to device, then the generated ringtone will also be stored on your computer. Then, you can select a path for it by clicking the three-dot icon. After everything is done, click the Generate button to create the ringtone.
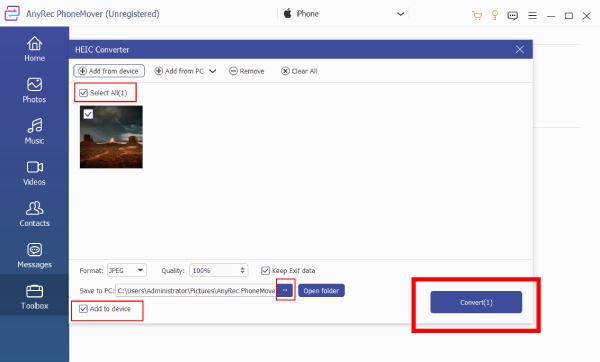
HEIC Converter
The HEIC Converter offered by AnyRec PhoneMover can perfectly resolve the incompatibility issue of your HEIC photos in the iPhone when transferring them to a computer or Android phone. Then, you can easily check these HEIC photos out of the iPhone devices and even share them in a more compatible format like JPEG or PNG. Here’re the detailed steps to convert iPhone HEIC photos to JPG.
Step 1 Add HEIC Images
As usual, connect either the iPhone or Android to the computer via a USB cable. Then, launch the PhoneMover. Next, click the HEIC Converter tool from the Toolbox. After that, click the Add file(s) from device button or Add file(s) from PC button to choose a HECI picture.

Step 2 Convert to JPG/PNG
You can keep the Exif data in your HEIC photo during the conversion. Once the picture is imported, choose an output format by clicking the Format dropdown option, you can choose either JPEG or PNG. Then, you can also tick the Add to device option to save the result to your computer. Finally, click the Convert button to start converting.
Need More Help?
Feel free to contact us if you have any questions about AnyRec PhoneMover.
Contact Us

