Hot

AnyRec Video Converter
120× faster video conversion and editing. No waiting.
Secure Download
How to Add Watermark to Videos Easily: 3 Free & Fast Ways

Creating videos takes your time, effort, and energy. The last thing you want is to see others steal your original content without permission. Adding watermarks is an effective way to protect your video copyright. Here we will show you step-by-step how to add watermark in a video on Windows and Mac easily.
Guide List
Part 1: Why You Need to Add Watermark to Video Part 2: Add Watermark to Video with the Best Desktop Editor Part 3: How to Add Watermark to Video Using iMovie Part 4: How to Add Watermark to Video Online Part 5: Top Tips for Watermarking Your VideosPart 1: Why You Need to Add Watermark to Video
A watermark can be your logo, brand name, website address, or custom text placed on the video. Adding a watermark to your videos is a simple but effective way to show ownership and make it harder for others to copy your work without permission.
- 1. Protects your original copyright: It's extremely common for online videos to be downloaded, cropped, and reposted without credit. Adding a watermark can effectively stop others from stealing your video for commercial use.
- 2. Build brand recognition: Adding a watermark like a logo or brand name can increase brand awareness. Every view and share will accumulate audience and drive more traffic over time.
- 3. Increase audience trust: Professional-looking watermarks make your content appear more authentic and reliable.
Part 2: Add Watermark to Video with the Best Desktop Editor
How do you watermark a video effortlessly on Windows or Mac? This desktop video editor is your top choice. AnyRec Video Converter is designed for content creators, businesses, or casual users. You can upload a video in any format, like MP4, MOV, and AVI, then add image or logo watermarks to video with a few clicks. You can also adjust every detail freely, such as the color, style, rotation, size, duration, and position.

Customize the font, style, size, color, transparency and position.
Export the watermarked video without quality loss.
Remove unwanted watermarks from your videos.
Secure Download
Secure Download
Step 1.Launch the software on your computer, and click "Toolbox" on the top menu bar to find more video editing tools.

Step 2.Select "Video Watermark" from the toolbox, then click the "Add" button to upload your video.
Step 3.Just click the "Text Watermark" button or the "Image Watermark" button to add watermarks. Move the watermark to the right position and adjust the details to make it look natural.
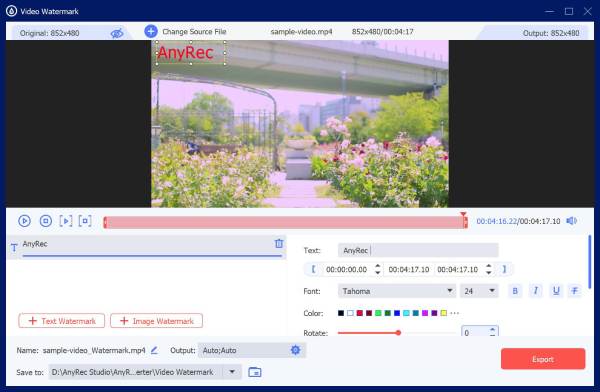
Step 4.Preview the result, then choose an output format. Click "Export" to save your watermarked video.
Part 3: How to Add Watermark to Video Using iMovie
If you are a Mac user, you can use iMovie to add a watermark to videos for free. Although iMovie does not have a dedicated watermark feature, you can create one by adding an image, logo, or text overlay and adjusting its position, size, and transparency.
Add Image Watermark Using iMovie
Step 1.Launch iMovie on your Mac. Open a new project in iMovie. Click "Import Media" to upload the video you want to edit, then drag it to the timeline.

Step 2.Import your logo image into iMovie. Drag it above the video clip in the timeline. Choose the "Video Overlay" feature.
Step 3.Select "Picture in Picture" from the drop-down menu. Adjust the size and position of the logo watermark.
Step 4.Drag the image watermark layer on the timeline and adjust its duration to match your video. Finally, export your video with the watermark added.
Add Text Watermark Using iMovie
Step 1.Import the video you want to add watermark to into iMovie, and then drag and drop the video on the timeline.
Step 2.Select "Titles", choose your preferred title style and enter your watermark text, such as your name, brand or website.

Step 3.Adjust the font, size, color, transparency, and position of the text.
Step 4.Drag and drop the title onto the timeline above your video clip. Preview your video, then export your watermarked video.
Part 4: How to Add Watermark to Video Online
Sometimes, you just want to add a watermark to a short video and downloading software feels too troublesome. This online video editor - Clideo allows you to add image or text watermarks to videos easily.
Step 1.Open Clideo's watermark video tool in your browser. Click the "Plus" button to upload the video you want to add a watermark to.
Step 2.Use the "Text" or "Image" tab to add a text or image watermark. You can select your desired text style, adjust size, transparency, and point to insert it.

Step 3.Click the "Export" button, choose an output resolution and save your video.
Part 5: Top Tips for Watermarking Your Videos
How to insert a watermark in video perfectly? Follow these tips to create a watermark that makes your video more professional and engaging.
- Make the watermark less distracting. If the watermark is too bright or solid, it may take attention away from your video. Set the watermark transparency between 15%-30% for the best balance.
- Match watermark style with your video. Your watermark's style should be consistent with your video's tone. Don't use exaggerated styles that make your video look cluttered.
- Place the watermark in the right position. Place watermarks at the four corners of the screen. These positions are not easy to crop and won't affect the main content. Avoid placing watermark at the center of the screen.
- Keep the same watermark style. If you add watermarks to multiple videos, use the same logo, font, and style. This helps people easily recognize your content.
Conclusion
Watermarking is a smart habit for all video creators. We hope you've found an easy way to insert watermark in video. All tools mentioned above are beginner-friendly. No matter which one you pick, you can keep your videos safe from content theft and grow your brand easily.
Related Article
About Our Author