How to Screenshot on Gateway Laptop with Desired Areas
Not all laptops have the same way to take screenshots, which is your case with your Gateway laptop. With Gateway laptops, taking screenshots comes in two common types: one is through hotkeys, and the other one is through tools. Therefore, if you have trouble getting it right, this article will show you how to take a screenshot on a Gateway laptop painlessly. Stop worrying if it runs whatever Windows version, as you can always rely on here to understand how to screenshot on a Gateway laptop; let’s begin!
Guide List
Best Way to Screenshot on Gateway in Full/Scrolling/Custom Screen Take a Screenshot on Gateway with PrtSc Key Capture Screenshots on Gateway with Snipping Tool Screenshot Games on Gateway with Xbox Game Bar FAQsEasy Way to Screenshot on Gateway Laptop with High Quality
Finding the right software to capture your Gateway screen is a bit difficult. Thankfully, after wasting time with all the popular tools today that don't give you high-quality screenshots, you finally crossed paths with AnyRec Screen Recorder. It won’t disappoint you during and after the process of knowing how to screenshot on a Gateway laptop. This software supports designing the hotkeys yourself and then proceeding to capture them on full screen or customize a part of your screen with its Snapshot tool. Also, it allows taking scrolling screenshots and capturing them during recording.

Capture Gateway laptop screenshots in full screen, window, or scrolling.
Customizable hotkeys for taking screenshots quickly in your Gateway laptop.
Make additional edits to your captured screenshots with shapes, lines, text, etc.
Support no ads during screenshotting and no watermarks once saved.
Secure Download
Secure Download
Step 1.Open AnyRec Screen Recorder and select "Video Recorder" to witness more options. From there, you will see the "Gear" icon above, where you can change the keys for screenshotting.
Step 2.Go to the Hotkey section from the left side tab and hunt "Screen Capture". Click its "bar" and enter your determined hotkeys. Click "OK" to apply changes.
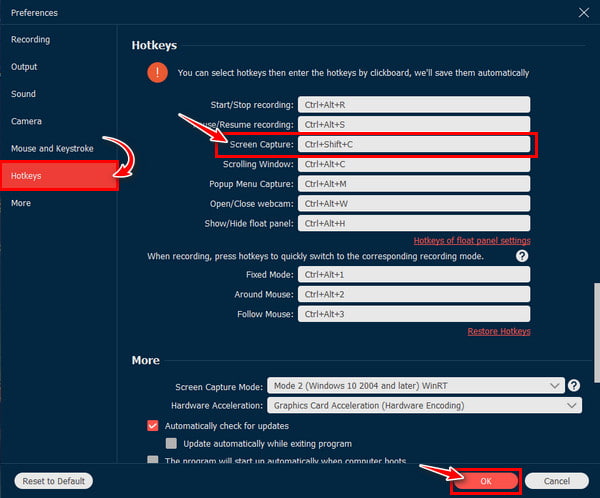
Step 3.Now that you have nailed everything, go to the window or any content you hope to capture in your Gateway laptop and use the combination keys you’ve fixed for screen capturing.
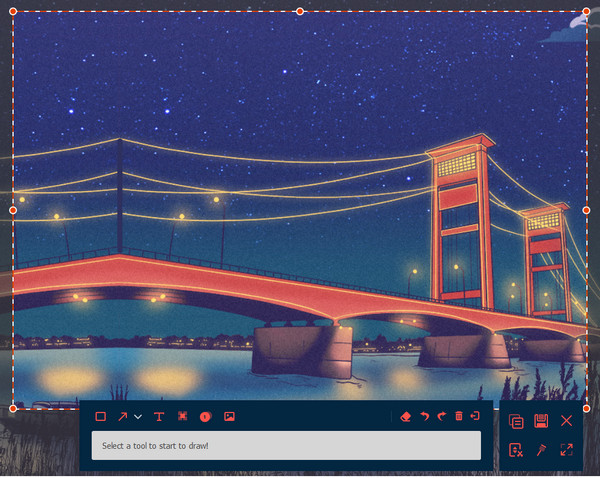
That’s how to screenshot on a Gateway laptop with your created hotkeys! Alternatively, you can also accomplish it by clicking the "Video Recorder" to capture your screen during recording. Otherwise, go to the "Snapshot" tool to take screenshots.
Secure Download
Secure Download
How to Take Screenshots on Gateway Laptop via PrtSc
Just like the typical way of taking screenshots on computers, you can also use the PrtSc key to capture in a Gateway laptop. This method is always available for everyone to understand how to screenshot on a Gateway laptop. However, this works if you only need a full screenshot of your screen and not a specific window or area. Here’s what you must do:
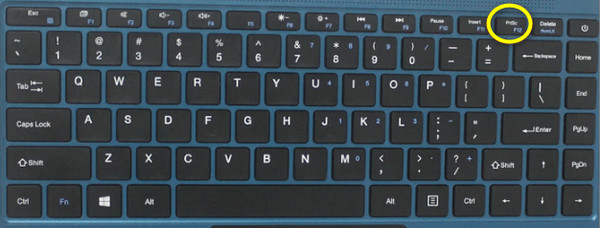
Step 1.Open the window/page you wish to capture on your Gateway laptop and press the "Print Screen" key on your keyboard.
Step 2.Next, open any editing software, like "Paint" or "GIMP", then "Paste" the captured photo on it. There, you can edit the picture and save it on the desktop afterward.
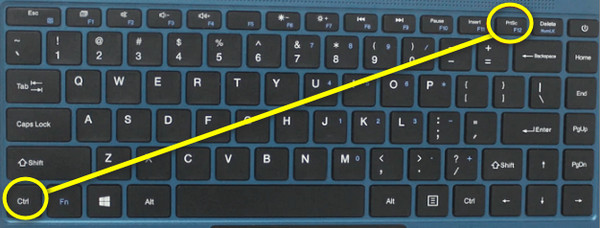
Step 3.Alternatively, press the Ctrl and PrtSc keys on your keyboard to screenshot the entire screen, but this time, it will be saved on your desktop or in the "Screenshots" folder.
Use Snipping Tool to Screenshot on Gateway with Desired Area
For those who prefer to take partial screenshots, you can go for the Windows Snipping Tool to comprehend how to screenshot on a Gateway laptop. It can be the perfect tool to take screenshots of a selected window or draw a form around the object you expect to capture. Later, you can edit the screenshot using the highlight, zoom, and other tools. But, you must keep in mind that the Snipping Tool can only be achieved for Windows 7 and higher.
If your Gateway laptop runs on that version, go after the steps below on how to screenshot on a Gateway laptop:
Step 1.Start by clicking the Windows key, then enter the "Snipping Tool" in the "Search bar". Make sure to choose the best result that appears. Otherwise, use the "Windows + Shift + S" keys.
Step 2.Before slipping inside the "Snipping Tool", go first to the window or part you want to take a screenshot, click "New", and "drag" your mouse to the desired area.
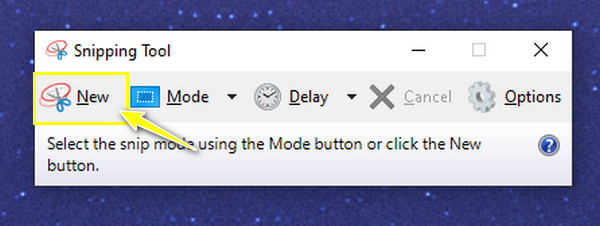
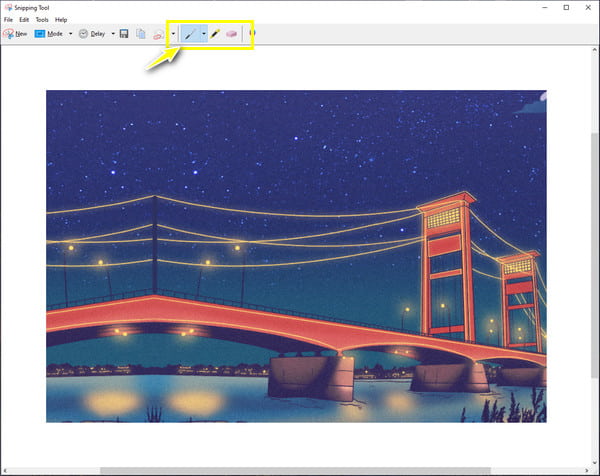
Step 3.Finally, the picture will be automatically seen in the "Snipping Tool" window; edit your screenshot using the drawing tools above, then save and share.
How to Screenshot on Gateway Laptop through Xbox Game Bar
If you’re now enjoying learning how to take screenshots on a Gateway laptop, you will surely love the method the Xbox Game Bar has. It is a built-in recording tool, but it can let you take high-definition screenshots as well. While the other tools start with Windows 7 and later, the Xbox Game Bar can only be accessed on Windows 10/11 Gateway laptops. So, for Windows 10/11 users, here’s how to take a screenshot on a Gateway laptop:
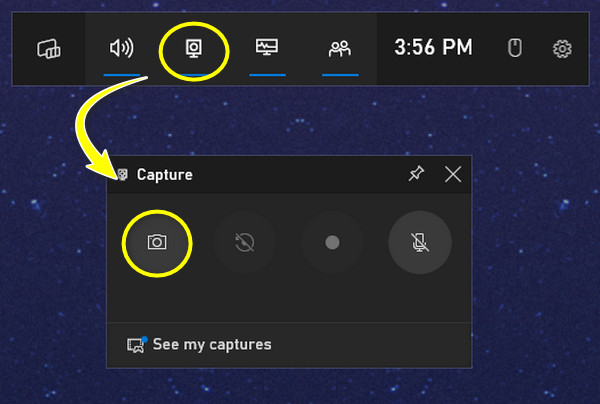
Step 1.To gain access to the Xbox Game Bar, press the "Windows + G" keys. The small window "Capture" may or may not open automatically; if not, click the "Capture" icon in the floating bar.
Step 2.Before you perform it, you should open the window you want to take a screenshot. Then, inside the "Capture" window, click the "Camera" icon to take screenshots. Otherwise, use the "Windows + Alt + PrtSc" key combination.
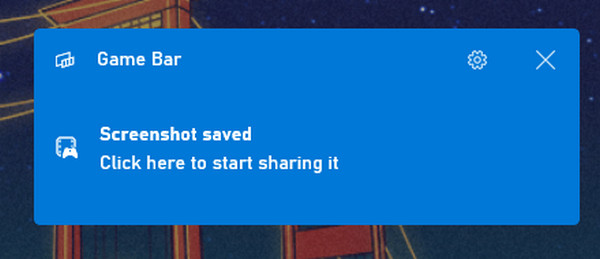
Step 3.Once done, a "notification" on the right side of your screen will be seen, letting you know that the screenshot was successfully done.
FAQs about How to Screenshot on Gateway Laptop
-
Aside from the Ctrl and PrtSc, how to take screenshots on a Gateway laptop using hotkeys?
You can apply the Windows + Shift + S keys to capture your screen, where you will be directed to choose a full-screen capture, an area of your screen, or a single window.
-
What is the default format of screenshots on a Gateway laptop?
When using the Print Screen key only, it will be preserved in PNG format and can be opened once you copy it to an image editing software. It will be saved in a JPEG format if you use the Ctrl plus Print Screen keys.
-
How can I record my Gateway laptop screen?
Probably the most available way to record the Gateway screen is through the Xbox Game Bar. As said, the built-in tool was primarily made for recording screens; however, it works with Windows 10 and the higher system of Gateway laptops.
-
How to take a screenshot on a Gateway laptop using Snip & Sketch?
After opening the Snip & Sketch window through the Search bar, choose between the area selection options, and once selected, use your mouse to capture the screen.
-
Where does the Xbox Game Bar save screenshots?
To not open it manually, open the Xbox Game Bar, go to the Widgets button, and choose Gallery. From there, click the small folder to open File Explorer to the location of your screenshots.
Conclusion
To conclude, you have seen how to take a screenshot on a Gateway laptop in four ways, using a typical Print Screen key, a Snipping tool, and others. Although shortcuts and built-in are convenient for taking screenshots, they are not guaranteed to be in a high-resolution photo. Thus, if you’re someone who loves quality screenshots, don’t miss the feature AnyRec Screen Recorder has to offer. It can record and capture your screen in the desired area of your screen. It can be done in simple clicks and is indeed of high quality; download it today and have a try!
Secure Download
Secure Download
Related Articles
About Our Author


