Take Zoom Screenshots - 4 Ways to Capture on Windows/Mac
You might be trying to save a complex slide, or capturing a project in a virtual meeting, taking a Zoom screenshot is more important than ever. The ability to quickly save visual information during a Zoom meeting will ensure you never lose critical information once the session ends. Therefore, today's guide offers you four distinct ways, from built-in tools to shortcuts, to take a screenshot of a Zoom meeting. Save virtual memories and notes today!
Guide List
A Convenient and High-Quality Method for Zoom Screenshots Take a Screenshot Using Zoom's Built-in Tools Take Zoom Screenshots with Windows Snipping Tools or Shortcuts How to Take a Screenshot of Zoom on MacA Convenient and High-Quality Method for Zoom Screenshots
Capturing the perfect moment during a Zoom virtual meeting needs the right tool. While built-in methods work for quick captures, for a more polished experience, use a dedicated tool like AnyRec Screen Recorder. This software lets you capture high-resolution screenshots of your Zoom meetings with no complex settings and screen clutter. It features a Snapshot function that allows you to highlight specific areas, add real-time drawings, and save files in multiple formats such as PNG, JPG, or BMP. Beyond just still images, it serves as a powerful solution for recording the entire Zoom meeting with system sound and microphone without affecting the quality.

Select full-screen, a specific window, or a selected region to capture.
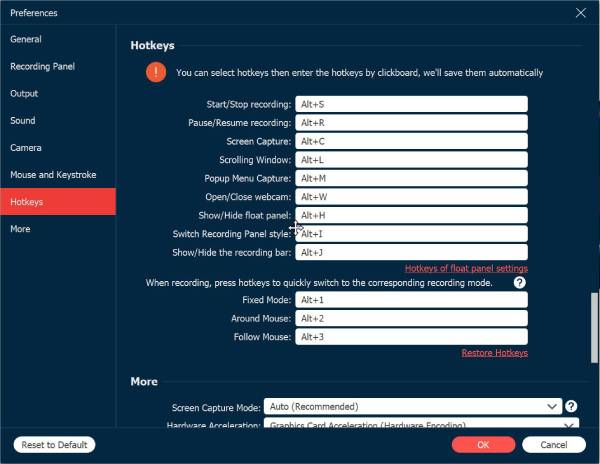
Set personalized keyboard shortcuts for instant capturing of Zoom meetings.
Maintain the crispness of image clarity by adjusting output parameters.
Save your captures that fit into any workflow with PNG, JPG, BMP, or GIF files.
Secure Download
Secure Download
Step 1.Launch AnyRec Screen Recorder on your computer, and locate the "Screen Capture" option on the main dashboard. Once selected, your pointer will transform into a crosshair. Click and drag this across your Zoom window to choose the area you wish to snap.
If you want to quickly take a screenshot on Zoom, you can trigger the feature using the set hotkeys found in the "Settings" menu.
Step 2.As soon as you release the mouse, the software will capture the image and open an editing toolbar. This lets you immediately add highlights to your Zoom screenshot by drawing arrows, adding text, or more.

Step 3.After you've finished customizing your image, click the "Save" button (Floppy Disk icon). Then, a prompt will show up to name your file, select your desired format, and the location folder.
Secure Download
Secure Download
Take a Screenshot Using Zoom's Built-in Tools
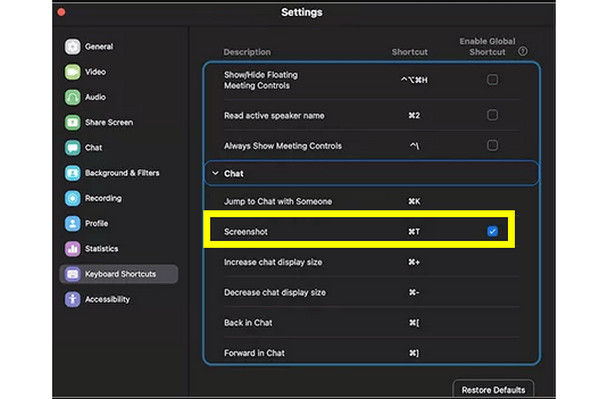
To make it even handier, Zoom provides a built-in screen capture feature. To use this to take a Zoom screenshot, first double-check that the screenshot shortcut is turned on within your Zoom keyboard settings. This solution is particularly perfect since it permits you to send the captured image directly into the Zoom chat thread. It makes the workflow much easier for teams who need to share meeting visual data in real-time.
Step 1.Head to Zoom "Settings", then click "Keyboard Shortcuts", and find "Screenshot". There, press the assigned keys during the meeting.
Step 2.Then, click and drag over the area of the meeting you wish to snap.
Step 3.Use the on-screen options to copy the image or save it to your computer.
Take Zoom Screenshots with Windows Snipping Tools or Shortcuts
Going to system-wide options, Windows holds several tools for Zoom screenshots, from the classic Print Screen key to Snipping Tool. Using the classic shortcuts here as well as the modern Snipping Tool, you can choose to capture your entire desktop, active window, or a selected area. With this variety of native options, you can ensure that regardless of your skill level, you can capture important Zoom meeting moments with just a few clicks.
Take Zoom Screenshots Using Windows Shortcuts:
- 1. Windows + Shift + S: Activate the Snipping Tool to select a specific area.
- 2. Windows + Print Screen: Screenshot the full screen and save it to your Screenshots folder. (See solutions to fix Print Screen not working.)
- 3. Alt + Print Screen: Capture the active Zoom window and copy it to your clipboard.
Take Zoom Screenshots Using Snipping Tool:
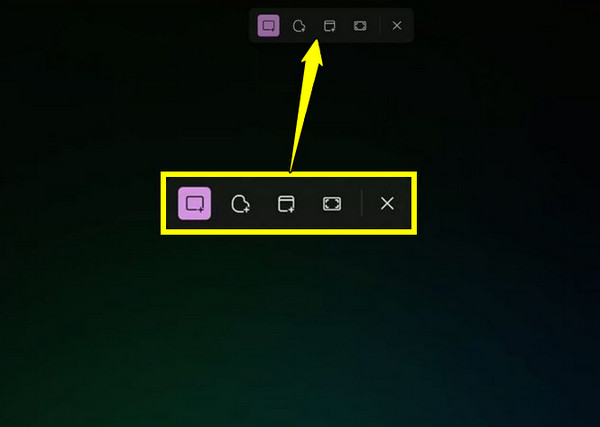
Step 1.Access the Windows 11 Snipping Tool by pressing the "Windows + Shift + S" keys. From the overlay, select the "Rectangular Snip" or "Window Snip" button.
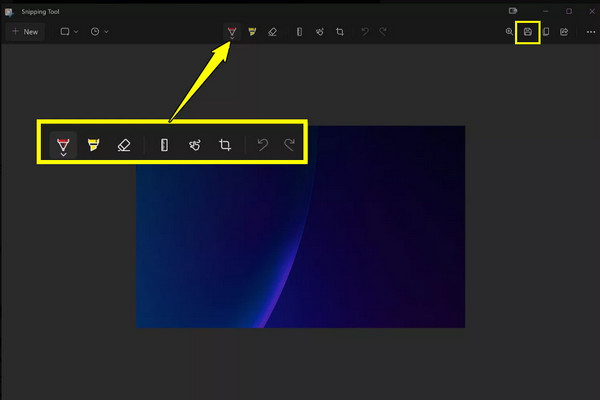
Step 2.Then, click and drag your mouse across the Zoom meeting you want to save. Click on the preview in the bottom-right corner.
Step 3.You can edit the captured Zoom screenshot image as needed, and then click the "Save As" button to name your file and select a location once done.
How to Take a Screenshot of Zoom on Mac
Switching your attention to the macOS ecosystem, Apple has a powerful set of shortcut combinations to take a Zoom screenshot. Once these screenshots are captured, they'll be saved to your desktop by default, making them very easy to find for you. This approach works fast and does not fail to produce high-quality screenshots of a Zoom meeting in PNG format.
Step 1.Press the "Command + Shift + 4" keys on your keyboard. Then, press the "Spacebar" to turn the cursor into a "Camera" icon.
Step 2.Click on the Zoom meeting window to take the screenshot.
Step 3.Now, find your captured image on your Desktop or your set location folder.

Conclusion
Between Zoom's built-in features and the robust tools in Windows and macOS, you have several reliable ways to try to take Zoom screenshots. While you've seen that shortcuts are perfect for quick tasks, they have no control needs for professional captures. So, here's AnyRec Screen Recorder as an exceptional alternative to elevate your screenshot game. This tool not only takes sharp screenshots but also has editing features, customization options, as well as a complete recording function for more comprehensive documentation.
Secure Download
Secure Download


