Lifesize Conference Recording: Easy Steps You Can Follow
Thinking of recording Lifesize video conferencing? For some who aren’t familiar with Lifesize, it is a cloud-based solution that allows you make better collaboration to accomplish online work or meetings. When someone can’t attend a meeting, recording is the best answer! The good thing is that when you need to record meetings, Lifesize video conferencing provides you with a Record and Share feature. Using those is hassle-free as you can record meetings for future reference and personal use. For more details, keep reading to learn how to record Lifesize video conferencing and share it by default and how to record one while annotating.
Guide List
Part 1: Record Lifesize Video Conferencing During the Call and Share It Part 2: How to Annotate Lifesize Video Conferencing While Recording Part 3: FAQs about Recording Lifesize Video ConferencingPart 1: Record Lifesize Video Conferencing During the Call and Share It
As said above, Lifesize video conferencing provides users a way to record meetings directly — without using any third-party tool. It comes with audio conferencing features, Click-to-Call, screen sharing, video recording, and more for better communication. Its built-in recorder comes so handy for quickly capturing activities on screen while sharing ideas and conversations. See the complete guide below to learn how to record Lifesize and share it with others.
Step 1.Start the video conference with Lifesize. You will then see a circular "Record" button below. Click on it once ready to start recording the meeting.
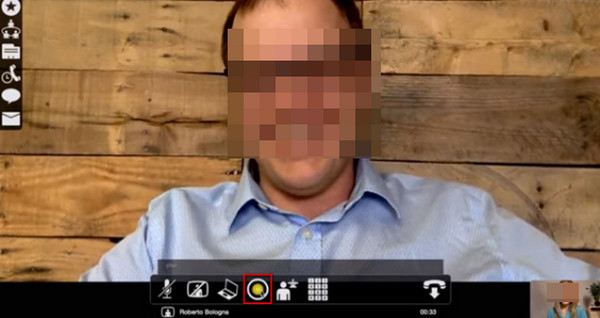
Step 2.The owner or organizer will be the owner of the recording regardless of which participant starts recording.
Step 3.Once done, click the "Stop" button with a red circle icon to stop the recording. However, in this part, only the one who started the recording will be able to stop it.
Step 4.To view your recorded Lifesize meetings, return to the Home page. Then, click the "View Recordings" button.
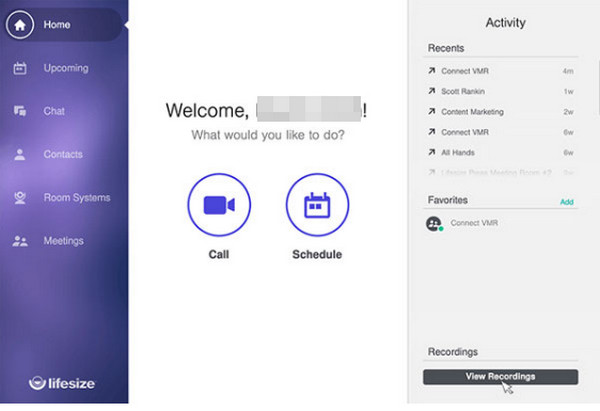
Step 5.You will see all the recordings displayed in the My Recordings section. Or, you can open the Recordings Feed to view all recordings you owned or shared with you.
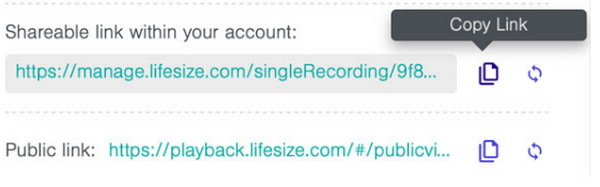
Step 6.Select the one you wish to share, then click the "Share" button in the bottom right corner. Lifesize will instantly create a sharing link for you to copy and paste to share with others
Part 2. How to Annotate Lifesize Video Conferencing While Recording
Using Lifesize's built-in recorder is indeed a convenient one to record meetings directly. However, it would be nice if you could annotate while recording. Isn’t it? Fortunately, there is a program that provides all the recording features you can enjoy — get to know more about AnyRec Screen Recorder! Furthermore, in contrast with Lifesize video conferencing, this meeting recoder enables you to add annotations during the conference.

Provide different recording windows for Lifesize video conferencing
Take annotation while recording without quality being compromised.
Contains a set of hotkeys to stop, start, resume, and pause quickly.
Offers no watermark when exporting the meetings to several formats.
Secure Download
Secure Download
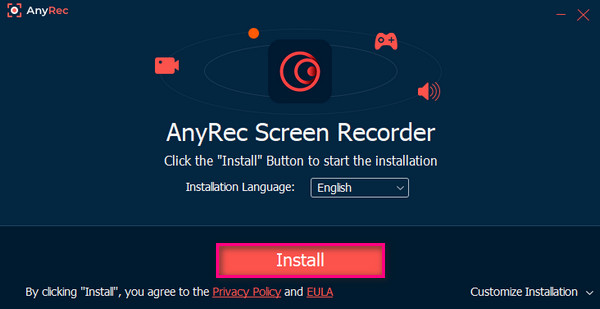
Step 1.To download the program AnyRec Screen Recorder, it is suggested to go to its main site. Do the installation process until you see the Install window.
Secure Download
Secure Download
Step 2.Launch it on your computer. Then you'll see the Video Recorder along with other recording options on your main screen. Click the "Video Recorder" button to record Lifesize.
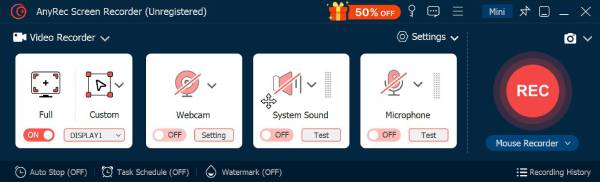
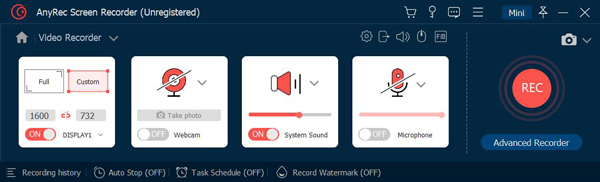
Step 3.Click the "Full" button to record the entire screen or the "Custom" button for a part of your screen. Turn on "System Sound" and "Microphone" to capture Lifesize meeting audio from both sides.
Step 4.After that, you can now click the "REC" button on the right side. You will have a three-second countdown before recording.

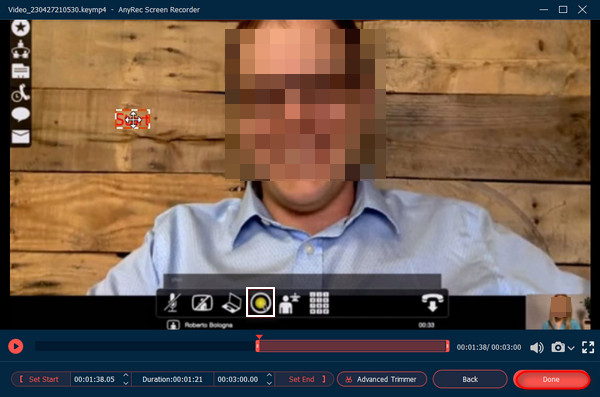
Step 5.During the recording, you can annotate, like adding text, images, arrows, and drawings, using the toolbox below.

Step 6.If finished, click the "Stop" button below to open the Preview window. From there, you can trim your recordings within AnyRec meeting recording software. Once satisfied, save it on your computer.
Secure Download
Secure Download
Part 3. FAQs about Recording Lifesize Video Conferencing
-
What format does Lifesize use when saving recordings?
When recording Lifesize video conferencing using the built-in recorder, the recorder meeting is in MPEG-4 format. And when you download it on your computer, it will be saved as an MP4 file. However, you can make a choice to extract the audio from the MP4 video and convert it to an MP3.
-
Is Lifesize video conferencing safe to use and secure?
Yes. Lifesize provides secure and tight video, audio, presentations, and call security. With the best security built by Lifesize, it will deliver the best quality for online meetings with no worries about viruses and encounter problems with security and safety.
-
What if the owner stops the meeting while still recording?
Although you can start recording the meeting even if you are the participant and you are the only one who will be able to stop it, once the owner or organizer ends the meeting for all, the recording will be stopped.
Conclusion
Recording important meetings to share with others who can’t attend is much easier now. Knowing how to record Lifesize video conferencing with the built-in recorder, you can have effective conversations with everyone inside and outside the online meeting. With Lifesize’s Record and Share feature, you can record meetings quickly and share them through the sharing link provided. However, if you want more effective meetings or discussions, go for a tool that lets you add real-time drawing while recording. Use the AnyRec Screen Recorder to record Lifesize video conferencing, then make additional edits afterward. Learn more about it by getting it now on your Windows PC or macOS.
Secure Download
Secure Download
Related Articles:
About Our Author


