Hot
AnyRec Screen Recorder
Capture every moment. Record like a pro.
Secure Download
QuickTime Screen Recording with Audio (System Sound Guide)
There is no direct system audio recording feature in QuickTime Player. If you want to use QuickTime Player to record screen with internal audio, you need to install virtual audio drivers, such as Soundflower, Black Hole, BackgroundMusic, and more. However, you may still encounter QuickTime audio recording not working. No worries, you can get detailed steps, troubleshooting solutions, and even alternatives for recording system audio on Mac. Just read and follow.
Guide List
Why QuickTime Player Cannot Record System Audio How to Screen Record with Internal Audio on QuickTime Player How to Record Mac Screen with Microphone Voice 4 Ways to Fix QuickTime Recording No Audio 3 Best QuickTime Player Alternatives FAQsWhy QuickTime Player Cannot Record System Audio
Because macOS restricts internal audio recording for security and copyright protection. You can record audio output from a microphone by default. If you want to capture audio from other programs with QuickTime Player, you need to install a virtual audio driver to get native routing, such as Soundflower, BlackHole, or BackgroundMusic. See the brief breakdown of these tools:
• Soundflower is an older audio tool that can create a virtual output device. Though it is no longer supported, some online guides still recommend it.
• BlackHole is a perfect Soundflower alternative. It is an open-source, free virtual audio device that offers better stability.
• BackgroundMusic is a hidden option within the default QuickTime Player. It allows you to record audio playing on your Mac screen while screen recording.
How to Screen Record with Internal Audio on QuickTime Player
Now, presuming you’ve chosen the "BlackHole" as your virtual audio tool, here’s how to set up the system output to the aggregate device and record screen with audio on QuickTime.
Step 1.After downloading and installing BlackHole from its leading site, locate the "Audio MIDI Setup" under "Utilities" from "Applications".
Step 2.Click the "Add" button to select the "Create Aggregate Device" option. Next, give your device name. Moving to the list on the left, put a check in the "BlackHole 2ch" boxes and your mic.
Step 3.After that, click "Configure" to modify the volume levels for the audio plugin and microphone. Now, open the "System Preferences", head to "Sound", choose the "Output" tab, and pick the name you set earlier for your aggregate device.
Now it's time to record Mac computer audio using QuickTime Player. Here are the steps you can follow.
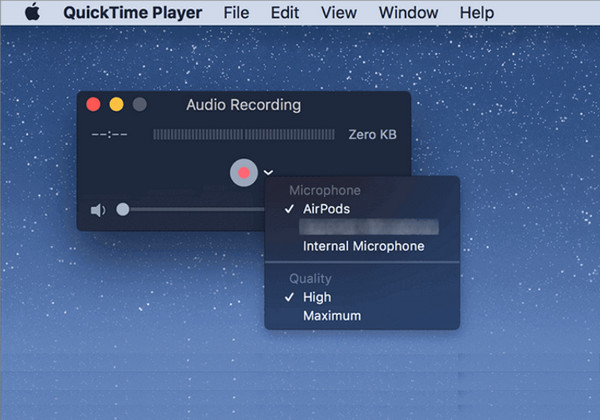
Step 4.Open QuickTime Player. (Or you can press Shift, Command, and 5 keys simultaneously to get Mac Screen Recorder. It is required on MacOS Mojave and higher.) Click the "File" tab on the top menu. Then click the "New Screen Recording" option.
Step 5.Under the "Record" button, click the arrow to choose your audio output; ensure to pick the aggregate device’s name; for example, you could set it as "QuickTime Audio".
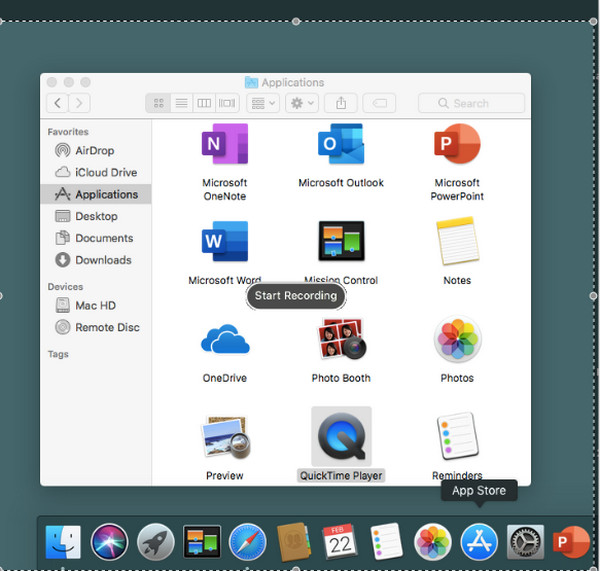
Step 6.Determine the recording area, such as the entire screen or a customized area. Now, click the "Record" button to start QuickTime screen recording with audio.
Some DRM protected websites may detect or block audio capture. It is also possible that your newly-downloaded programs changed your settings. To record QuickTime screen capture with internal audio successfully, you can uninstall conflicted apps. It also works to check whether Soundflower/BlackHole/BackgroundMusic has been set as the system audio output. Go to System Settings and then check Sound.
How to Record Mac Screen with Microphone Voice
You can use QuickTime Player (or the Screenshot Toolbar via Shift + Command + 5) to screen record on Mac with microphone audio. It is suggested to takes trial to bypass the microphone too quiet problem. Moreover, you can test to select the built-in or external microphone first without further redo. Now, follow the steps below.
Step 1.Open QuickTime Player. Click the "New Screen Recording" option from the top "File" drop-down list.
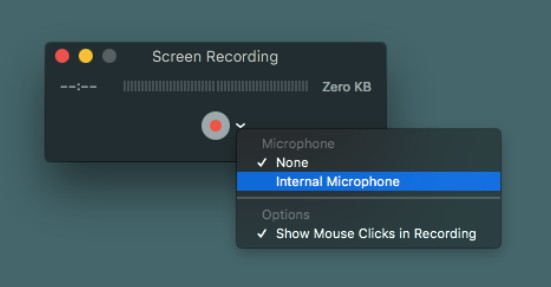
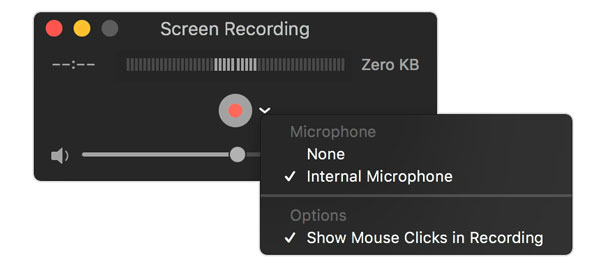
Step 2.Click the arrow next to the "Record" button. Choose the "Internal Microphone" option.
Step 3.Click the "Record" button to record the Mac screen with the microphone audio.
Step 4.You can click the "Stop" button in the menu bar. Or press the "Esc" key on your keyboard to finish screen recording.
4 Easy Ways to Fix QuickTime Recording No Audio
Most of the time, Mac users face a QuickTime recording with no audio issues whenever they want to screen record. So, to fix this issue, let this section guide you through the four easy workarounds to finally record the QuickTime screen with audio.
Way 1. Make Sure All Permissions and Input
The culprit for QuickTime screen recording not working is sometimes a simple permission problem. It might be muted, or the setting of the mark to use your microphone is unchecked.
Way 2. Inspect the Sound Input Settings
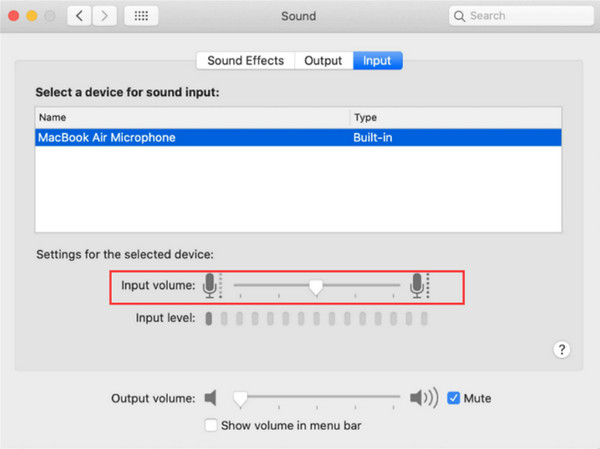
If you have been permitted to use the microphone and still don’t get any audio, checking the Sound Input settings is necessary; ensure that the slider is put up to maximize the volume.
Way 3. Pick the Correct Source
Perhaps you set it to record the screen from the wrong audio source or microphone, or maybe it is set to none. Hence, you have to make sure to determine the active internal microphone to guarantee the audio for screen recording on QuickTime.
Way 4. Simply Update the QuickTime Player
As you know, an outdated program can cause glitches or minor bugs affecting its performance, which may be the same with the QuickTime player on Mac. Thus, you won’t have any audio while recording the screen.
3 Best QuickTime Player Alternatives to Record Internal Audio on Mac
| Feature / Tool | Internal Audio Easy | Mic Audio | Ease of Setup | Best For | Notes / Real Experience |
| QuickTime Player | No (needs BlackHole/Soundflower) | Yes | Hard | Basic recorder | Doesn’t capture system sound easily. |
| AnyRec Screen Recorder | Yes (built-in) | Yes | Easy | All-in-one audio/video | Records system and microphone voice on Mac without drivers. |
| OBS Studio | Yes (with setup) | Yes | Hard | Advanced/Free | Powerful, but complex setup. And it lags on low-end PCs. |
| Screencast-O-Matic | Yes | Yes | Easy | Quick simple clips | Free version has limits, have watermark. |
1. AnyRec Screen Recorder
Even after all that, if you're still looking for a straightforward way to record a QuickTime screen with audio, whether system sound or microphone, it’s nice to use AnyRec Screen Recorder. This Windows and Mac program is an excellent alternative to QuickTime, primarily if you want to access more features or have issues capturing internal audio in the default Mac player. AnyRec features built-in support for recording internal audio, not requiring any workarounds like virtual audio devices, which QuickTime needs. Also, it goes beyond screen recording as it covers editing features after recording screen and audio without QuickTime.

No additional setups! It captures both internal and microphone directly;
Adjustable recording settings, like resolution, quality, audio volume, etc.
Enjoy trimming unnecessary parts in the preview window before saving.
Provide noise cancellation and voice enhancement to keep high quality.
Secure Download
Secure Download
Step 1.Launch AnyRec Screen Recorder. Select the Video Recorder on the main window to record screen and audio.
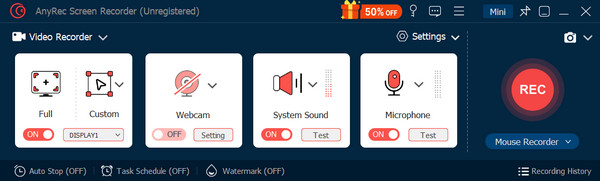
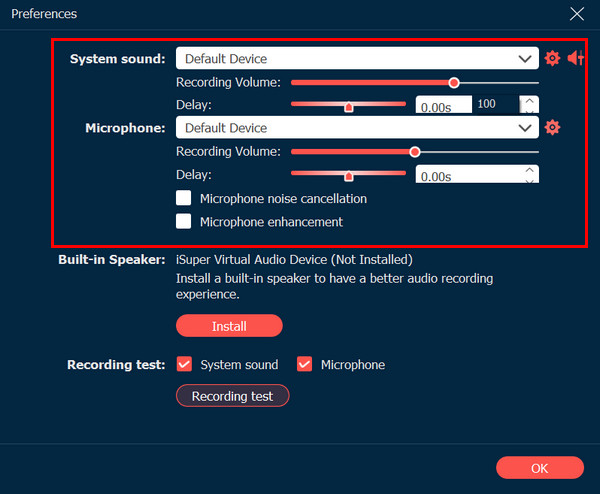
Step 2.Enable both switches for "System Sound" and "Microphone". Next, go to "Record Settings" from the "Cog wheel" icon, locate the options for "System Sound" and "Microphone", and select your desired audio sources; adjust the quality if needed.
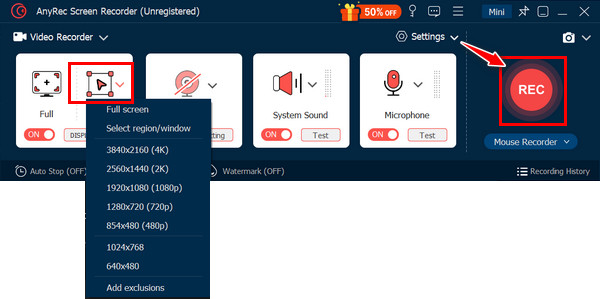
Step 3.After that, if you only want to record a specific window or area, pick the "Custom" option. Click the "Record" button to record screen and audio activity.
Once it is done, end the recording to open the "Preview" window to watch and edit the recording before saving it. Rather than doing a QuickTime screen recording with audio, that’s how you record audio without the default player.
Secure Download
Secure Download
Before wrapping things up about the QuickTime screen recording with sound, here are two other options that provide screen and audio recording functionalities without the issues of QuickTime.
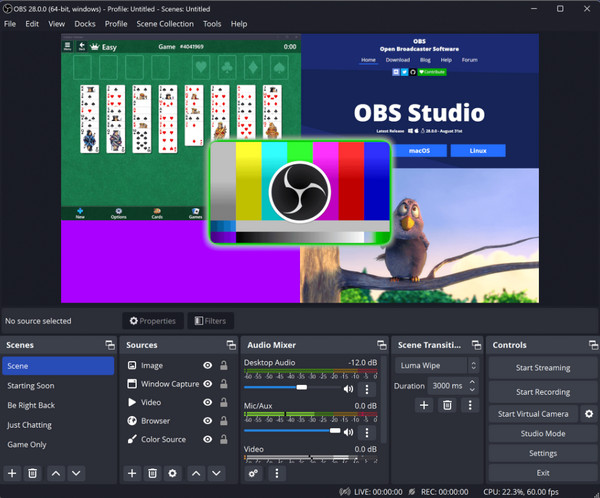
2. OBS Studio
OBS is a powerful and famous screen recording tool that comes with extensive customization options. This QuickTime alternative is ideal for live streaming and complex screen recording setups, supporting multiple sources, including webcam, microphone, screen regions, and more. Because of its power, it is among the favorites of experienced users, although it comes with a bit of complexity for starters.
- Pros
- Very customizable for advanced users.
- Cover multiple audio and video sources.
- Suitable for professional recordings.
- Cons
- The feature-rich interface can be overwhelming.
- Require research and tweaking.
- Have limited editing tools.
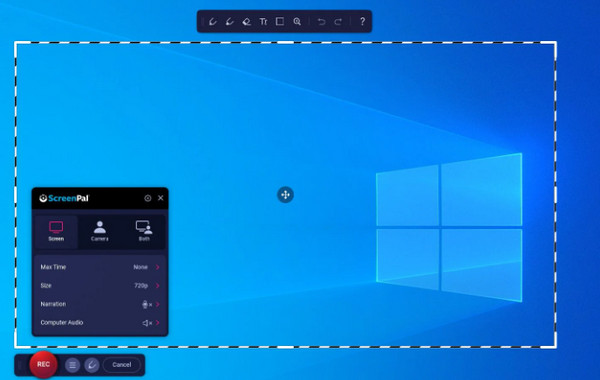
3. Screencast-O-Matic
Another free QuickTime alternative is the Screencast-O-Matic. This program is a famous recording for Windows and Mac that supports both free and paid versions. It has a user-friendly interface that caters to different requirements, making it an ideal choice for beginner and casual users. Go here immediately if you want a quick capture, tutorials, anprimaryic screen demonstrations.
- Pros
- No-cost program that allows you to do quick capture.
- Share recordings directly on its hosting platform.
- Have an easy-to-navigate interface that is good for beginners.
- Cons
- Recording has a limit and watermark in the free version.
- Lack extensive customization and features.
- Limited editing features, even in the paid version.
FAQs
-
How to use QuickTime to screen record with microphone audio?
After opening QuickTime, go to the File tab and select New Screen Recording. Under the Down arrow beside the Record button, select the Internal Microphone option. Next, you can define the recording area yourself, and once you're ready, click the "Record" button.
-
Can you record an iPhone screen with audio through QuickTime?
Unfortunately, no. You cannot directly record your iPhone screen alongside audio using the default QuickTime Player on Mac. The player is only capable of capturing the screen and audio of the devices that it’s running on your Mac.
-
What can I use to record my iPhone screen with audio?
If it is impossible to do this on QuickTime Player, the simplest method will be provided by the built-in screen recorder on your iOS device, which is accessible in the Control Center. If it is not there, locate it in Settings and add the feature.
-
Where do all the recordings from QuickTime are saved?
By default, all recordings made in QuickTime are saved in the Movies folder on your Mac. However, you can select a different location for your file before saving the recording.
-
What is the excellent format for saving QuickTime recordings?
There isn’t an excellent format for saving recordings made in QuickTime since it depends on your requirements. However, the player's default format is MOV, which offers good quality and compatibility with most platforms and devices. If you find it larger in size, you can consider MP4 for easy sharing and saving storage space.
Conclusion
You see, doing a QuickTime screen recording with computer audio is possible if it has an audio plugin. But if you have it but are still getting no audio, it’s better to stick with some alternative mentioned today. Among all, the best you could have is AnyRec Screen Recorder. Not only does it provide a seamless way of recording, it can also capture both internal and external audio with your screen at the quality you want. Later, you can add your touches with the editing tools.
Secure Download
Secure Download
Related Article
About Our Author


