How to Convert M4A to WAV? 4 Best Ways with Comparison
If you have ever worked with audio files, you may have noticed that players or devices don't have full support for the M4A format. Since WAV files are ideal for playback on different platforms, converting M4A to WAV becomes crucial. Luckily, multiple ways are available to make the switch! In this guide, four ways are mentioned to change M4A to WAV format, helping you get the best options based on your needs: desktop software, online tool, and more.
| Method | Platform | Ease of Use | Speed | Best For |
| Batch Convert M4A to WAV with AnyRec Video Converter | Windows, Mac | Very easy to use | Fast | MP3, FLAC, AAC, WMA, OGG, AIFF, and more |
| Change M4A to WAV with Audacity | Windows, Mac, Linux | Moderate with minimal setup | Moderate | MP3, FLAC, OGG, AIFF, AAC, etc. |
| Turn M4A to WAV Online | Web-based | Very easy | Depends on the internet speed | MP3, OGG, FLAC, AAC, WMA, etc. |
| Transcode M4A to WAV with FFmpeg | Windows, Mac, Linux | Difficult | Fast | MP3, AAC, FLAC, OGG, WMA, etc. |
Quick Comparison of M4A vs. WAV
It is crucial to understand the differences between M4A to WAV formats. While both are known in the audio world, they have different purposes. M4A format is used for everyday listening due to its good quality in smaller file sizes, while the WAV format is ideal for professional editing due to being uncompressed. See the table below to check their main uniqueness in detail:
| Feature | M4A | WAV |
| Compression | Lossy (AAC compression) | Uncompressed |
| File Size | Smaller, efficient storage | Much larger |
| Compatibility | Widely supported on Apple devices and other media players | Universally supported by platforms and software |
| Audio Quality | Good quality, but it is reduced due to compression | High quality |
| Use Case | Every day, playback, streaming, and music downloads | Professional audio production, editing, and archiving |
Batch Convert M4A to WAV with AnyRec Video Converter
When it comes to bulk M4A to WAV conversions, AnyRec Video Converter should never be left out. It is one of the most reliable solutions that not only covers M4A and WAV formats but also more than a thousand different audio and video formats as well. This software's strength lies in batch conversion, letting you get those dozens of audio files at once without affecting the sound quality. Unlike other free M4A audio converters, this one offer GPU acceleration, ensuring fast conversion and no waiting time. With its speed, quality, and flexibility, this fantastic M4A converter software is the best option for anyone who wishes for a smooth and professional workflow.

Convert between well-known formats like M4A, WAV, MP3, FLAC, and more
Keeps original quality and lets you adjust bitrate, sample rate, etc.
Built-in player to listen to your audio files and watch videos before converting.
Has editing tools to trim, merge, adjust volume, add effects, and more.
Secure Download
Secure Download
- Pros
- Can convert multiple files at once.
- Has tools for enhancing audio quality
- Maintains original audio quality.
- Cons
- Full functionality requires a purchase.
Step 1.Launch AnyRec Video Converter on your Windows PC now. On the home screen, click the "Add Files" button to import one or multiple M4A audio tracks you intend to convert.
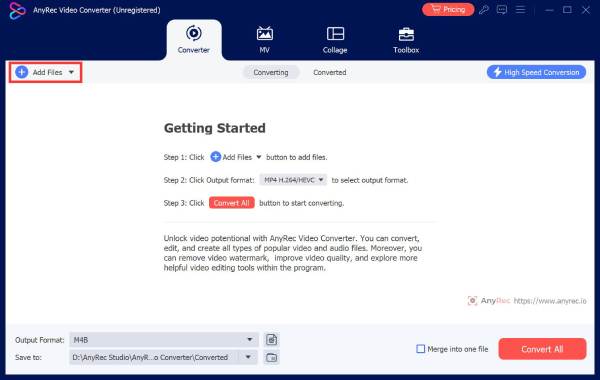
Step 2.Open the "Format" dropdown menu. Go to the "Audio" tab. Then select "WAV" as your target format.

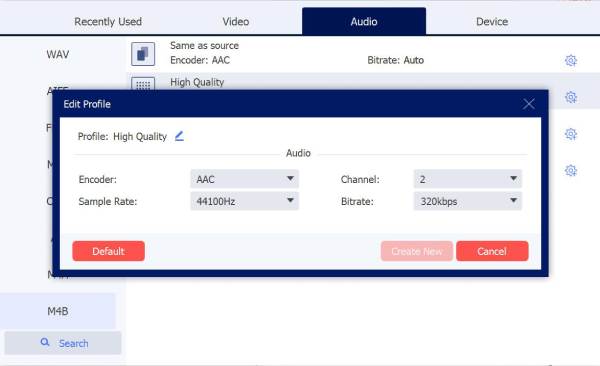
If needed, click the "Custom Profile" button to adjust audio settings like bitrate, sample rate, and channels for precise sound quality control.
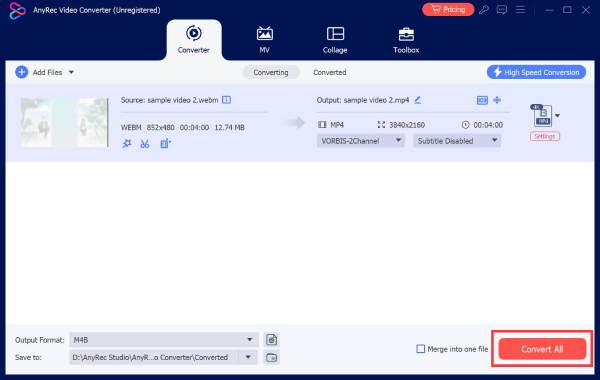
Step 3.Set your preferred output folder in the main window. Finally, click the "Convert All" button to begin the process. In just a short time, you can get your converted M4A to WAV files.
Secure Download
Secure Download
Change M4A to WAV with Audacity
Audacity is a free and open-source audio converter for Windows, Mac, and Linux. You can use Audacity to change audio format from M4A to WAV for free on desktop. While it may not work as fast as others here, it offers advanced editing features, perfect if you wish to edit your audio first before finally converting it.
- Pros
- Works on various platforms.
- Offers advanced audio editing tools.
- Completely free.
- Cons
- Needs FFmpeg plugin to import M4A.
- Slower than other dedicated converters.
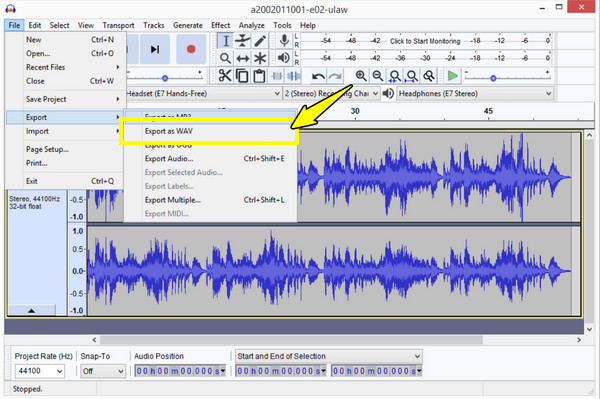
Step 1.Open Audacity on your computer. Then, head to "Import" to "Audio" and choose your M4A file to import.
Step 2.Once the file loads into Audacity, click on "File" then "Export" to "Export as WAV". From the settings window, select your desired format options, folder, and file name.
Click the "Save" button to finalize the audio conversion.
Turn M4A to WAV Online
AnyRec Free Online Audio Converter is a perfect online M4A to WAV converter for beginners. Unlike other platforms, it has fewer restrictions on file size and ensures a stable conversion process. Aside from M4A to WAV conversion, it supports formats like MP3, AAC, and more, and preserves audio quality throughout the operation. This M4A to WAV converter is a wise choice for everyone needing a quick conversion without installing anything.
- Pros
- Works on any device with a browser.
- Simple to use.
- Cons
- Slower with large files.
- Potential risks when uploading files.
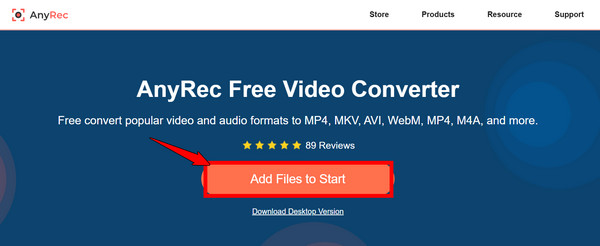
Step 1.Visit AnyRec Free Video Converter on your chosen browser, and start by clicking the "Add Files to Start" button to import an M4A audio file. If you're a first timer, you'll have to get the launcher.
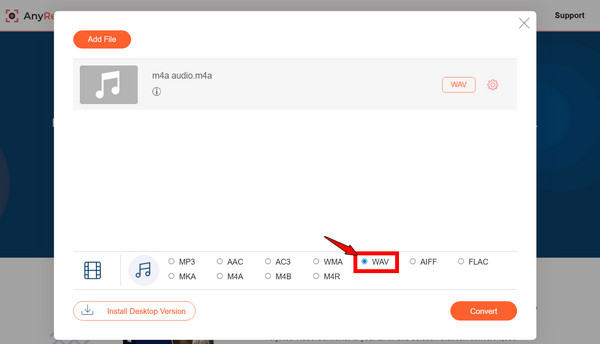
Step 2.After that, click the "Audio" (Musical Note) button, then select the "WAV" radio button. You can adjust the output settings as needed by clicking the "Settings" button.
Click the "Convert" button to start the M4A to WAV conversion.
Transcode M4A to WAV with FFmpeg
FFmpeg is a command-line tool that is commonly used by professionals. It works fast, is powerful, and supports almost every audio and video format, including the M4A to WAV conversion. However, using this as an M4A to WAV converter can be challenging for starters since it requires typing commands instead of a graphical interface. You can use FFmpeg to trim, crop, and resize videos too. Just run the related commands.
- Pros
- Covers almost every format.
- Advanced customization.
- Free and open-source.
- Cons
- Needs command-line knowledge.
- Steeper learning curve.
Step 1.Get FFmpeg installed on your computer, then open "Command Prompt" (Terminal on Mac and Linux). Navigate to the folder with your M4A file.
Step 2.Then, enter the following command: ffmpeg -i input.m4a output.wav. Press the "Enter" key, and FFmpeg will start turning M4A into WAV.
Conclusion
By converting M4A to WAV, you can make editing and archiving much easier. Among those online and desktop M4A to WAV converters, the most efficient and reliable option you can try is AnyRec Video Converter. It not only converts M4A to MP4 with ease but also covers a wide range of formats, features batch conversion, and guarantees high-quality results at super-fast speed. Handle all your audio and video conversion needs here!
Secure Download
Secure Download
Related Article
About Our Author


