[5 Ways] How to Archive Messages on iPhone Safely & Quickly?
While iPhone photos hold many memorable moments, messages have essential information that cannot be disclosed. To avoid having them accidentally deleted from your iPhone, archiving the messages is one perfect way! However, Apple doesn't provide built-in free functionality to save them. Therefore, this post gives you the 5 most accessible ways to archive iPhone text messages, allowing you to no longer worry about accidentally losing a message. Scroll down now!
Guide List
Ultimate Way to Archive Text/Photo Messages on iPhone How to Archive Messages on iPhone 17 with Screenshots Save Important Text Messages on iPhone through Notes How to Archive Messages on iPhone to Cloud via iCloud Use iTunes to Sync Your Messages on iPhone 17 FAQs about How to Archive Messages on iPhoneUltimate Way to Archive Text/Photo Messages on iPhone
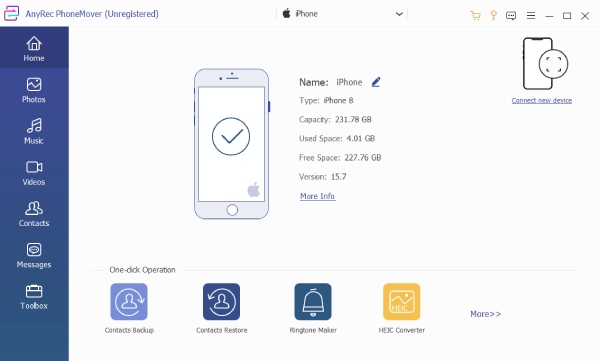
Although iPhone doesn’t offer the option to archive text messages directly, you can still archive messages on iPhone to a computer with AnyRec PhoneMover. So, in case data is missing, you can find your back to restore all messages to your iPhone 17. If you wish to restore a specific message only, you can take the edge of its built-in search feature to locate the one message. This tool also delivers a one-click transfer of messages to a computer, without iTunes or other transferring app restrictions.

Transfer everything from iPhone to computer, including messages, in one click.
Give you a glimpse of text messages before transferring with the preview function.
Can also export messages and iMessages in TXT, HTML, or CSV format.
Let you organize and manage iPhone text/photo messages within the program.
Secure Download
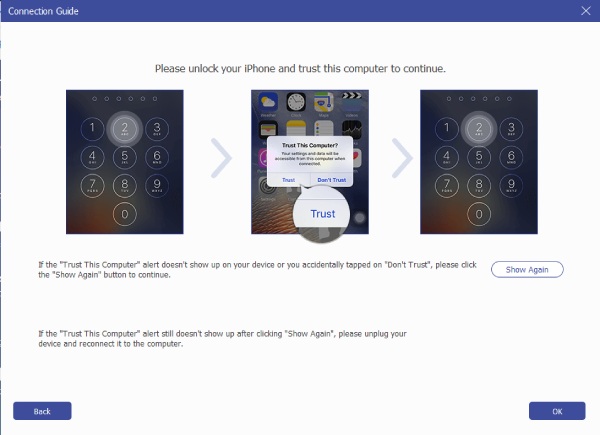
Step 1.Bring a USB cable to connect your iPhone to your computer. Once connected, tap "Trust" in the pop-up notification on your mobile device to start scanning your iPhone data.
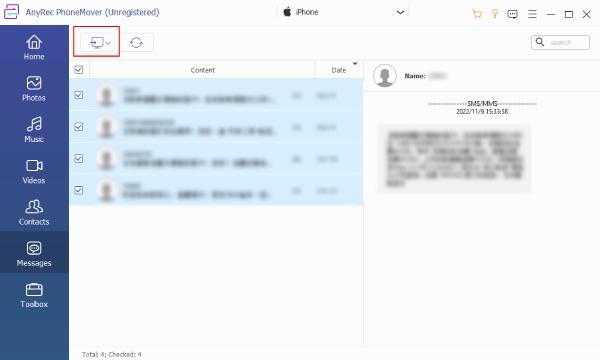
Step 2.When it gets done, head to "Messages" from the left side tab to load all iPhone messages organized the same way as they are being viewed on your mobile device.
Step 3.Click each message you want to archive to your computer; you can click the "checkbox" above to select all. Once done, click "Export to PC" to select the file location to save those messages. Click "Select Folder" to verify the selection. In this way, you can sync iPhone messages to Mac.
How to Archive Messages on iPhone 17 with Screenshots
A screenshot of your text messages can also be used for archiving messages on iPhone as it will be saved in the Photos app. However, it may be challenging at some point since you need to look for the desired messages manually, and your phone will consume lots of space due to these new files.
If you don’t mind, here’s how to archive messages on iPhone by taking screenshots:
1. For iPhones with a Touch ID: Go to the "Messages" app, then select the desired message. Take a screenshot by pressing the "Home" and "Power" buttons.
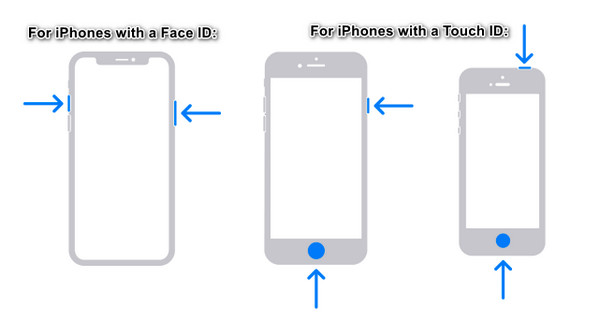
2. For iPhones with a Face ID: Once you have opened the desired message to archive, press the "Side" and "Volume Up" buttons at once.
Save Important Text Messages on iPhone through Notes
Now, if you have a specific text message to archive on iPhone in mind, consider using Notes. All you must do is copy and paste the iPhone text messages, and then you can eliminate those messages from the Messages app right after. However, copying and pasting will not include details like the sender and number if you use Notes to archive messages on iPhone.
Step 1.Open the "Messages" app, then head to the message you desire to archive. "Long press" the text to see options, and choose "Copy".
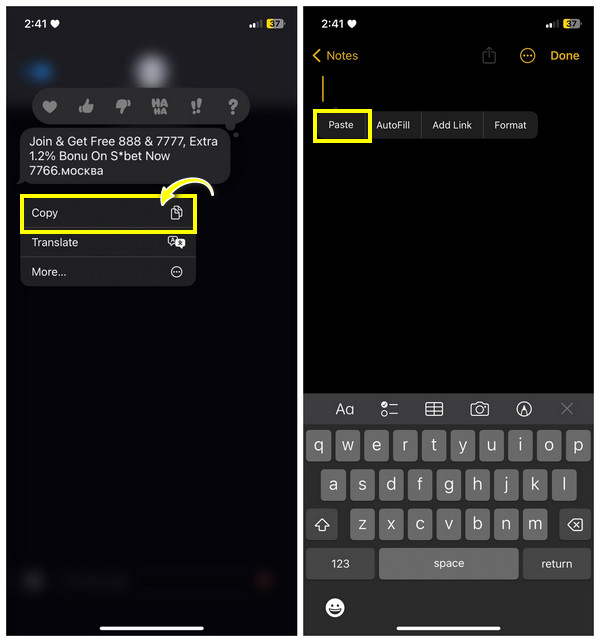
Step 2.Go to "Notes" and start a new one by tapping the "Paper" button. Tap anywhere in the blank area, and select "Paste".
How to Archive Messages on iPhone to Cloud via iCloud
Suppose the contact details are essential to you alongside their messages; use iCloud to archive messages on iPhone. Besides text messages, iCloud works on backing up contacts, music, photos, and more. But, if you have so many messages to archive or back up, the 5GB free space may be full quickly, so you must pay for extra storage space to continue archiving new messages.
If you have enough cloud storage space, you’re ready to follow the steps below to archive iPhone text messages:
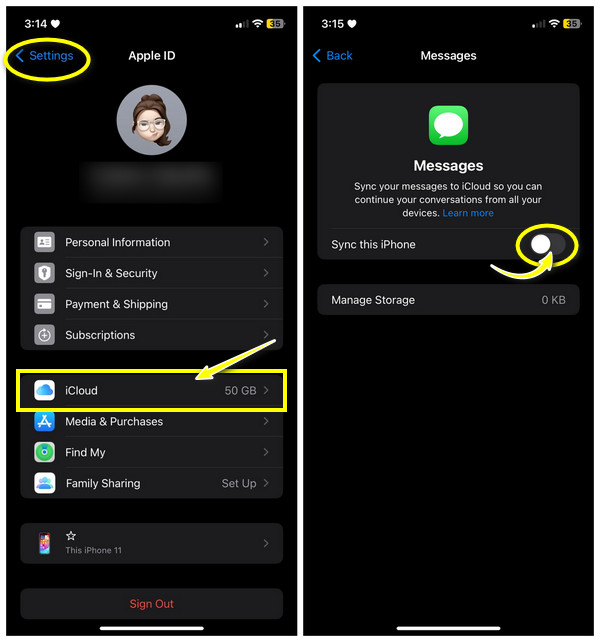
Step 1.Confirm that you have a strong Wi-Fi network to avoid difficulties syncing your iPhone messages.
Step 2.Then, open "Settings", tap your "Name", and select "iCloud". Locate "Messages" under the "Apps Using iCloud" section; please enable it. Your iPhone text messages will be synced to iCloud right away!
Use iTunes to Sync Your Messages on iPhone 17
Like iCloud, iTunes can also back up iPhone messages, photos, videos, etc. While you can archive messages on iPhone with iTunes, you must ensure that the messages aren’t synced to iCloud. Plus, you cannot only backup messages. What’s more, iTunes will wipe out existing data on your iPhone once you restore from backup. Although that’s the case with iTunes, it is still effective in archiving text messages.
Once you’re ready, here’s how to archive messages on iPhone with iTunes:
Step 1.Download the new version of iTunes on your computer. Then, prepare a USB cable to connect your iPhone to it. Make sure to tap "Trust" on your iPhone.
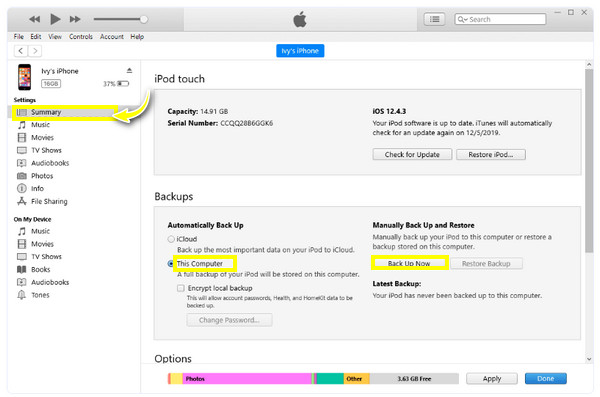
Step 2.On the iTunes screen, click the "Device" button or your iPhone above and the "Summary" tab after. Under "Backups", click the radio button of "This Computer", then tap "Back Up Now" to begin.
FAQs about How to Archive Messages on iPhone
-
Can you archive iMessages on an iPhone?
Unfortunately, the iPhone doesn't provide a direct option to archive messages, including iMessages. Once the recipient reads it, the message is encrypted. However, there are many ways to get it done, like taking screenshots, through notes, iCloud, and others that have been discussed.
-
How can I take screenshots easily to archive messages on iPhone?
Aside from using the buttons, you can use the Assistive Touch to capture your screen. Tap on it, go to Device, head to More, and tap the Arrow to see the Screenshot option. If it is not activated on your iPhone, find Settings, Accessibility, and locate Touch.
-
What is the point of learning to archive messages on iPhone?
Archiving text messages offers you a record of exchange that the recipient or other people cannot change once the messages have been removed from their account. Plus, it is crucial once you have accidentally deleted messages.
-
Can I archive email on iPhone directly?
Yes. You can transfer emails to the Archive directly to keep your inbox from being cluttered. All archived emails will remain in the folder unless you delete them.
-
How do you use Finder to archive messages on iPhone?
If you have been using the latest Mac OS, you can no longer use iTunes; instead, use Finder to archive messages. Do so by connecting your iPhone and then launching Finder. Find your way to the General tab to see the backup option. Click Backup Now.
Conclusion
Archiving is the answer if you wish to remove messages yet don’t want to lose them! You can archive messages on iPhone through screenshots, Notes, iCloud, or iTunes, but you might face issues like not having enough cloud space, being unable to back up selectively, and others. Thus, getting to know more about the AnyRec PhoneMover tool is vital. It is your ideal solution for backing up text messages, photos, contacts, videos, and music seamlessly and quickly without affecting existing data. Achieve nothing but greatness with this data-transferring tool.
Secure Download
Related Articles:
About Our Author