Hot
AnyRec Screen Recorder
Capture every moment. Record like a pro.
Secure Download
5 Ways to Record Screen on Mac with Internal & External Audio
You may have tried using QuickTime Player or Screenshot toolbar to record your Mac screen with audio. But these tools only capture audio from the microphone. If you want to record Mac screen with internal audio mainly, you’ve come to the right place. Here are 5 easy ways to record screen video with audio from your Mac directly, including program audios, streams, online meetings, and more. Ready to pick your best screen recorder for Mac with internal audio? Just read and follow!
Guide List
Record Computer Audio with AnyRec Screen Recorder QuickTime Player + BackgroundMusic Record Internal Audio on Mac with Browser Extension Record Program and Website Audio on Mac with OBS Record Internal Audio on Mac with Audacity + SoundFlower FAQs| Method | Internal Audio | Mic Audio | Difficulty | Best For | Real Experience |
| AnyRec Screen Recorder | Yes | Yes | Easy | All-in-one screen + audio | Reliable, no drivers needed. |
| QuickTime + BlackHole | Yes (via driver) | Yes | Medium | Free native tools | Setup tricky, often breaks. |
| Browser Extension Recorder | Yes (browser only) | Limited | Easy | Web content only | Records only browser audio. |
| OBS Studio | Yes | Yes | Hard | Advanced recording/streaming | Powerful but deep learning curve. |
| Audacity + Virtual Driver | Yes (via driver) | Yes | Hard | Audio-only capture | Not standalone screen recorder. |
Screen Record on Mac with Audio Using AnyRec Screen Recorder
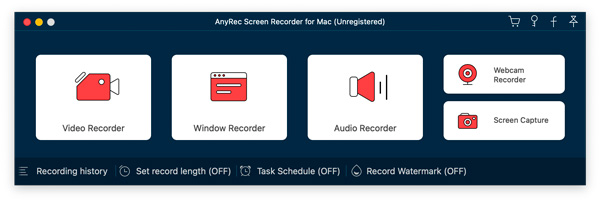
Different from common recording software, AnyRec Screen Recorder for Mac provides a built-in window recorder. You can flexibly include, exclude, or select multiple windows on Mac. Moreover, you can highlight the mouse area and record the mouse cursor during Mac screen recording. After selecting the video recording area, you can set the audio recording with system sound and microphone freely.

Include or exclude any program window for Mac recording.
Screen record with audio from computer and microphone flexibly.
Get a video recorder and webcam recorder with audio.
Add mouse tracking, float panel hiding, and more during recording.
Secure Download
Secure Download
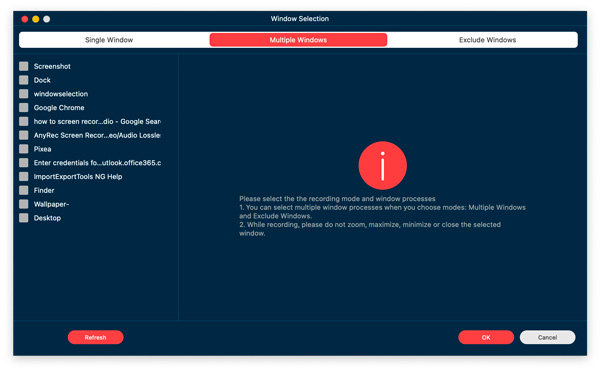
Step 1.Open AnyRec Screen Recorder for Mac. Click the "Window Recorder" button to capture custom program window with audio. (You can click the "Video Recorder" button for general video recording.)
Step 2.In the "Window Selection" screen, go to "Single Window", "Multiple Windows", and "Exclude Windows" to select which programs you want to capture.
Step 3.Enable the toggle button before "System Sound". If you want to do screen recording with internal and external audio on Mac, you can enable the toggle button before "Microphone" too.
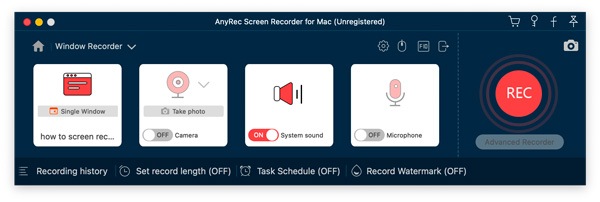
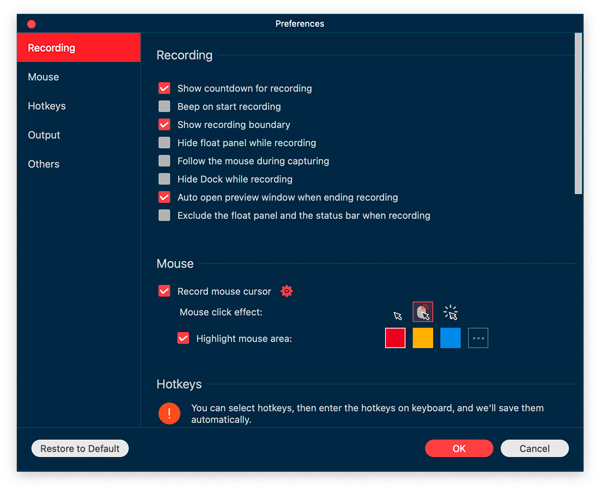
Step 4.Click the "Record settings" button. You can specify recording preferences, mouse tracking, output formats, and more here. Click the "OK" button to save changes.
Step 5.Now click the "OK" button to record a screen with video and audio on Mac. After recording, you can save or share this Mac recording based on your needs.
Secure Download
Secure Download
Pros
1. There is no need to download extra tools for Mac internal audio recording.
2. Record the mouse cursor and highlight the mouse area on Mac.
3. Include/exclude float panel and dock during recording.
Cons
1. The free trial version can save up to 3 minutes of recording.
Record Internal Audio on Mac with QuickTime Player
QuickTime Player is a must-have tool for all Mac users. It allows you to record MacBook screen with microphone audio quickly. But what if you just want to record the screen with system audio? To achieve this, a third-party virtual audio driver is required.
Step 1.Search for "Background Music Github" in Google. Click the first result to get Background Music developed by Kyle Neideck.
Step 2.Scroll down and click the "BackgroundMusic-0.4.3.pkg" hyperlink to download it.
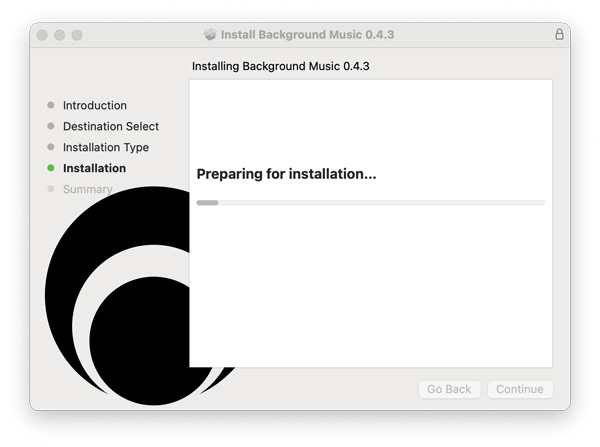
Step 3.Run the Background Music app on your Mac after installation. Later, open QuickTime Player. Click "New Screen Recording" from the top "File" dropdown list. You can also press Shift, Command, and 5 keys on your keyboard simultaneously instead. (MacOS Mojave or later is required.)
Step 4.Set the screen capture area. Later, click the "Options" dropdown menu. Select "Background Music" in the "Microphone" section.
Step 5.Click the "Record" button to screen record on Mac with internal audio using QuickTime Player.

Pros
1. QuickTime Player can work as your free screen recorder and basic video editor.
2. To record system sound and microphone on Mac, you need to create an aggregate device using Audio MIDI Setup.
Cons
1. Even though you install SoundFlower, BlackHole, Background Music and other virtual audio drivers, the QuickTime audio recording may still fails.
2. Record and save the recording video to MOV format only.
3. The output video file size is large.
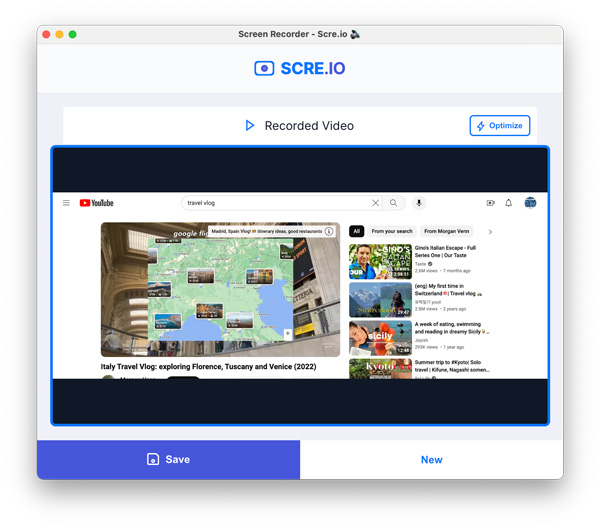
Record Internal Audio from Browser on Mac
For people who want to record streaming video on Mac, scre.io Screen Recorder extension is a good choice. You can capture video and audio from Chrome and Safari browsers and save them to WebM for free. No watermark. However, it fails to record an entire screen or a selected window on my MacBook Air M1 2020 Sonoma 14.0. The only thing I can do is capture video from a Chrome tab. If that’s what you want, pick this tool to record streaming video with sound on a Mac.
Step 1.Click the "Add Extension" button to install scre.io Screen Recorder. Later, click its button to access the window.
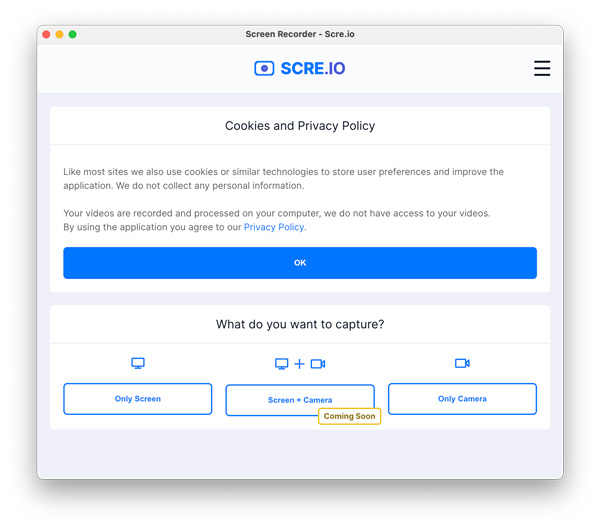
Step 2.Click the "Only Screen" followed by "System" buttons.
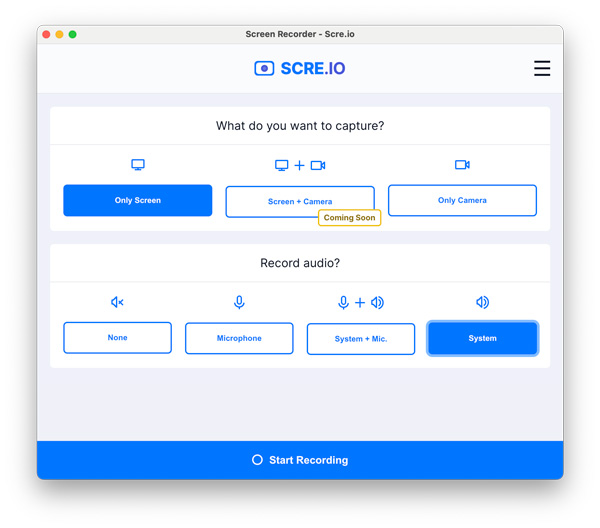
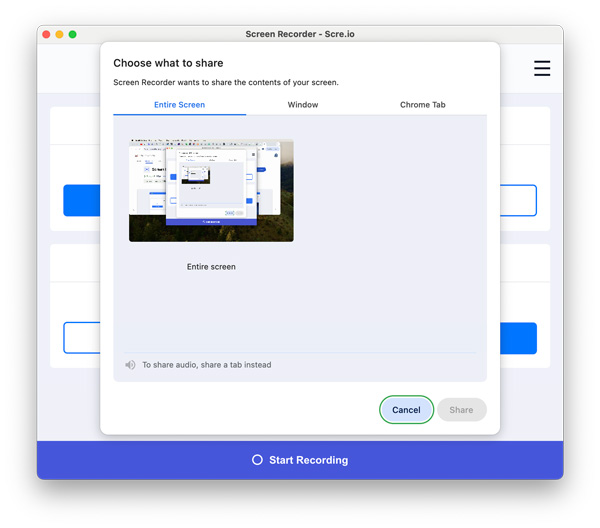
Step 3.Switch to "Chrome Tab" and select which browser tab you want to capture. Later, click the "Share" button.
Step 4.Stop recording. Click the "Save" button. Go to your Chrome Recent Download History to quickly find this recorded WebM video.
Pros
1. Free to record audio from Chrome, Safari, and other browsers on Mac.
2. Record a video of your Chrome browser with audio without a time limit or watermark.
Cons
1. Can’t record program windows or entire screen on Mac.
2. Record screen video of the selected browser tab only. You need to start a new recording to capture on another tab.
Record Audio from Social Networking Sites on Mac with OBS
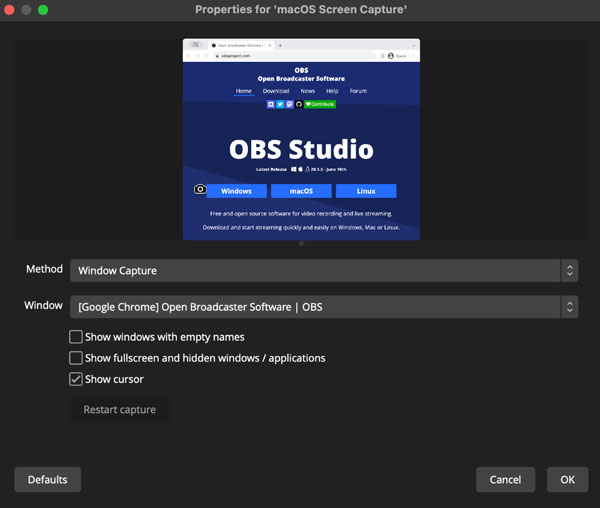
OBS is a hot choice for recording system audio on desktop computers and laptops. You can use OBS to record audio from internal and external sources for macOS Ventura and later users. But if you use earlier macOS versions, you need to install BlackHole, VB-CABLE, and other virtual audio drivers for internal audio recording. Select this virtual audio driver as the output device via "System Preferences", "Sound" and "Output" on Mac. Meanwhile, add this virtual driver as an "Audio Input Capture" source in OBS.
Step 1.Open OBS. In the "Scenes" panel, click the "+" button to create a new recording.
Step 2.Locate the "Sources" panel. Click the "+" button. Add a macOS Screen Capture source. You can check if you have added audio in Audio Mixer dock.
Step 3.To select the audio input source, you can select the "Window Capture" or "Application Capture" mode from the "Method" dropdown list.
Step 4.After selecting the audio input source, you can click the "Start Recording" button. That's how you screen record on Mac with internal audio using OBS.
Pros
1. It is free to screen record on Mac with system audio.
2. You can record and stream your desktop activities within OBS.
Cons
1. The OBS audio capture can be failed. And it is difficult for beginners to operate.
2. OBS may make your old Mac computer (short of available storage space) run slower.
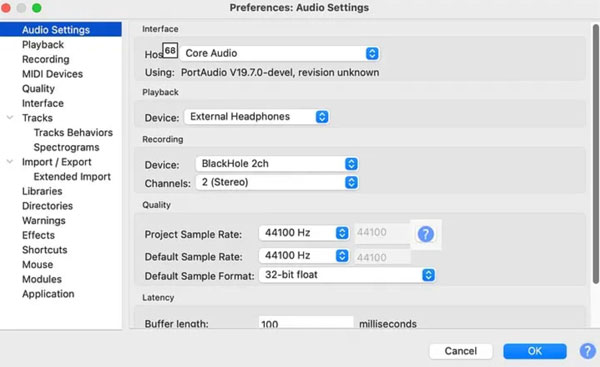
Record Internal Audio with Noise Reduction on Mac Using Audacity + SoundFlower
Audacity is also a free and open-source audio recorder and editor for Mac users. Just like QuickTime Player and OBS (runs on macOS Ventura earlier versions), you need to install a third-party virtual audio driver to record internal audio on Mac successfully. BlackHole and SoundFlower are hot choices. Follow the steps here to record computer audio on Mac with Audacity.
Step 1.Download Audacity and BlackHole (or choose from SoundFlower and Loopback) to your computer.
Step 2.Set BlackHole (2ch) as your sound output. You can click "System Preferences", "Sound", and then "Output" to find it.
Step 3.Later, go to Audacity and click "Preferences" and "Devices". Select "BlackHole (2ch)" from the "Device" list in the "Recording" section.
Step 4.Create a new project in Audacity. Click the "Record" button to screen record on MacBook with internal audio.
Pros
1. You can get noise reduction, equalization, and multitrack editing after Mac audio recording.
2. Audacity allows you to save recording files to WAV and FLAC format for high-quality sound.
Cons
1. A virtual audio driver is needed to set up Mac internal audio recording.
2. Cannot capture screen video on Mac with Audacity. You need other video recorders to grab on-screen content.
Video Guide to Screen Record on Mac with Audio
Secure Download
Secure Download
FAQs
-
Why is my screen recording just black?
If you record DRM-protected apps (such as Apple Music) or streaming videos (Netflix, Hulu, etc.), you will encounter the screen recording black issue. The built-in copy protection can detect and stop unallowed screen recording.
-
My OBS recording file size is too large, how can I reduce it?
Adjust OBS recording settings (lower resolution or frame rate), get an OBS for Mac alternative, convert video to MP4 format, or use a video compressor to reduce video file size effectively.
-
Does Shift, Command, 5 record audio?
Yes. You can screen record with the microphone on a Mac by using the Screenshot toolbar. If you encounter no sound for the saved video issue, check the microphone status. Or you can install SoundFlower, BlackHole, and other virtual audio driver extensions to successfully capture computer sound on Mac.
-
How to stop QuickTime screen recording?
If you can’t find the Stop button in QuickTime Player, go to the top of your Mac screen. Click the button with a black circle and white square inside. Alternatively, you can press Control, Command, and Esc keys on your keyboard simultaneously to make QuickTime stop recording.
-
Why Mac cannot record system audio?
The strict privacy and security rules in macOS stops internal audio recording. QuickTime Player and the Screenshot toolbar can capture microphone voice by default. If you want to gain access to the system audio, you need to install a virtual audio driver, such as BlackHole and SoundFlower.
Conclusion
Need help deciding which method to choose? If you need a powerful and easy-to-use screen recorder, AnyRec Screen Recorder is worth trying. This program can handle most video and audio recording activities on all MacBook Air/Pro up to macOS Sequoia 15 yet. For people who rarely do Mac screen recording, QuickTime Player and Background Music is also a free choice. If recording a video playing in your browser is the only thing you want to do, don’t miss the Screen Recorder extension. You can start with AnyRec Screen Recorder first. Click the Free Download button below to see how good it is.
Secure Download
Secure Download
Related Article
About Our Author


