Mac Screenshot Shortcut: What Are They & How to Use
For every Mac user, capturing the screen is an essential task for saving a document, capturing a moment from a video, or creating a quick tutorial. Luckily, the fastest way to do this is by using the Mac screenshot shortcuts. These combinations let you capture any area of your screen. How to use it effectively? This guide will share easy ways to use macOS screenshot shortcuts, alongside alternative tools that will elevate your screen capture game.
Guide List
How to Screenshot on Mac with Keyboard Shortcuts Take a Screenshot on Mac with Touch Bar Mac Screenshot Shortcuts Not Working? Try This Alternative Other Alternative Tool to Mac Screenshot ShortcutHow to Screenshot on Mac with Keyboard Shortcuts
With Mac keyboard shortcuts, you can quickly capture content on macOS. Luckily, the operating system offers three distinct Mac screenshot keyboard shortcut keys, allowing you to grab the entire screen, a window, or a custom area, all without requiring an extra application. The output will then be instantly saved to your desktop.
Mac Screenshot Shortcut for Entire Screen: Shift + Command + 3
Press all three keys at once, then release, and the entire screen will be instantly captured. You will see a thumbnail appear in the corner before the image is saved to your Mac desktop.
Mac Screenshot Shortcut for Selected Area: Shift + Command + 4
Press all three keys simultaneously, then release. Your mouse cursor will switch into a crosshair icon. Click and drag it to select the area you want to capture, then upon releasing it, it will immediately take a screenshot.

Mac Screenshot Shortcut for Specific Windows: Shift + Command + 4, then Spacebar
Start by pressing the first three keys, and once you see the crosshair icon, press the "Spacebar". The cursor will switch into a camera icon, select a window you wish to capture, and it will turn blue, capturing right away.

Take a Screenshot on Mac with Touch Bar
Meanwhile, for Mac users with models that feature the Touch Bar, you can access a customizable menu of screenshot options. This Mac screenshot shortcut method utilizes the built-in Screenshot Toolbar to offer a clear, mouse-driven interface for selecting your capture type, save location (See solutions to fix Mac not saving screenshots.), and timer options.
Step 1.On your keyboard, press the "Shift + Command + 5" keys, launching the floating "Screenshot Toolbar" on your screen, and the options will appear on the Touch Bar.
Step 2.From the Touch Bar, tap the one corresponding to the type you want, such as Capture Entire Screen, Capture Selected Windows, and Capture Selected Portion.
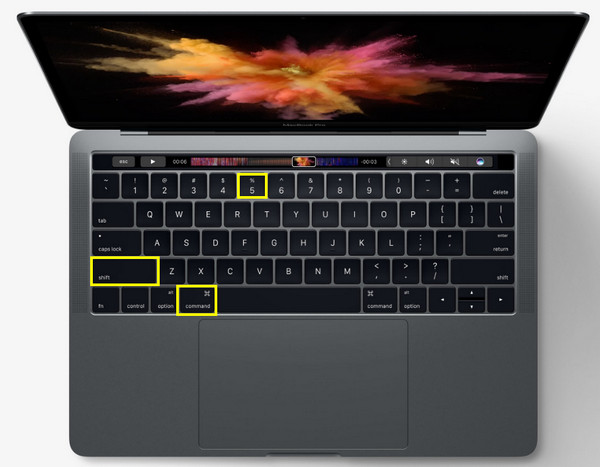
Step 3.Upon selecting your capture type, press the "Capture" button, which may also show up on the Touch Bar or on the screenshot toolbar. The image will be instantly saved or will appear in the thumbnail, where you can review and edit it.
Mac Screenshot Shortcuts Not Working? Try This Alternative
While macOS offers quick Mac screenshot shortcuts, you may want more advanced editing capabilities than the built-in tools provide. For this, AnyRec Screen Recorder offers a superior, shortcut-driven alternative for taking high-quality on-screen activities on your Mac. Beyond simple capture, this tool also has an instant, feature-rich editing suite, making it an excellent choice for creating a clean, annotated image for your tutorials, presentations, documentations, and other projects.

Easily capture your entire screen or any part with high quality.
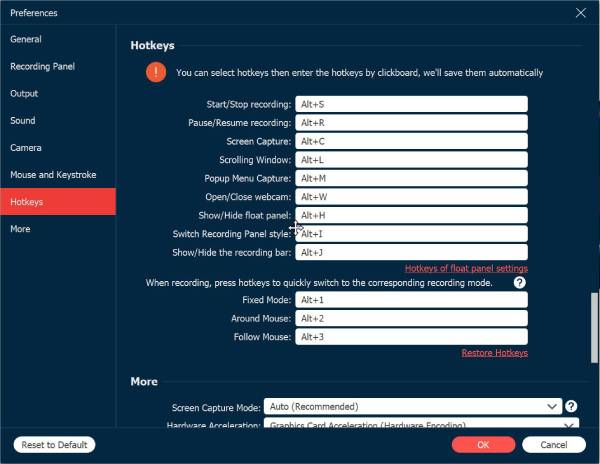
Create keyboard shortcuts to activate the screenshot function instantly.
Export captured images in popular formats, such as PNG, JPG, BMP, and GIF.
Save screenshots in sharp, high-resolution, with adjustable output settings.
Secure Download
Secure Download
Step 1.Open AnyRec Screen Recorder on your Mac. On the main dashboard, select "Screen Capture" to activate the screenshot function. Click and drag the crosshair across the specific area of the Mac screen you wish to capture, then release the mouse or trackpad button.
Step 2.The editing window will immediately show up. Use the built-in tools to enhance your screenshot by inserting text, drawing arrows or lines, or applying highlights directly.

Step 3.Once your edits are complete, click the "Save" button (Floppy Disk icon). Select your desired output folder and choose the preferred file format, such as PNG, JPG, etc, to save the final high-quality screenshot to Mac.
Secure Download
Secure Download
Other Alternative Tool to Mac Screenshot Shortcut
Although the Mac screenshot shortcuts are fast and convenient, they are limited to image capture and saving files to your desktop. So, for users who are looking for a zero-installation solution that offers quick capture, editing, or even seamless integration with video capture, the following online platforms serve as powerful and flexible alternatives. Moreover, you can take a scrolling screenshot on Mac with some online and chrome extensions, such as GoFullPage.
1. Screen Capture Online - No-Fuss Screenshot Tool for Mac
This web-based tool, Screen Capture Online, removes the need for any software or confusing setup, making it the ideal, easy alternative to the Mac screenshot shortcut. Here, you can simply visit the website, click a button, and select the area of your screen you want to capture. It is a perfect lightweight tool for quick capture and is also ready for download in standard formats like PNG or JPG.
Step 1.Navigate to the Screen Capture Online website. There, click the "Start Recording" or "Capture Screen" button, and determine which screen is to share.
Step 2.Once you have selected an area, click the "Share" button. The screenshot will be taken immediately.
Step 3.You can then edit as needed before saving the final image file.
2. Screencapture.com - Online Capture with Video Flexibility
Screencapture.com works beyond the static capabilities of the keyboard shortcut for taking screenshots on Mac by giving both screenshotting and video recording within your browser. This tool is useful for capturing browser dynamic content, such as quick tutorials, streaming video, alongside a side still image capture. Indeed, a powerful replacement for capturing screenshots and short video clips.
Step 1.Go to Screencapture.com in your Mac browser. If it starts in video mode, switch the output to capture a still image or stop the recording after the capture moment.
Step 2.Click the "Start Recording" button, select an area to be captured, and then click the "Share" button.
Step 3.The tool will capture the screen, and later on, you can save the screenshot directly to your Mac.
Conclusion
The simple combinations of keyboard shortcuts for taking a screenshot on Mac allow for quick capture of the whole screen, a window, or a custom area. You've seen here how to use it, making everyday work incredibly fast on macOS. However, these shortcuts sometimes hit a wall. So, to go beyond the limitations, use AnyRec Screen Recorder! This software is ideal not only for capturing high-quality images using customized shortcuts but also includes a powerful editor for enhancing everything after capture. Whatever projects you have on your Mac screen, it is a perfect all-in-one tool for screenshots, video capture, and editing.
Secure Download
Secure Download


