
Content
Instructions
AnyRec Phone Mirror is a versatile casting tool for you to screen-mirroring both your iPhone and Android to your Windows computer. Meanwhile, it offers both conventional ways of the USB connection for mirroring as well as the wireless connection of screen casting. Moreover, you can also get more features like recording or taking a snapshot while casting phone screens.
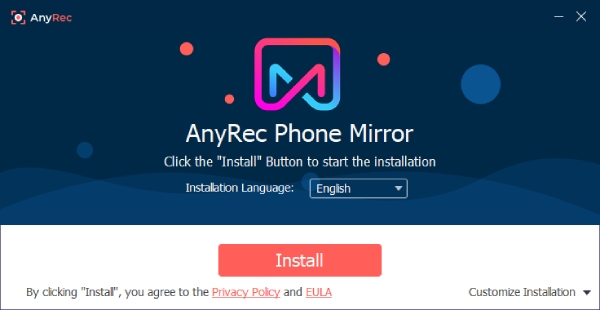
Install and Launch
Download AnyRec Phone Mirror on your computer for free via the button at the top. You can double-click the package to install it after the download finishes. Then, choose a preferred language and installation path. Click the "Install" button to begin. After it finishes, click the Start button to launch the program on your computer.
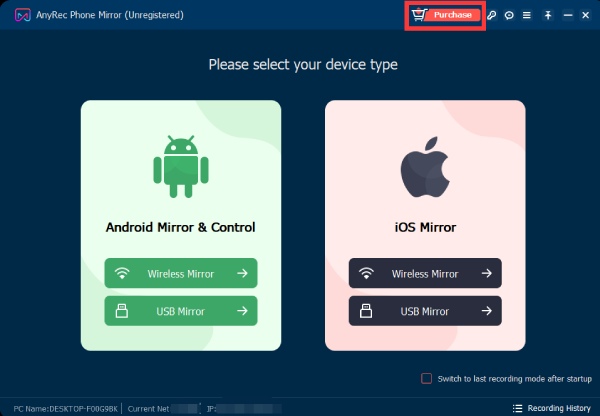
Purchase
After purchase, you can access the full features of AnyRec Phone Mirror. Simply click the "Purchase" button on the upper right side after launching the program to purchase it online. Next, on the following webpage, choose a plan, and fill in your email address, which is used for receiving the registration code later.
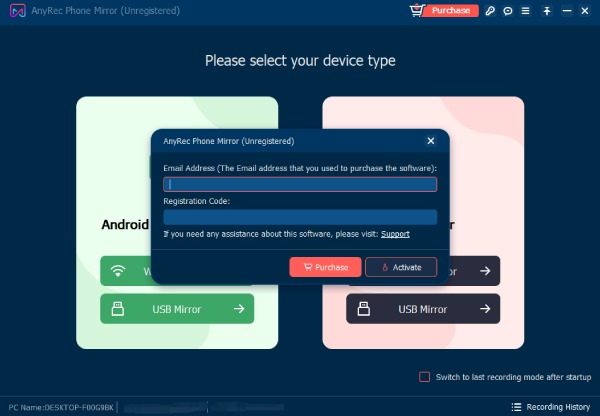
Register
Once you have successfully purchased the product, you can check your email and copy the registration code you receive. Then, in the Phone Mirror app, click the Register button with a key icon above to enter this code and the email address you used for the purchase. Finally, click the Activate button to unlock all functionality.
Update
There are two ways to update the program: manual update and auto-update. You can manually update it by clicking the "Menu" button with the three-line icon. Then, click the "Check Update" button to check for a new version. Besides, you can also go to the "Preferences" window and "More" tab. Next, tick the "Automatically check for updates" option to enable the auto-update.

Preferences
In the Preferences window, you can freely tweak more settings like output settings and hotkeys. You just need to click the "Menu" button with the three-line icon to activate a small menu. Then, click the "Preferences" button to move on.
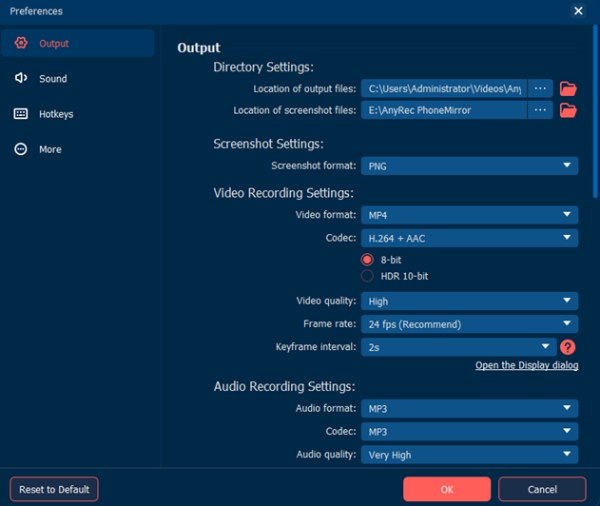
Output
In the Output section from "Preferences", you can adjust settings for video, screenshot, audio, and directory. To change the destination folder of your output files or screenshots, click the three-dot icon under "Directory Settings" to select a new folder. Additionally, you can click the "Screenshot format" dropdown option to choose a different format from PNG, JPG/JPEG, BMP, GIF, and TIFF. Then, for Video and Audio Settings sections, you can adjust video and audio format, video and audio quality, video codec, and frame rate.
Sound
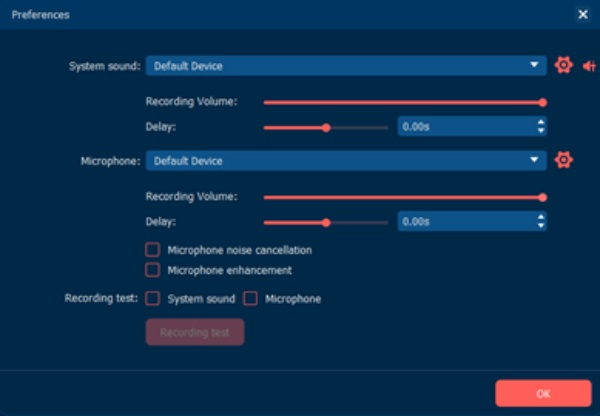
Here you can adjust the volume of the system sound and microphone. Click the "Sound Settings" button to open a pop-up window. Moreover, you can choose the default devices for "System sound" and "Microphone". "Volume" is also adjustable by dragging the slider. Also, the program provides "Delay" feature by adjusting the slider. You may also enhance the microphone performance by clicking the "Microphone noise cancellation" button and the "Microphone enhancement" button. If you want to test your recording equipment, just click the button for devices and click the "Recording test" button.
Hotkeys
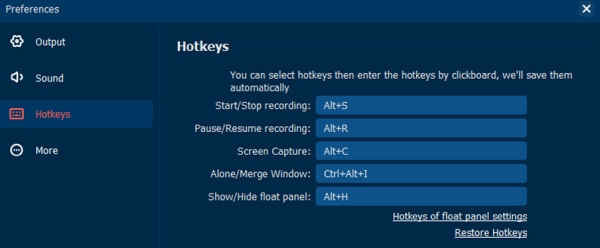
From the "Hotkeys" section, you can see all the default shortcut keys, their usage, and whether it is occupied. You can click one of them and to change the key combination, you press the corresponding keys you want on your keyboard to set it up. If you want to withdraw your changes, click the "Restore Hotkeys" button to back to the default ones.
More
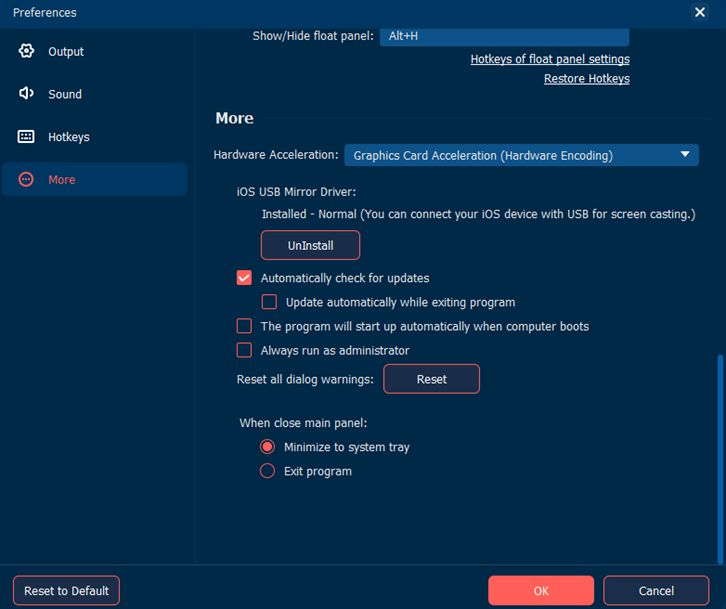
You can enable or disable "Hardware Acceleration" and "Automatically check for update" options by clicking the buttons. Moreover, you can tick to "Update automatically" while exiting the program. Or decide whether to launch the program automatically every time you boot the computer. Besides, there are two actions available for closing the main panel. Whatever changes you have made in these sections, you need to click the "OK" button to save them.
iOS Screen and Audio Mirror
There are two modes for you to cast the iOS screen onto the computer: USB connection and Wi-Fi connection. Besides, you can screen-mirroring only the audio from your iOS device to the computer as well. Here are the detailed steps for the two modes.
Wi-Fi Connection
Step 1: Activate Screen Mirror
First, launch the program and click iOS Mirror on the main interface. On the new popup, you will see two mirroring styles under the Wi-Fi Connection and choose Screen Mirroring. Meanwhile, you will also see a GIF showing how to activate the screen mirroring on your iPhone.

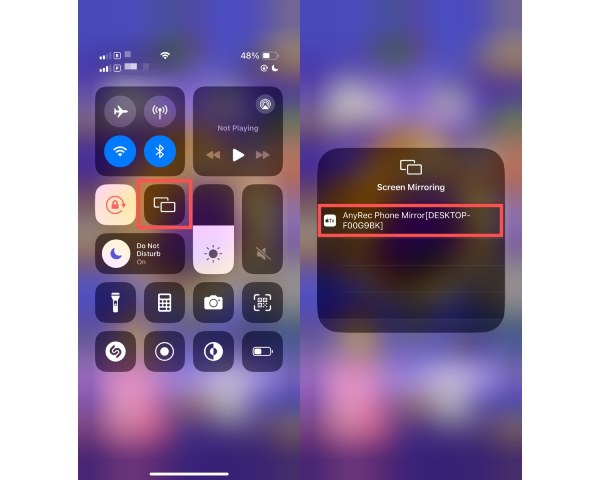
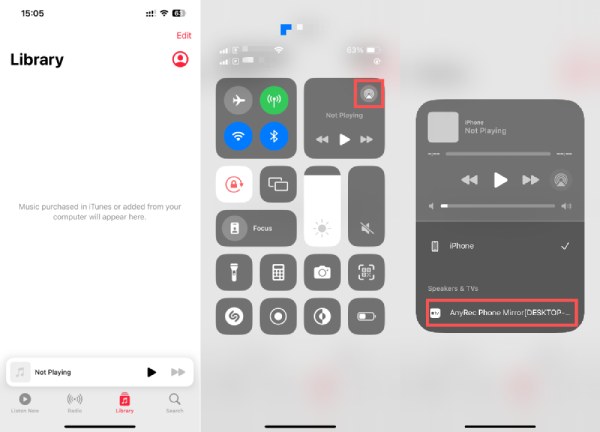
Step 2: Cast iPhone to Computer
Now, take out your iPhone, and open the Control Center. Then, tap Screen Mirroring. It will automatically search for workable devices. Next, tap AnyRec Phone Mirror to cast your iPhone screen to the computer.
USB Connection
Step 1 Choose Audio Mirroring
After choosing the iOS Mirror, click Audio Mirroring in the new pop-up window. This allows you to cast the audio you are playing on the iPhone to the computer. Next, unlock your iPhone, and swipe down from the top or swipe up from the bottom to go to the Control Center.
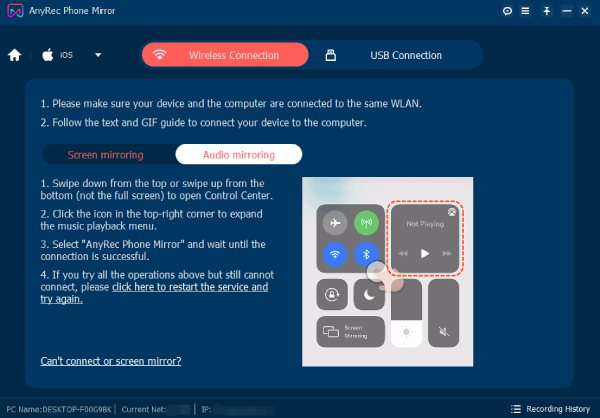
Step 2 Mirror Speakers & TVs
On the right corner, tap the audio you are playing to access the music playback menu. Then, your iPhone will show you the Speakers & TVs you can use for mirroring. After that, tap AnyRec Phone Mirror, and your music or audio will be played on the computer.
Android Screen and Audio Mirror
When mirroring your Android screen or audio to the computer, you can either do it through a wireless connection or connect your Android device to the computer with a USB cable. The former requires a specific app installed on your Android phone. Then, you can follow the steps below.
Wi-Fi Connection
Step 1 Detect
Tap the "Detect" button in the "FoneLab" app on your phone and it will start searching devices. Tap your computer to cast once its name shows up.
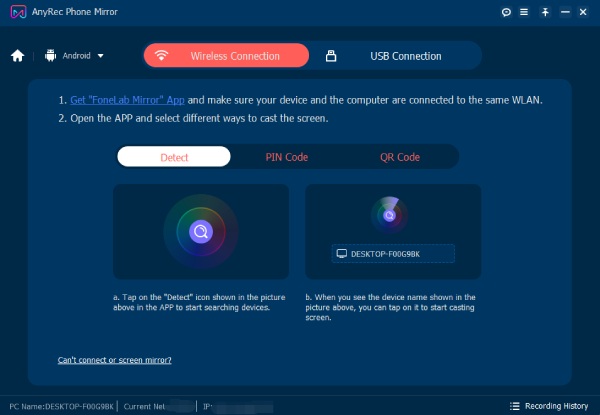
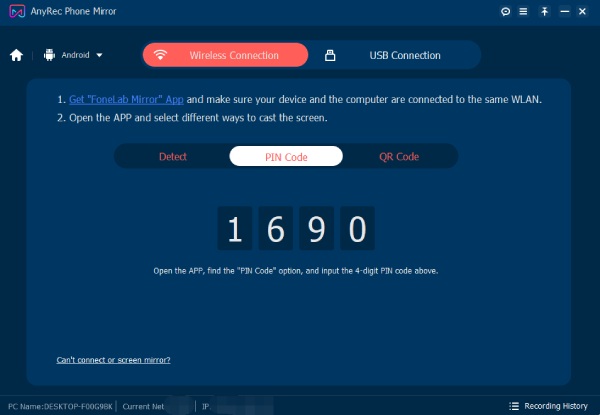
Step 2 PIN Code
Meanwhile, you can also click the "PIN Code" button and enter the code in the app on your phone.
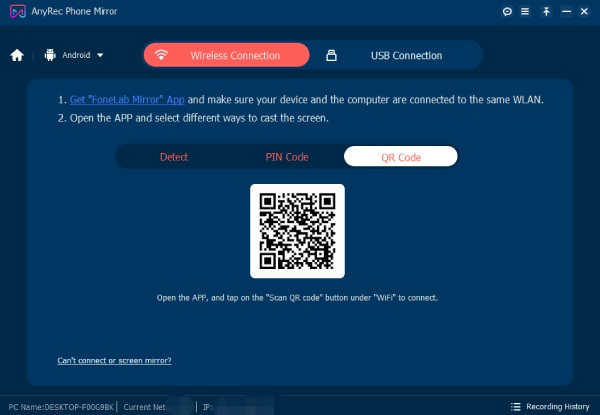
Step 3 QR Code
Or you can also click the "QR Code" button to get a QR code for you to scan with the "FoneLab Mirror" app so that your phone screen will be shown on the computer.
USB Connection
Step 1 Connect with USB Cable
Once you launch the program, click the "USB Connection" button in the "Android Mirror & Control" tab. You need to connect your Android phone to the computer with a USB cable.
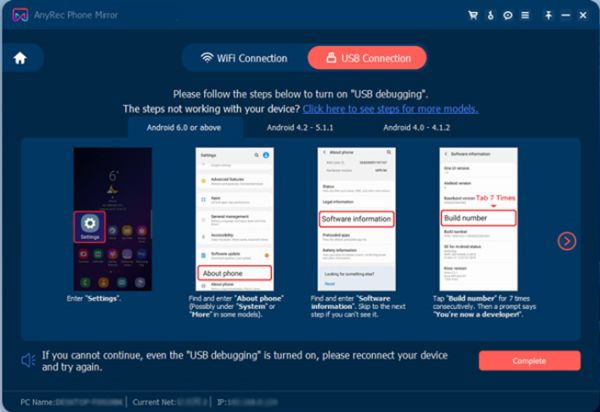
Step 2 Follow the Guide for Different Android
Go to "Settings" on your phone. Next, find "System & Updates" and tap the "Developer" button. Then, tap the "USB debugging" button to enable it. Go back to your computer screen and click the "Complete" button.
More Features
AnyRec Phone Mirror offers more than just screen mirroring. When mirroring your iPhone or Android screen, you may also capture the phone screen on your computer through Snapshot or record on the computer what your phone screen shows.
Record
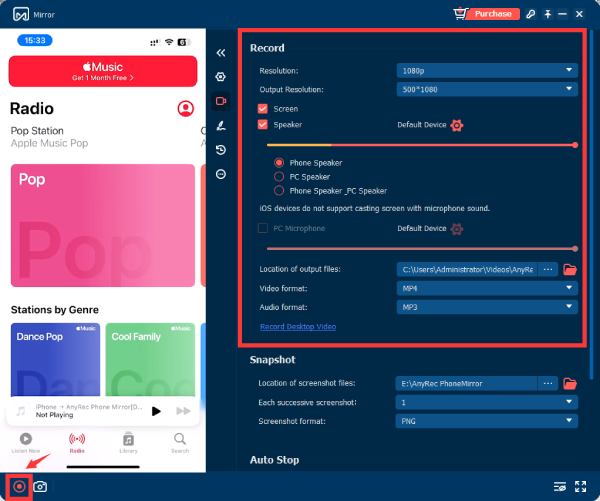
When the phone screen is cast on your computer screen, you can click the "Record" to start recording. Or you can press the "Ctrl", "Alt", and "R" keys to record iPhone and Android screen as well. Before start recording, you can also click the "Video" button to adjust record settings like output video "Resolution" or "Screen Mirroring Display". Once you finish recording, click the "Stop" button or use the key combination again to stop. Or you can set a specific duration in the "Auto Stop" tab. After that, you can play, cut, rename, or share the recorded video.
Snapshot
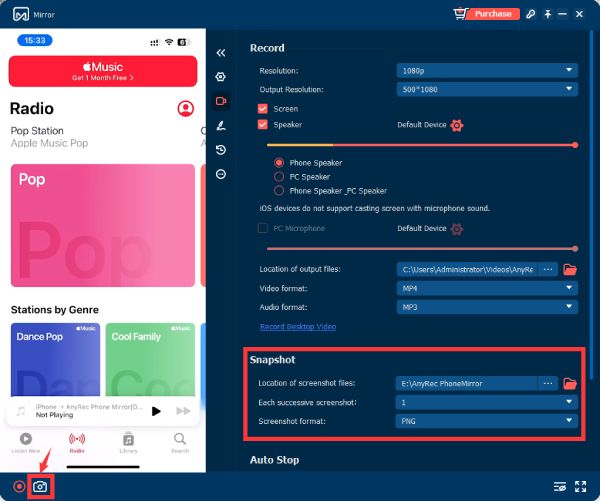
To capture a certain moment when screen mirroring your phone, you just need to click the "Snapshot" button or use the "Ctrl", "Alt", and "C" key combinations. You can take several screenshots successively by setting up the number behind Each successive screenshot. Additionally, if you do not want the toolbar to show up in your snapshot, simply click the "Hide" button below. Furthermore, you can also click the "Full-Screen" button to make the window bigger.
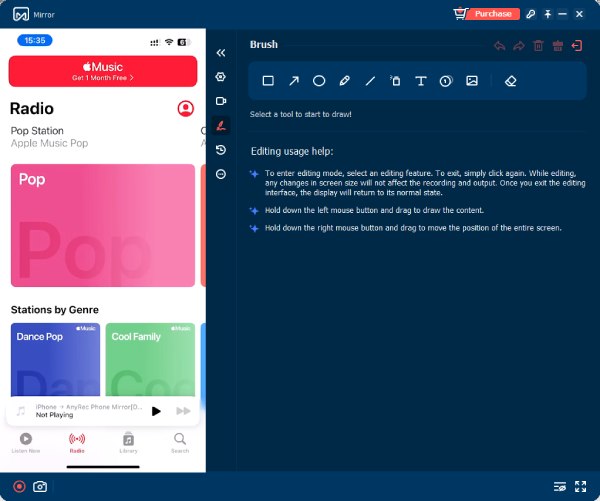
Brush
To highlight a specific region of your content, you can click the "Brush" button. Here, you can choose different kinds of shapes to draw on your screen. Also, you may use tools like "Airbrush", "Text", "Callout" or "Images" to decorate your screen. If you make a mistake by accident, click the "Eraser" button to remove the wrong trace.
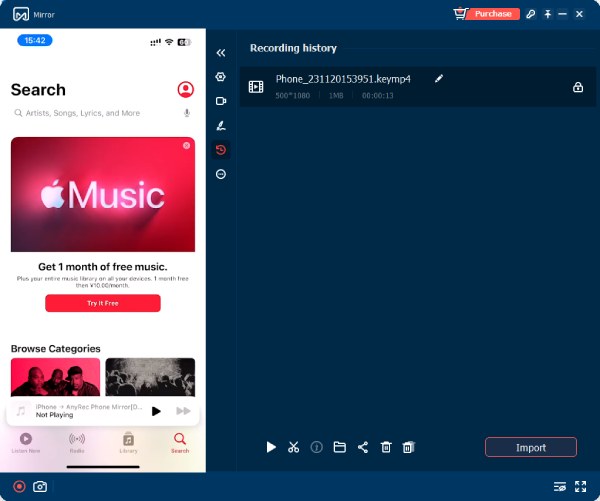
Recording History
By clicking the "Recording History" button, you can see all the videos you just recorded. You can click the "Play" button to preview the recordings. Also, you can click the "Cut" button to further edit them. You can find out where the file is stored in the local folder by clicking the “Open Folder “button. Or you can just click the “Share” button to upload your recordings directly to different social platforms such as YouTube, X, Facebook, etc. Finally, you can click the "Import" button to save your recordings.
Need More Help?
Feel free to contact us if you have any questions about AnyRec Phone Mirror.
Contact Us

