Windows Voice Recording: From Built-in Tools to Pro Software
To capture high-quality audio on a Windows PC, you no longer need a professional recording studio or a pricey setup. All you need is a reliable Windows voice recording software! Having the right one can help you save lectures, record a game walkthrough, and even finish a podcast. Thus, do not miss the details below for the top four Windows sound recorders, ensuring you find the perfect method for a quick memo or polished multi-track audio file.
Guide List
Use the Windows Built-in Sound Recorder Tool The Professional Voice Recorder on Windows Use Audacity as Windows Voice Recorder Recording Windows System Audio with CamtasiaUse the Windows Built-in Sound Recorder Tool
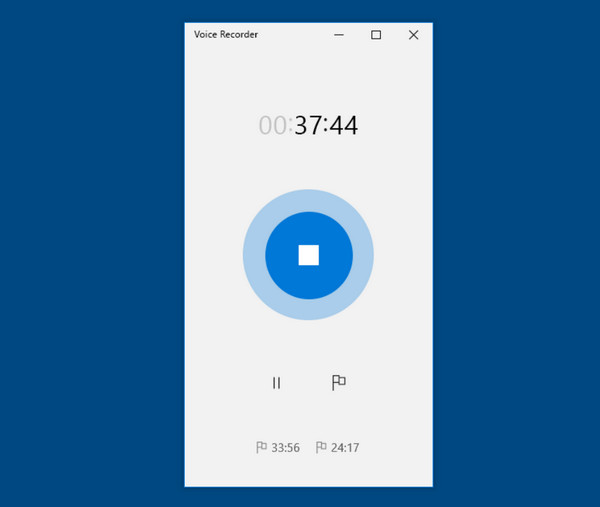
The Sound Recorder is pre-installed on all Windows computers and laptops. Although it has no advanced editing tools, it is ideal for Windows voice recording, especially for lectures, meetings, and personal voice notes. With its integration with the Windows ecosystem, your files are saved in formats like M4A or MP3.
Step 1. From the "Start menu", search for the "Sound Recorder" tool and launch it.
Step 2. Next, choose your desired microphone from the list in the bottom-left corner of the window.
Step 3. Click the "Record" button to start capturing audio.
Step 4. Tap the "Stop" button once finished, and your voice recording will show up in the sidebar for playback.
The Professional Voice Recorder on Windows
Moving to more specialized software, you might find that you need more control over your Windows screen and voice recording. For this, a professional voice recording software like AnyRec Screen Recorder must be your companion! This software lets you capture high-definition audio from both your system and mic without the lag often experienced in heavier suites. You'll also love its real-time preview, ensuring your audio levels are just perfect. With its dedicated Audio Recorder mode, you can cut away any visual clutter to focus entirely on the sound, from gameplay audio to sensitive calls. Whether it is a simple phone memo or a high-end production, this tool never disappoints!

Lossless audio capture for system sound and microphone input.
Microphone noise cancellation to suppress hums and clicks.
Save your audio recordings in MP3, AAC, WMA, or M4A formats.
Trim and save only the important parts of your audio after recording.
Secure Download
Secure Download
Step 1. Start by launching AnyRec Screen Recorder on your Windows PC. From the main screen, select "Audio Recorder" mode.
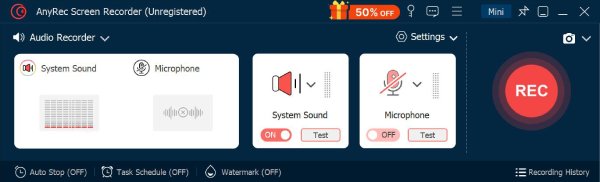
Step 2. Then, depending on what you need, toggle ON the "System Sound" to capture computer audio, and the "Microphone" as well for your voice. Adjust both inputs to make sure the balanced mix.
Step 3. Once everything is set, click the "REC" button. Watch how the volume levels move, and adjust audio if needed for the perfect audio recording.
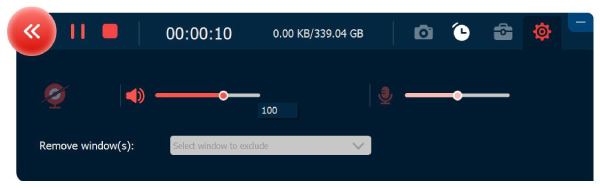
Step 4. Soon, click the "Stop" button to enter the preview window. Use the clipping tool to cut out extra parts if necessary, then click the "Save" button to save the voice recording on your PC.
Secure Download
Secure Download
Use Audacity as Windows Voice Recorder
Meanwhile, for a granular waveform type of editing required for your music or podcast, do a Windows voice recording with Audacity. It is an open-source powerhouse that offers multi-track recording and editing. Here, you can view waveforms, apply noise reduction, and even layer multiple tracks on top of each other. Thanks to its wide library of plugins, it is the top place for creators who need polished audio for their professional standards.
Your step-by-step guide to using Audacity as your Windows voice recorder is below!
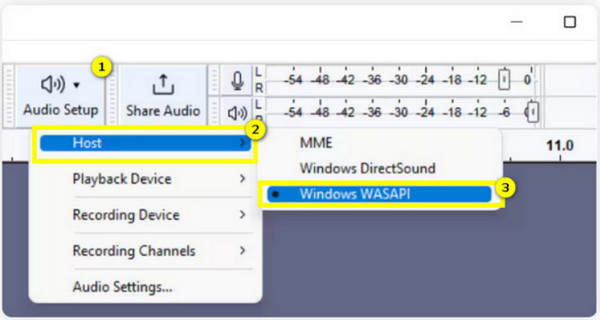
Step 1. Fire up Audacity on your Windows screen. Start by setting your "Audio Host" to Windows WASAPI to capture system sound or MME for standard microphone input.
Step 2. Once ready, click the "Record" button at the top.
Step 3. After a while, stop the recording and use the "Selection Tool" to select any mistakes and press "Delete", then head to the "File", then "Export" to save your voice track.
Recording Windows System Audio with Camtasia
Suppose your project involves not only Windows voice recording but also the screen, then Camtasia must be used! This tool is famous for its premier screen recording and editing suite alongside its audio capture capabilities. It lets you record everything at once, keeping each element on a separate track, which is important for anyone who wishes to adjust the voice volume without affecting the background music.
Here's the quick process of how to use Camtasia as your Windows screen and voice recorder:
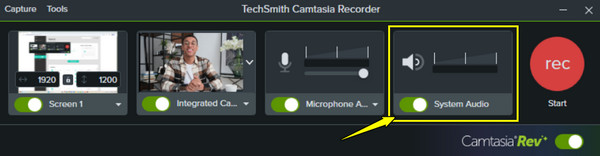
Step 1. Start Camtasia on your desktop now. Click the "New Recording" button, and in the toggle bar, make sure "System Audio" and "Microphone" are switched to ON.
Step 2. Afterward, click the "Record" button and start performing your tasks on the Windows screen as the software captures the sound.
Step 3. Later, click the "Stop" button to bring it right away into the timeline for editing.
Conclusion
Is it a quick verbal note or an important meeting? Perhaps it is a creative school project. Whatever that is, you now have a range of tools to do Windows sound recording. From built-in apps to professional software, mastering the four methods discussed ensures you record voice and capture all ideas on your Windows screen. Want to take the audio quality to the next level? For that experience, AnyRec Screen Recorder is the ultimate all-around solution for your Windows setup. Enjoy its various recording modes, editing tools, customizable settings, and many more every time!
Secure Download
Secure Download
About Our Author


