Cách chuyển ảnh từ iPhone sang iPhone 17 mới
Bài viết này cung cấp 7 cách để chuyển ảnh từ iPhone sang iPhone:
- AnyRec – Chuyển tất cả ảnh nhanh chóng và an toàn chỉ bằng một cú nhấp chuột.
- iCloud – Đồng bộ trực tiếp với cùng một tài khoản hoặc chia sẻ liên kết.
- AirDrop – Chuyển trực tiếp dễ dàng chỉ với một vài bức ảnh.
- Email – Chuyển ảnh có giới hạn trong vòng 25 MB.
- Album chia sẻ – Tải lên và tải ảnh xuống khi bạn cần.
- Dropbox – Đồng bộ hóa ảnh lên đám mây và tải xuống những ảnh mong muốn.
- iTunes - Đồng bộ hóa các thư mục với máy tính và sau đó với iPhone mới của bạn.
An toàn tải
Cách chuyển ảnh từ iPhone sang iPhone Khi nào bạn đã chuyển sang iPhone 17 mới nhất? Apple nổi tiếng với hình ảnh chất lượng cao, vì vậy bạn có thể không muốn mất đi những kỷ niệm đẹp trên chiếc điện thoại cũ của mình. May mắn thay, iPhone cung cấp cách dễ nhất để chuyển dữ liệu qua AirDrop, và bạn cũng có thể tin tưởng vào iCloud. Tuy nhiên, bạn có thể gặp một số hạn chế. Đọc thêm để tìm hiểu 8 phương pháp hiệu quả và nhanh chóng sau đây để chuyển ảnh từ iPhone sang iPhone mới.
Danh sách Hướng dẫn
Chuyển hàng loạt ảnh giữa các thiết bị iPhone bằng AnyRec Đồng bộ hóa trực tiếp hoặc chia sẻ ảnh từ iPhone sang iPhone bằng iCloud 2 cách gửi ảnh không dây với chất lượng gốc Cách đồng bộ hóa ảnh với dịch vụ đám mây [2 cách] Sử dụng iTunes để chuyển ảnh từ iPhone sang iPhone Câu hỏi thường gặp về việc chuyển ảnh từ iPhone sang iPhoneChuyển hàng loạt ảnh giữa các thiết bị iPhone bằng AnyRec
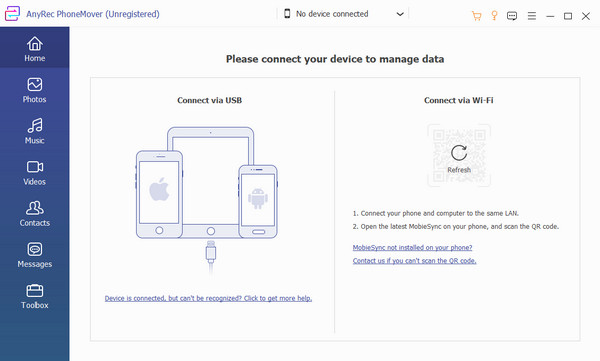
Cách dễ nhất để chuyển ảnh từ iPhone sang iPhone 17 mới là sử dụng AnyRec PhoneMoverĐây là công cụ dành cho máy tính để bàn Windows hỗ trợ iOS 26 và Android 16/15 mới nhất. Một trong những tính năng tốt nhất của AnyRec là bạn có thể kết nối thiết bị bằng cáp USB tương thích, quét mã QR hoặc sử dụng mạng Wi-Fi mạnh. Hơn nữa, nó hỗ trợ tất cả các tệp như tài liệu, tin nhắn và danh bạ với các tùy chọn sao lưu và khôi phục. Hãy thử công cụ mạnh mẽ này và chuyển ảnh từ iPhone sang iPhone chỉ bằng một cú nhấp chuột.

Cung cấp tính năng chuyển bằng một cú nhấp chuột để chuyển tệp hàng loạt sang iPhone mới mà không bị chậm trễ.
Hỗ trợ tất cả các tệp dữ liệu và bạn cũng có thể xem trước nội dung chi tiết trước khi chuyển.
Có thể quản lý, khôi phục hoặc xóa ảnh trùng lặp khỏi iPhone của bạn để giải phóng dung lượng lưu trữ.
Quá trình truyền tải mượt mà và nhanh chóng hứa hẹn không bị kẹt hoặc mất dữ liệu.
An toàn tải
Bước 1.Phóng PhoneMover trên Windows. Cắm cáp USB vào máy tính với điện thoại được kết nối với đầu kia. Hoặc chỉ cần cài đặt ứng dụng "MobieSync" trên thiết bị di động của bạn và kết nối.
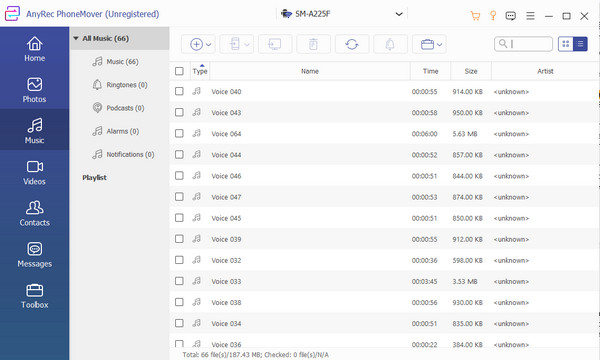
Bước 2.Sau đó, thông tin của điện thoại di động sẽ hiển thị trên giao diện của phần mềm, nơi bạn có thể truy cập tất cả các tệp từ điện thoại. Đi tới "Ảnh" hoặc menu khác và đánh dấu vào các hộp kiểm để chọn ảnh mong muốn để chuyển từ iPhone sang iPhone.
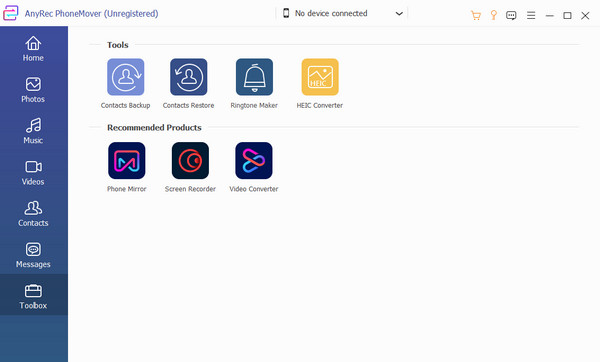
Bước 3.Nhấp vào nút "Kết nối thiết bị mới" ở đầu cửa sổ. Sau đó, quét mã QR bằng iPhone 17 nhận dữ liệu. Chờ quá trình chuyển ảnh hoàn tất. Bạn cũng có thể quản lý, chuyển đổi hoặc xóa tệp.
Đồng bộ hóa trực tiếp hoặc chia sẻ ảnh từ iPhone sang iPhone bằng iCloud
iCloud cho phép bạn sao lưu và khôi phục dữ liệu bất cứ lúc nào bạn muốn, vì vậy đây là một cách hiệu quả để chuyển ảnh từ iPhone sang iPhone 17. Dịch vụ đám mây mặc định của Apple hỗ trợ di chuyển tệp. Vì vậy, tại đây, bạn có thể đồng bộ hóa ảnh trực tiếp hoặc chia sẻ liên kết để chuyển qua iCloud.
Phương pháp 1: Đồng bộ ảnh với cùng một tài khoản iCloud
Khi đồng bộ hóa ảnh iPhone với iCloud, bạn có thể truy cập các tệp trên bất kỳ thiết bị nào. Nó thay thế các tùy chọn "Camera Roll" và "Photo Stream" muộn bằng tính năng "Tất cả ảnh", có thể lưu trữ hàng nghìn bức ảnh đã chụp.
Bước 1.Đi tới "Cài đặt" của nguồn iPhone. Xác định vị trí menu "iCloud". Bật nút "Ảnh" để bật đồng bộ hóa Ảnh iCloud.
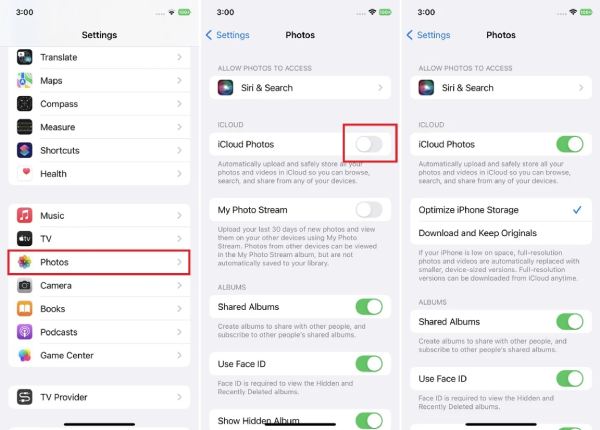
Bước 2.Khởi chạy thiết bị nhận và làm theo lời nhắc. Khi bạn đến menu "Ứng dụng và dữ liệu", hãy nhấn vào nút "Khôi phục từ bản sao lưu iCloud". Đăng nhập vào Apple ID và chọn bản sao lưu bạn muốn khôi phục.
Phương pháp 2: Gửi liên kết iCloud của ảnh tới iPhone khác
Nếu bạn có phiên bản iOS 14 trở lên, bạn có thể sử dụng liên kết iCloud để chuyển ảnh từ iPhone sang iPhone có ID Apple khác. Bằng cách này, bạn có thể mở hình ảnh trên mọi thiết bị mà không gặp sự cố. Làm theo các bước dưới đây:
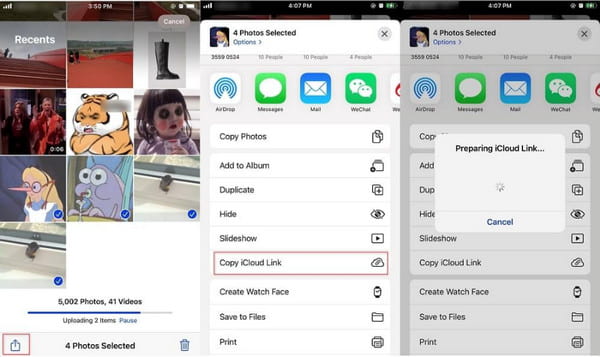
Bước 1.Mở ứng dụng "Ảnh" trên iPhone của bạn. Chọn những hình ảnh bạn muốn chuyển sang iPhone mới.
Bước 2.Nhấn vào nút "Chia sẻ" và tìm tùy chọn "Sao chép liên kết iCloud". Nó sẽ chuẩn bị một liên kết mà bạn có thể gửi tới tin nhắn, email và các ứng dụng mạng xã hội khác.
2 cách gửi ảnh không dây với chất lượng gốc
Ngoài ra, bạn có thể sử dụng AirDrop và email để chuyển ảnh từ iPhone cũ sang iPhone 17 mới. Đây cũng là một giải pháp tuyệt vời nếu bạn cần sao lưu các tệp tin lên iCloud. Dưới đây là hai phương pháp để gửi ảnh chất lượng cao.
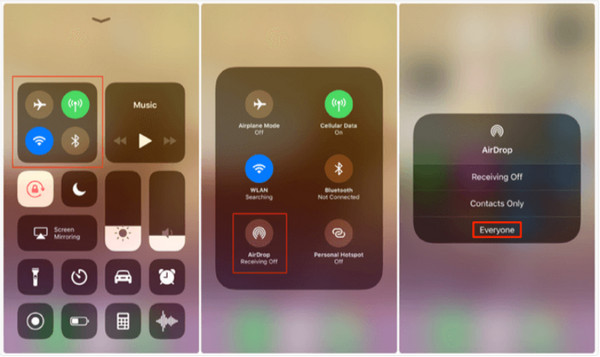
Phương pháp 1: AirDrop Photos sang iPhone khác
Bước 1.Khởi chạy Bảng điều khiển "Trung tâm". Bật tính năng "AirDrop". Đảm bảo Wi-Fi và Bluetooth cũng được kích hoạt. Chọn giữa "Chỉ danh bạ" và "Mọi người" theo nhu cầu của bạn.
Bước 2.Đi tới ứng dụng "Ảnh" và chọn ảnh bạn muốn gửi. Nhấn vào nút "Chia sẻ" ở cuối màn hình và nhấn "AirDrop". Chọn iPhone mới để chuyển ảnh. Bạn cũng có thể AirDrop từ iPhone sang Mac.
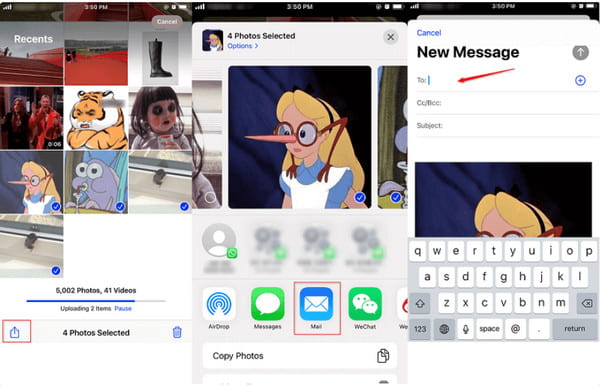
Cách 2: Gửi Ảnh kèm Email
Bước 1.Mở "Ảnh" trên thiết bị của bạn. Chọn ảnh và nhấn vào nút "Tải lên". Chọn tùy chọn "Thư" để mở ứng dụng email.
Bước 2.Nhập địa chỉ email để gửi ảnh dưới dạng file đính kèm. Mở email trên iPhone khác.
Cách đồng bộ hóa ảnh với dịch vụ đám mây [2 cách]
iCloud không phải là dịch vụ đám mây duy nhất để chuyển ảnh từ iPhone sang iPhone và may mắn thay, bạn có thể sử dụng Dropbox trên iOS. Tốt nhất là phần này sẽ tiết lộ hai cách để xuất tệp qua dịch vụ đám mây. Và một trong số đó là tính năng mới trên phiên bản iOS 18. Bạn có thể sử dụng hai phương pháp này để chuyển ảnh không dây khi AirDrop không hoạt động.
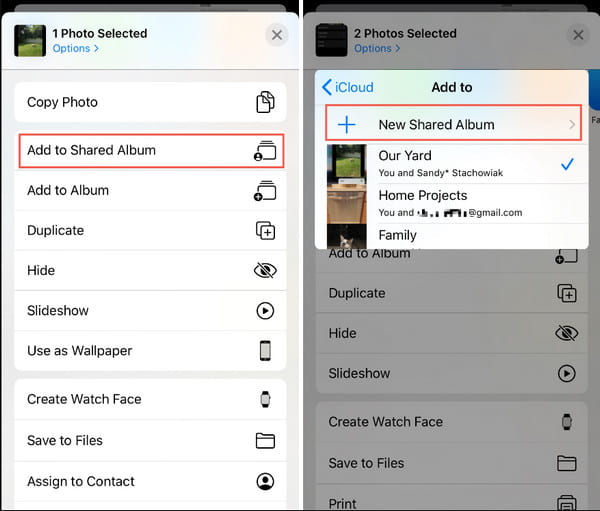
Cách 1: Tạo Shared Album để Sync Ảnh
Bước 1.Đi tới "Ảnh" trên thiết bị nguồn. Nhấn vào nút "Album". Nhấn vào "Plus" từ trên cùng bên trái màn hình của bạn và tạo album.
Bước 2.Chọn tất cả các hình ảnh để đưa vào album mới. Sau đó, nhấn "Album chia sẻ mới" và đặt tên cho nó. Bao gồm tất cả các địa chỉ liên hệ để chia sẻ album và nhấn nút "Tạo" để xác nhận các lựa chọn.
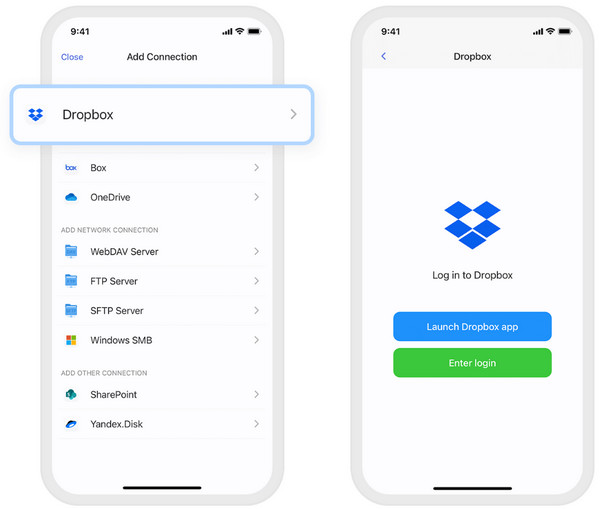
Cách 2: Sử dụng Dropbox Cloud để đồng bộ ảnh
Các bước: Cài đặt ứng dụng Dropbox trên điện thoại của bạn và khởi chạy nó. Đăng nhập vào tài khoản. Sau đó tải hình ảnh lên từ thiết bị nguồn. Ứng dụng sẽ đồng bộ hóa ảnh với iPhone mới của bạn qua Wi-Fi.
Sử dụng iTunes để chuyển ảnh từ iPhone sang iPhone
iTunes là một phương pháp tiêu chuẩn để chuyển ảnh từ iPhone sang iPhone trên các phiên bản macOS Catalina trước đó. Tuy nhiên, dịch vụ này có thể sẽ xóa các ảnh hiện có trong Thư viện ảnh khi bạn gửi chúng đến một thiết bị khác. Và có thể mất nhiều thời gian vì kích thước lớn nếu bạn không tắt HEIC tính năng hình ảnh.
Bước 1.Cắm cáp USB vào máy tính để kết nối điện thoại thông minh. Khởi chạy ứng dụng ảnh mặc định trên cả hai thiết bị.
Bước 2.Sau đó, chọn những hình ảnh bạn cần gửi. Nhấp vào nút "Nhập/Xuất đã chọn" từ điện thoại của bạn để truyền tệp sang máy tính. Sau đó, kết nối thiết bị nhận với máy Mac của bạn.
Bước 3.Mở iTunes và nhấp vào nút "Thiết bị" từ phần trên cùng bên phải của cửa sổ. Chọn tùy chọn "Ảnh" từ bảng điều khiển bên trái.
Bước 4.Sau đó, nhấp vào nút Đồng bộ Ảnh từ thư mục "Ứng dụng". Xác nhận thao tác bằng cách nhấp vào nút "Áp dụng" để chuyển ảnh sang iPhone 17 mới.
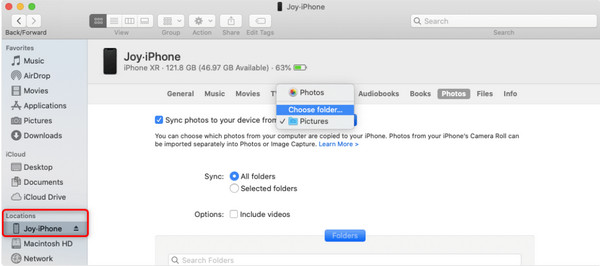
Lưu ý: Đối với các phiên bản macOS Catalina, Big Sur, Monterey và Ventura, bạn có thể trực tiếp chuyển và quản lý ảnh iPhone trên máy Mac bằng Finder. Vì iTunes không có sẵn trên các hệ điều hành Mac mới đó.
Câu hỏi thường gặp về việc chuyển ảnh từ iPhone sang iPhone
-
1. Ảnh của tôi có bị giảm chất lượng sau khi chuyển sang thiết bị khác không?
Đúng. Khi bạn chuyển ảnh từ iPhone sang iPhone, sẽ có những thay đổi nhỏ về chất lượng. Tuy nhiên, bạn có thể tránh làm giảm chất lượng hình ảnh bằng cách chuyển đổi hình ảnh sang định dạng HEIC. Nếu bạn có iOS mới nhất, bạn có thể chuyển đổi ảnh để có chất lượng tốt hơn và giải phóng một số dung lượng.
-
2. Thời gian chuyển ảnh từ iPhone sang iPhone là bao lâu?
Có nhiều yếu tố có thể ảnh hưởng đến thời gian chờ khi bạn di chuyển ảnh sang iPhone 17 mới. Thời gian ước tính dao động từ 45 phút đến khoảng một giờ. Hãy đảm bảo bạn có kết nối WiFi tốt, phần mềm được cập nhật và đủ dung lượng lưu trữ.
-
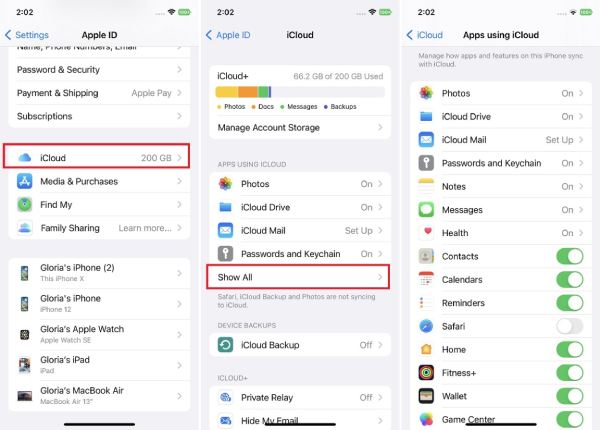
3. Các tệp có tự động được lưu trong iCloud không?
Không. Bạn cần thiết lập iCloud từ phần cài đặt của iPhone để lưu tệp. Trong trường hợp này, bạn có thể truy cập nó trên Apple ID trên bất kỳ thiết bị Apple nào.
Phần kết luận
Với các giải pháp được trình bày, việc chuyển ảnh từ iPhone sang iPhone 17 không còn là vấn đề đáng lo ngại. Tuy nhiên, nếu vẫn còn một số tệp từ thiết bị trước, bạn có thể sử dụng AnyRec PhoneMover để chia sẻ và quản lý tập tin của bạn. Phần mềm này có thể giúp bạn chuyển dữ liệu sang iPhone từ bất kỳ thiết bị nào; bạn thậm chí có thể sử dụng nó để chuyển dữ liệu từ Android sang iPhone 17 của bạn. Tải xuống công cụ máy tính để bàn tốt nhất cho quá trình chuyển nhanh.
An toàn tải
Những bài viết liên quan:
Giới thiệu về tác giả