
Hot

AnyRec DVD Creator
Create DVDs with custom menus and themes.
Secure Download
How to Convert and Burn AVI to DVD? (Why Does AVI Not Work?)

After spending hours finding your AVI favorite classic movies, you just get nothing when you play them on your TV screen. This feels like a massive headache. Why do AVI files refuse to play with your home DVD player? And how can you get AVI to DVD? Keep reading to see the foolproof ways to convert and burn AVI to DVD, the perfect burning settings, and why this playback clash happens. Get those AVI videos onto the big screen!
Guide List
Why AVI Files Don't Work on DVD Players Burn AVI to DVD on Windows and Mac Convert AVI to DVD with FFmpeg + Burn Best Settings for AVI to DVD Burning FAQsWhy AVI Files Don't Work on DVD Players
Pop open a standard DVD player, drop in a disc of AVI files, and there's a great chance you'll get an error. Here's why exactly those AVI files won't work on a standard DVD player that requires you to convert AVI to DVD:
DVD Video Standard Requires:
- • MPEG-2 Video Codec. Standard players have hardware chips made specifically to decode MPEG-2 video and AC-3/PCM audio. AVI files have newer or different codecs that the player simply can't read.
- • VOB Files in VIDEO_TS Folder. A DVD player needs a strict file structure directory. The disc must have a folder named VIDEO_TS, which includes Video Object files containing the multiplexed audio and video streams with .IFO and .BUP files.
- • Proper DVD Menu Structure. The player needs specific navigation data to tell it how to start, when to show the menu, and how to jump between chapters.
- • Disk Formatting. The physical disc must be burned using Universal Disc Format so the laser knows how to track and read it.
To solve this and successfully play AVI files on the screen, you need to convert AVI to DVD format, then burn it to a physical disc. Get more details below.
Burn AVI to DVD on Windows and Mac
Simply copying AVI to a blank disc won't create a playable movie DVD. You need an all-in-one audio software to handle the exact transition, and that's AnyRec DVD Creator. It brings the modern formats and traditional home entertainment together by simplifying the burning process. Throughout the DVD authoring process, it ensures your videos maintain their original visual fidelity without sacrificing quality or frames. Ultimately, it is a complete solution that guarantees your DVD will play flawlessly on any standard player.
Converts and burns AVI to DVD, and over 500 other video formats.
Offers numerous pre-designed DVD menus alongside options to add images, text, etc.
Fully supports burning to many disc types like DVD-5, DVD-9, DVD-R, and more.
Fine-tune AVI footage before burning by trimming, cropping, or adjusting effects.
Secure Download
Secure Download
Step 1.Launch AnyRec DVD Creator. Pop a blank DVD into your computer's drive, then from the main screen, choose "DVD Disc" as your project type. Click the "Add Files" button in the middle to upload your AVI video to burn.
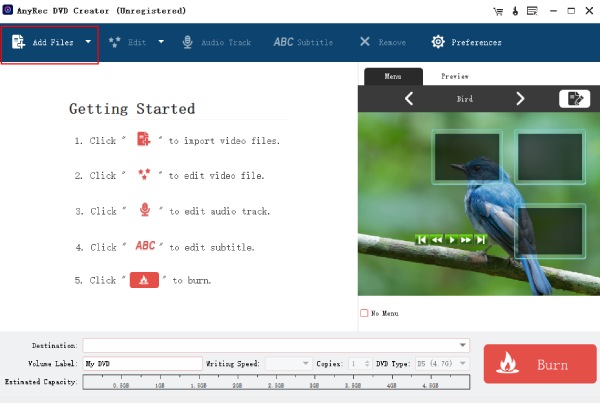
Step 2.Then, tick the boxes next to your videos, and set the Disc Type, Aspect Ratio, and Video Quality. You can also click on the thumbnail and edit the video further with trimmer, watermarks, etc.
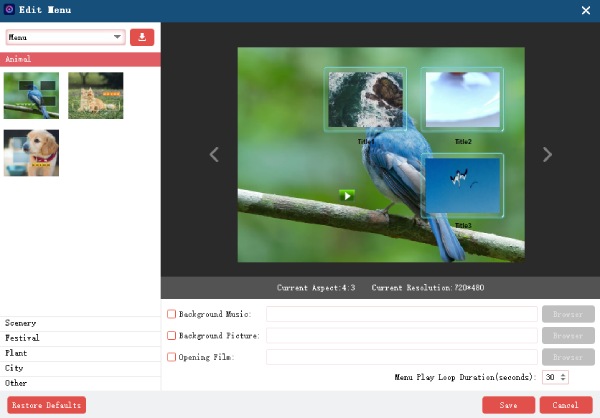
Step 3.After that, click the "Next" button to open the menu design window. Pick a template, and optionally change the background for a more personalized feel.
Step 4.Once done, click the "Burn" button. Choose your optical drive as the destination, the correct TV standard, and click the "Start" button to begin the AVI to DVD burning process.
Convert AVI to DVD with FFmpeg + Burn
For those who want a hands-on approach and don't mind terminal commands for AVI to DVD conversion, using FFmpeg is a powerful alternative. This method offers direct control of the transcoding process. But here's the catch: you will still need to run the output using a separate, free DVD burning software, so it is more time-consuming.
Anyway, here's a step-by-step guide to convert AVI files to DVD with FFmpeg and burn them with a free DVD authoring tool.
Step 1.Launch the Command Prompt (Terminal) and go to the directory where your AVI file is saved. Type the command: ffmpeg -i input.avi -target ntsc-dvd output.mpg. Press "Enter".
Replace the input.avi with the file name and change the NTSC-DVD to PAL DVD if you live in the PAL-standard region.
Step 2.Afterward, FFmpeg will convert it, adjust the frame rate, aspect ratio, and audio streams to match DVD specifications. Now, you can use DVDStyler as your free authoring tool to burn AVI to DVD.
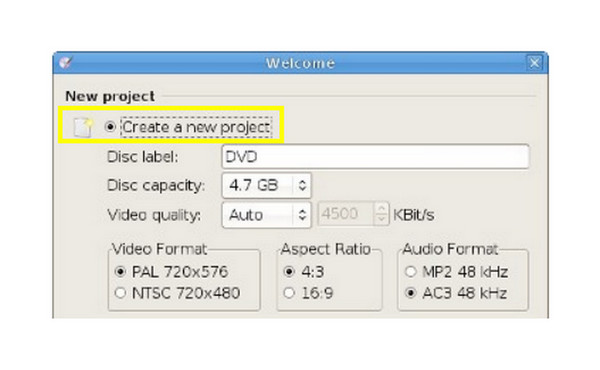
Step 3.When all the conversions have happened, launch DVDStyler. Select "Create a new project" after inserting a blank DVD into the drive. Then match the settings to FFmpeg output settings, and click "OK".
Step 4.Choose a menu layout if you want. Then, import your converted video by clicking the "File Browser" or dragging and dropping it into the panel. You can customize the disc interface with text fields or buttons afterward.
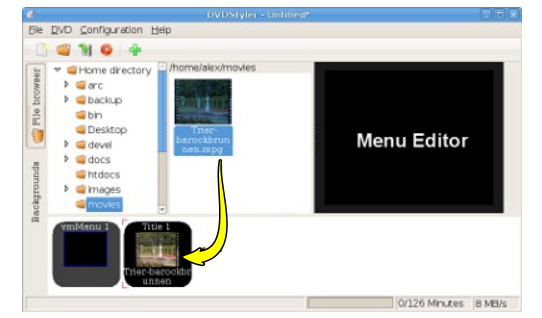
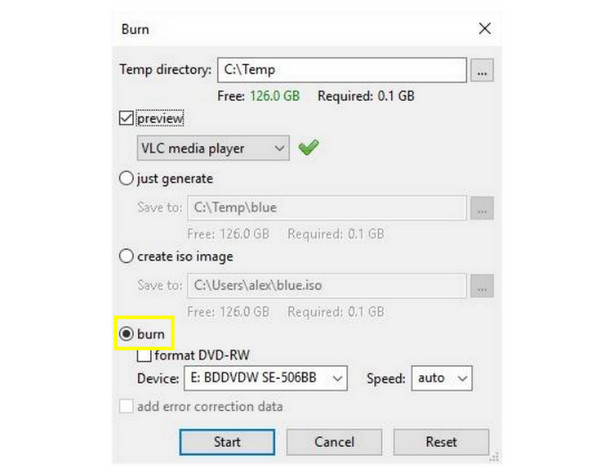
Step 5.Lastly, click the "Burn" button on the top toolbar. Choose the "Burn" radio button, pick your optical drive, and click the "Start" button to start writing to your blank DVD.
Best Settings for AVI to DVD Burning
To guarantee that your newly created AVI to DVD disc plays smoothly without skipping, you must ensure your software is locked into the following optimal configuration settings:
Video Settings:
- • Codec: MPEG-2. The required compression standard for DVD playback.
- • Resolution: NTSC or PAL
NTSC: 720×480. It is used for displays and players in North America, the Philippines, and Japan.
PAL: 720×576. Meanwhile, this is needed for systems and hardware across Europe, Australia, and parts of Asia. - • Frame rate. You can keep the original or match the local region's television broadcast standard (29.97 fps for NTSC or 25 fps for PAL).
Audio:
- • Codec: AC3. Known as Dolby Digital, AC3 ensures your audio plays smoothly across all speakers and home theater.
- • Bitrate: 192–384 kbps. This range is the perfect balance for DVD compression, giving you high-fidelity sound clarity while keeping the file size small.
FAQs
-
Why does my burned AVI to DVD play on my PC but not on my DVD player?
The issue might come down to how it was burned. When you burn a DVD using a standard file copying tool, your computer may treat it like a USB flash drive and copy the raw file to it. To work on a DVD player for laptop, you must convert it into MPEG-2 format and burn it using a proper authoring tool.
-
Why does my burned DVD play, but no sound on my TV?
The culprit may be the unsupported audio codec. While computers handle modern audio formats like AAC, FLAC, or DTS, older home DVD players only know the traditional audio streams. So, ensure to set the audio track to AC3 when burning.
-
Why won't my burned DVD play on TV at all?
You might have burned it in the wrong regional format. Or some older players are picky about the physical you use, so try burning it onto a standard DVD-R disc instead. Perhaps it is because the burning speed is too high, since this causes tiny data errors that a player's laser cannot read.
Conclusion
Once you understand that a home DVD player simply needs a very specific language, the errors of your AVI files will vanish. Whether you want full control of the AVI to DVD burning process or the command lines of FFmpeg, you now have the exact steps and settings needed to create a playable disc. To skip so many tools and complex terminal commands, create your DVD with AnyRec DVD Creator. It simply handles everything, from transcoding to encoding and burning the final product in one seamless motion. Enjoy your movie night on the big screen now!
Secure Download
Secure Download
About Our Author