Screencastify Review: Is It Safe and Good to Use Now
Nowadays, many people will need a screen recorder to capture activities on their computers. And Screencastify seems like a popular extension on Google Chrome. So, for your need, this post will give you the Screencastify review about the true reaction after using this extension. What’s more, there would be a best alternative for you if you are seeking the best screen recorder on the computer.
Guide List
Review of Screencastify How to Use Screencastify Alternative to Screencastify FAQs about ScreencastifyReview of Screencastify
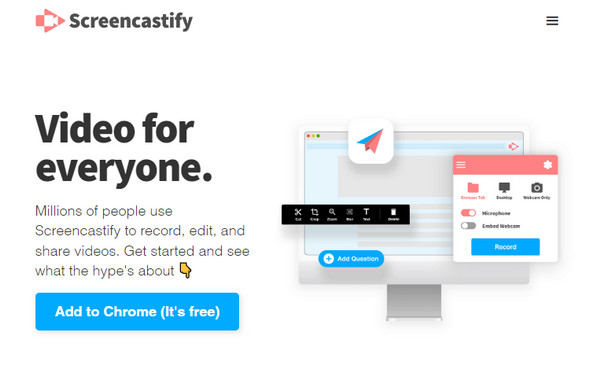
Screencastify is an excellent choice for a screen recorder. For one, it is an online tool, so you don’t need to install software to capture onscreen activities. It is also an excellent tool for creating a video from scratch because it is well-provided with features for editing and enhancing your media. The famous screen recorder also offers a free version, in which you can customize the screen region to capture, share output to Google Drive, and export videos as MP4 or a GIF. Other than these, here are the key features of Screencastify to look forward to when you avail it:
Powerful Screen Recorder
Flexible saving or sharing: Record your entire screen or a single browser tab. You can save to Google Drive and then share directly. Or you can upload video to YouTube. It is also supported to export as MP4 or GIF. Full control of recording: You can get webcam overlay, microphone narration, and auto-save rights to your account. Track mouse and click: Get handy annotation tools like a drawing pen, as well as mouse spotlight and click highlight. So you can record screen while tracking pointer movements seamlessly.
Easy Editing Capabilities
Basic edits: Trim, merge, crop, and rearrange clips. Advanced enhancements: Text overlays, smooth zoom, and selective blur. Integrate with Google Drive: You can import external videos from Google Drive, which makes editing easy and accessible from any Chrome-enabled device.
Submission Tool for Educators
Teachers can send a magic link for students to record and submit assignments. There is no need to create accounts or install software. All submitted videos will show in the teacher’s dashboard with privacy controls.
Screencastify Pros and Cons
The screen recorder has all the advantages of recording video from your screen. It is one of the best solutions for screen recording as it doesn’t require you to install software. Of course, Screencastify is not everyone’s go-to for a screen recorder. Most probably, it is because it lacks certain features. Despite this dilemma, here are the advantages and disadvantages of Screencastify to see its two sides.
- Pros
- Record and edit screen video directly on your browser.
- Get built-in webcam overlay, annotation, mouse, and click highlighting tools.
- Seamless classroom and workflow integration for educators.
- Easy sharing by links, Google Drive, and YouTube.
- Cons
- It may take some time for a recorded video to be downloaded.
- Not compatible with other devices like mobile phones and tablets.
- The screen recorder doesn’t support older models of computers.
- Only support MP4 and GIF as export formats.
- Screencastify free version is limited to 5-minute recordings.
How to Use Screencastify?
If you are new to Screencastify, this part will show you how to record using the screen recorder. Follow the guide below to see how to start capturing onscreen activities.
Step 1.Go to your browser and search for Screencastify. Click the very first result on the webpage. Once you are on the site, click the "Add To Chrome" button to download the Chrome extension. Click the "Sign in to with Google" button and answer the following questions.
Step 2.Click the "Extensions" button and choose Screencastify. Select if you want to record a desktop, browser tab, or webcam. You can click the Microphone button to record your voice during recording. Afterward, prepare the site you want to capture, then click the "Record" button.

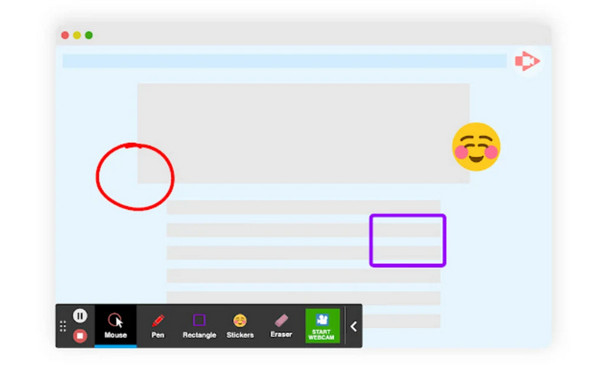
Step 3.A small widget menu will appear on your screen. You can use the pen, rectangle, and sticker features for annotation. The "Mouse" button will allow your cursor to change in a circle when you hold right-click your mouse. Click the "Stop" button to stop the recorder.
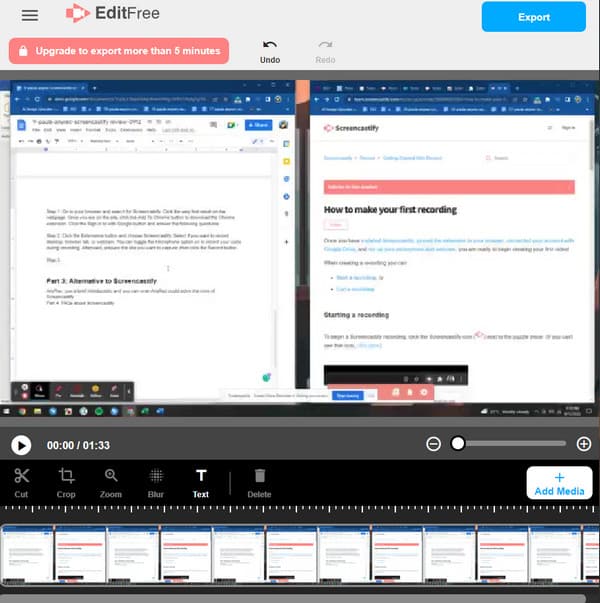
Step 4.Another tab will open from your browser. You can trim the footage there, or go straight to the editor by clicking the "Open in Editor" button. Use other features to edit the video, such as cut, crop, zoom, and blur. After editing, click the "Export" button to save the video to your Google Drive.
Alternative to Screencastify
As mentioned, the Screencasitfy extension is not yet the perfect tool for screen recording. The best alternative to try out is AnyRec Screen Recorder for Windows and macOS. Unlike Screencastify, this screen recorder is easier to navigate with a fast-loading process. You can unlimitedly record videos online, gameplay, webinar, and even on your mobile device. Moreover, AnyRec Screen Recorder supports many export formats, including MOV, WMV, MP4, etc. Free download the software now from its official site.

Capture different onscreen activities through Video, Audio, Webcam, and Phone recorders.
Customizable settings to change the video encoder, format, quality, resolution, and audio settings.
User-friendly interface with present widget menu for drawing effects, screenshot, and recording schedule feature.
Provide soundcheck for microphone and sound system with noise cancellation and audio enhancement.
Secure Download
Secure Download
Step 1.Download AnyRec Screen Recorder from the official website. Once installed, launch the software on your device to start recording. Click the "Video Recorder" button from the main menu. You can also try other recorders for different onscreen activities.
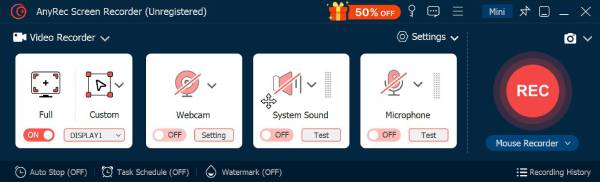
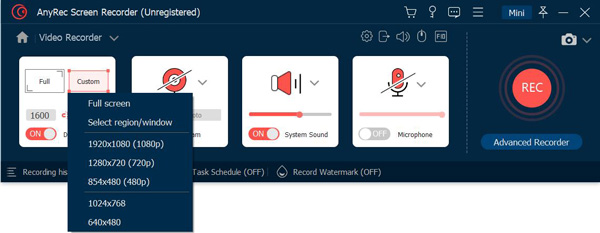
Step 2.Set up the screen recorder to own preference. You can customize the recorder to fullscreen or select a particular region of your screen. Click the "System Sound and Microphone" buttons to turn them on. Click the "REC" button to begin capturing the screen.
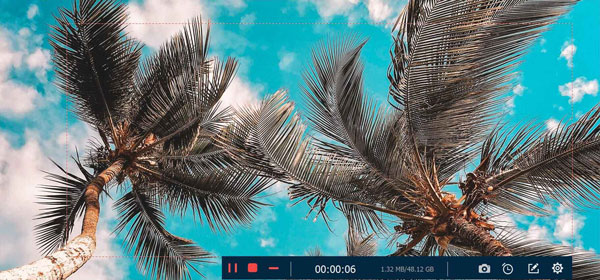
Step 3.During screen recording, you can use the options from the widget menu. For example, if you are giving a tutorial, you can use drawing effects to point, highlight, and annotate important topics or words. You can also pause the recording if needed.
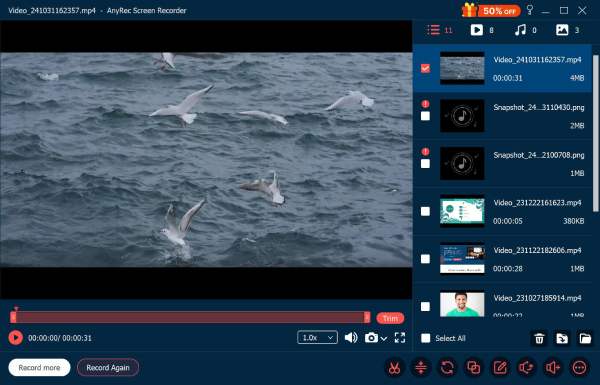
Step 4.After recording, you can trim the recorded footage on the next window. You can set the desired time for the beginning and ending parts; the software will automatically cut the video for you. Browse for the designated folder path where you want to save the file. Click the "Done" button to wrap up everything.
FAQs about Screencastify
-
How long can I record using the Screencastify extension?
If you are only using the free version of Screencastify, you can maximize the recording time by up to 5 minutes. Even if you have availed a plan for the screen recorder allowing you to record unlimitedly, your storage space on Google Drive will be the only hindrance.
-
Can I share my recorded videos from Screencastify with others?
Yes. Since the outputs are saved to your Google Drive, you can share the Screencastify folder. Choose the people you want to share the folder with; they can view all the recordings, even future footage unless you change the settings.
-
Do students have access to Screencastify’s drawing tools?
The students can’t access Screencastify features through Submit. They would need to download the extension to use the screen recorder completely.
Conclusion
After reading this Screencastify review, you can find it is an excellent screen recorder extension. It has an intuitive interface to capture your screen content with good quality. However, you are limited to export format, watermarked videos, and clear audio recordings. The best alternative to use is AnyRec Screen Recorder for Windows and macOS. Free download the software and try its powerful features!
Secure Download
Secure Download


