2 Ways to Record Switch Gameplay - Steps and Comparison
Wish to share the vast world of Zelda or the perfect combo in Super Smash Bros? If so, knowing how to record Switch gameplay is a great way to save, share, and relive those moments anytime. Whether you're a casual player or a content creator, two ways are shared here to capture your gameplay. From the built-in tool to capture card setups, dive in now to record Nintendo Switch gameplay, choosing the best way that fits your goals.
Guide List
How to Record Switch Gameplay on PC [No Time Limit] How to Record Nintendo Switch Gameplay Up to 30 Seconds AnyRec Screen Recorder Or Switch Built-in Recorder, Which to ChooseHow to Record Switch Gameplay on PC [No Time Limit]
If you want to record Switch gameplay on PC without being limited by time restrictions, you’re on the right path. Whether it is for creating content on YouTube, streaming to Twitch, or just saving your gaming moments, using a capture card and a recording software is what you need. This guide will walk you through everything you need to begin.
What Do You Need to Prepare?
- • Nintendo Switch console
- • Game capture card
- • HDMI cables
- • USB cable
- • A PC or laptop
- • Recording software
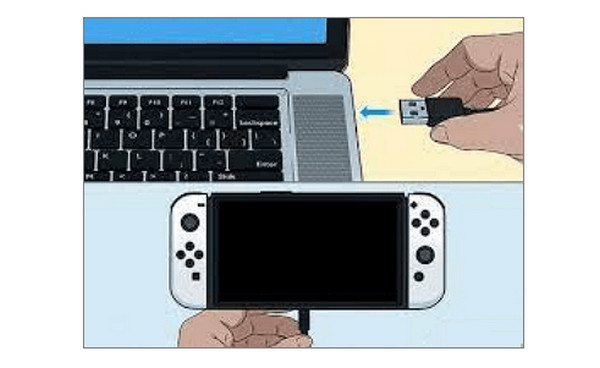
Step 1. Connect Nintendo Switch to PC via a Capture Card
- 1. Dock your console and connect one HDMI cable from the HDMI "out" port of the Switch to the HDMI "in" port of the Switch capture card.
- 2.Next, plug a second HDMI cable from the HDMI "out" port of your capture card to your monitor. Then, utilize the USB cable to link the captured card to the PC.
Step 2. Record Switch Gameplay with AnyRec Screen Recorder
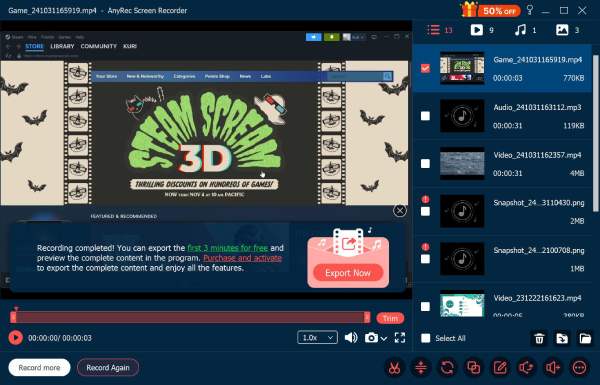
To start the smooth way to record gameplay on Nintendo Switch on PC, AnyRec Screen Recorder is a top-notch tool worth checking out. It’s a beginner-friendly tool that is packed with powerful features that content creators will love. No time limits, no lag, and no hassle recording experience awaits you here. Also, you can capture in-game sound, add your voice commentary, and even include a face-cam overlay for your live reactions during the game. Once you have finished recording, you can quickly trim the footage within the program.

Game Recorder for recording Switch gameplay, and Steam, LOL games etc.
Used advanced hardware acceleration to record gameplay with no lag.
Real-time preview and editing tools to clean up your footage before saving.
Save your recording in all popular formats such as MP4, MOV, AVI, etc.
100% Secure
100% Secure
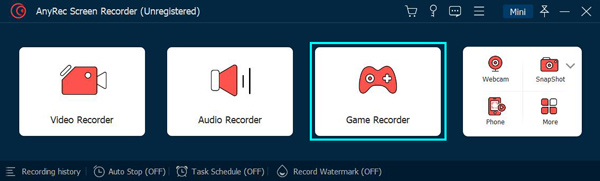
Step 1.Open AnyRec Screen Recorder on your PC. From the home screen, select "Game Recorder", as this mode is made for gameplay only with the best performance.
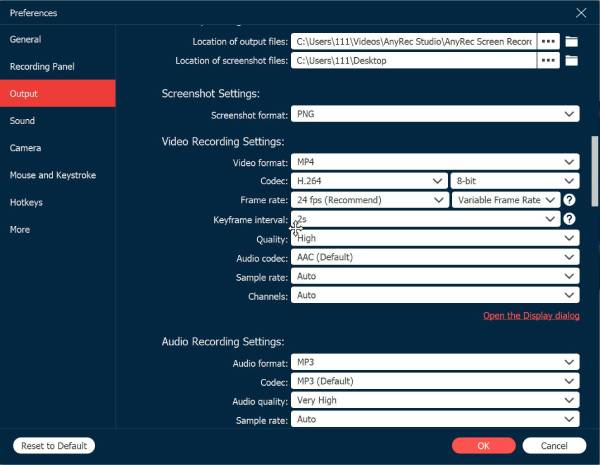
Step 2.Click the "Select the game" option and choose your Switch gameplay window as it streams through your capture card. Then, head to "Settings" to fine-tune your preferences like resolution, format, frame rate, etc.
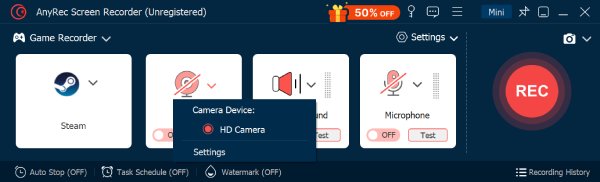
Step 3.Toggle on "System Sound" to record Switch game audio, and switch on the "Microphone" if you want to add commentary. To show you face reactions while you play, turn on the "Webcam" switch button, too.
Step 4.Click the "REC" button and jump into your game! Once done, click the "Stop" button to preview and lightly edit your footage. Happy with the outcome? Just click the "Done" button to save your recorded Switch gameplay.
How to Record Nintendo Switch Gameplay Up to 30 Seconds
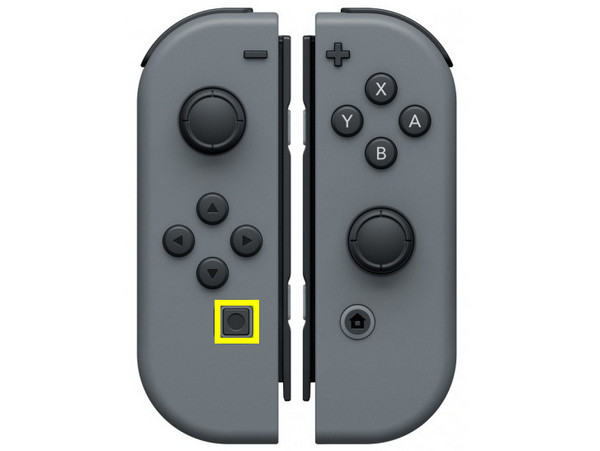
If you wish to record Switch gameplay highlights, the Nintendo Switch makes it easy for you to do so with its built-in recording features. Using it, you can instantly save the last 30 seconds of gameplay with simply pressing one button, ideal for surprise wins, and clutch moments!
Here’s how to record up to 30 seconds on Nintendo Switch:
Step 1.Start playing your game as usual, then ensure it supports video capture. Using the left Joy-Con, press and hold the "Capture" button (Square icon). Doing so will instantly save the preview 30 seconds of gameplay. You can use it to record Fortnite on Switch.
Step 2.Now, head to the "Album" section from the Home screen. From there, trim the video clip and share it to social media platforms e.g., Facebook directly from Switch.
AnyRec Screen Recorder Or Switch Built-in Recorder, Which to Choose
When it comes to recording Nintendo Switch gameplay, you have the best two options: using a capture card and recording software for a full-length recording or using the built-in capture for quick highlights.
The decision relies on what kind of content you wish to capture, but to decide better, here’s a comparison of the two options:
| Feature | AnyRec Screen Recorder | Nintendo Switch Built-in Recorder |
| Ease of Use | Easy | Easy |
| Video Quality | UHD to 4K with customizable resolution and other video settings | Standard 720p |
| Audio Capture | Game sound and microphone input | Game audio only |
| Face-cam Overlay | Yes | No |
| Editing Tools | Built-in trimming, preview, and more tools | Basic trim only |
| Sharing Options | Manual, you can upload anywhere | Share directly to Facebook/Twitter |
| File Format Options | MP4, MOV, MKV, AVI, and more | Native format only |
| Best For | Length gameplay, streaming, commentary, and more screen activities | Quick game highlights and social media sharing |
Conclusion
Learning how to screen record Switch gameplay can be as simple or as advanced as you need it to be. If you want to capture quick highlights, the Switch’s built-in capture is a fast and convenient option to do so. However, for longer gameplay sessions, you will need the power duo solutions of capture card and AnyRec Screen Recorder. With its support for unlimited recording, webcam overlay, voice commentary, and built-in editor, it’s undeniably a great choice for capturing every moment of your gameplay. Record Nintendo Switch gameplay now like a pro.
100% Secure
100% Secure